Physical Address
304 North Cardinal St.
Dorchester Center, MA 02124
Physical Address
304 North Cardinal St.
Dorchester Center, MA 02124
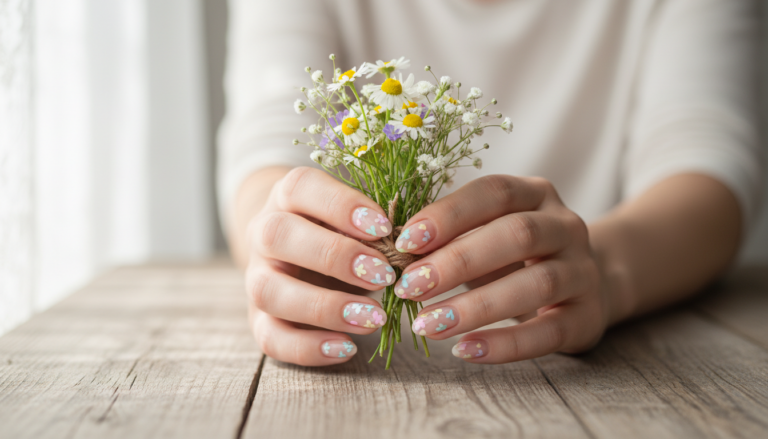
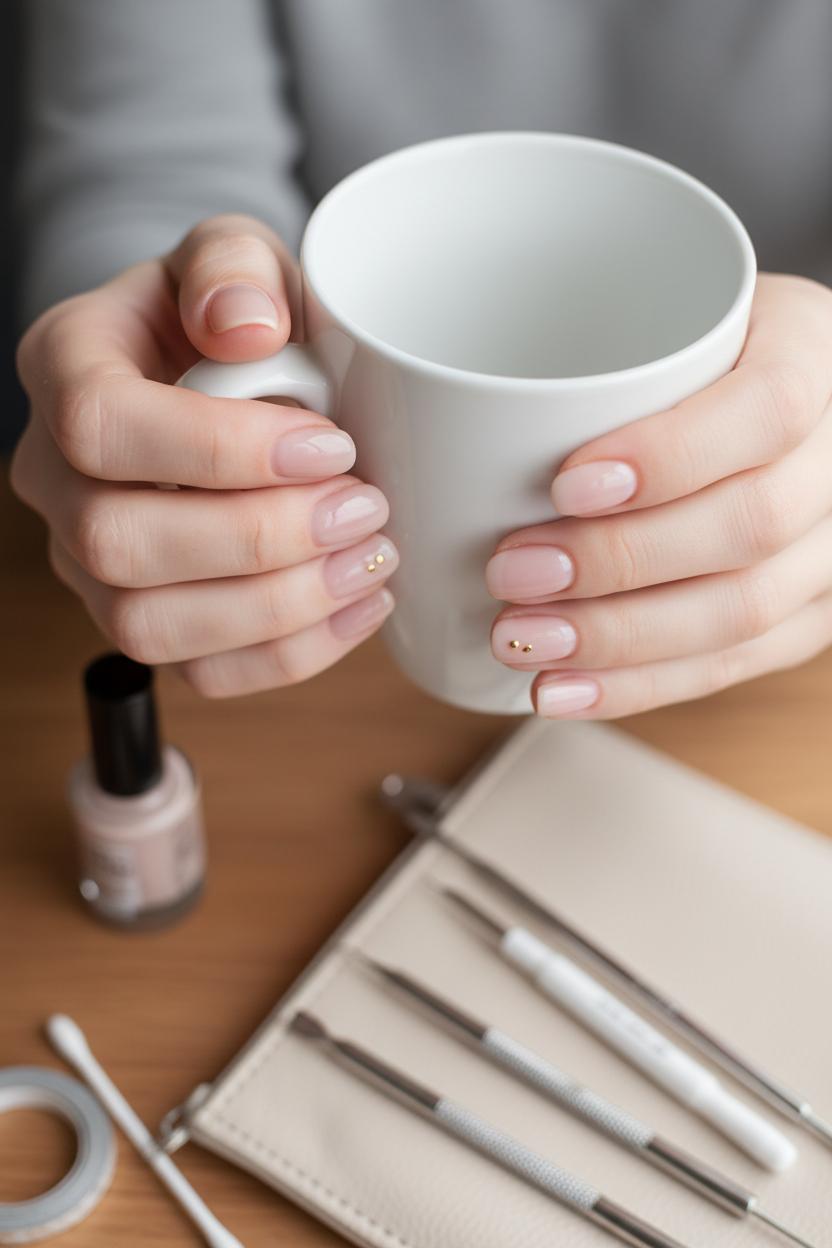
Pressed for time? Try these 5-minute, beginner nail art ideas that look salon-worthy with zero stress. From minimalist nails to easy nail designs perfect for short nails, you’ll learn simple nail art using just a few nail art tools: dotting tools, striping tape, and a quick dry top coat over your favorite nude nail polish. These short nail ideas are swipe-and-go, budget-friendly, and totally foolproof—ideal for absolute beginner nail art lovers. Ready to elevate your mani during a coffee break? Let’s dot, stripe, and shine.
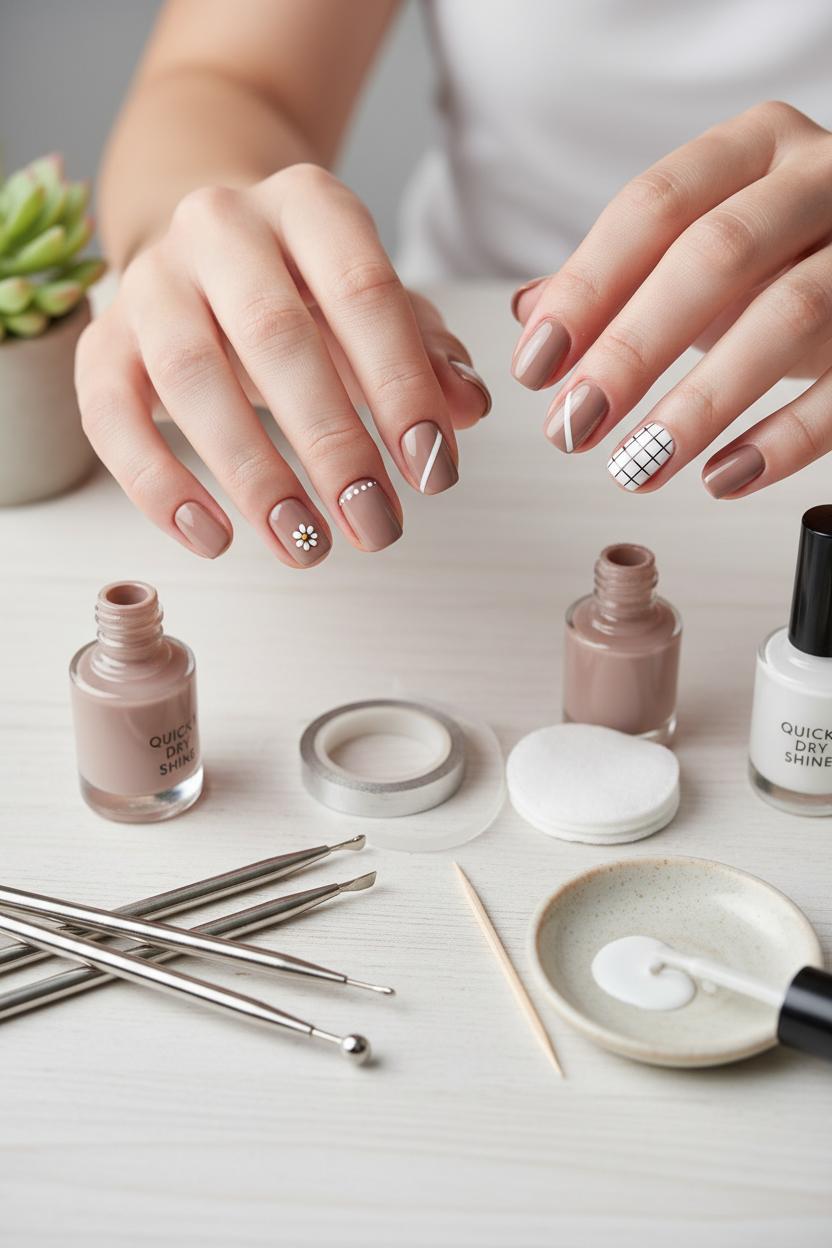
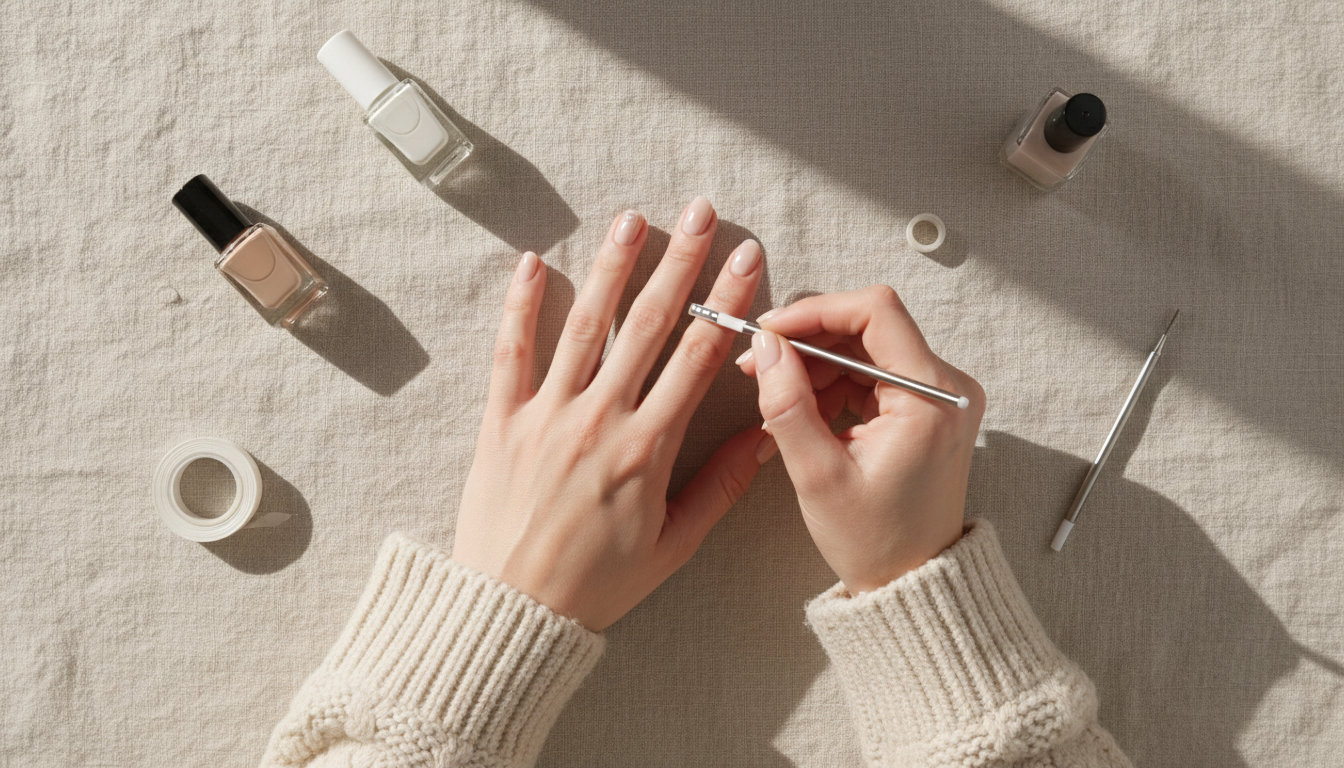
When you only have five minutes, the secret to pulling off simple nail art is having a few smart nail art tools within reach. Think of dotting tools, striping tape, and a quick dry top coat as your tiny glam squad—compact, inexpensive, and perfect for beginner nail art. Start with a smooth base of nude nail polish (it’s forgiving, chic, and instantly elevates minimalist nails), then let your tools do the heavy lifting. You don’t need a drawer full of supplies; a small bundle of dotting tools, a roll of striping tape, and your favorite quick dry top coat are enough to create easy nail designs that look purposeful and polished, even on your busiest days.
Dotting tools are the fastest way to add personality without effort. Dip the rounded tip into polish and tap it onto your nails to create dainty polka dots, scattered confetti, or a tiny daisy at the corner of one accent nail. Vary the pressure or switch sizes for dots that look designer. For short nail ideas, try a single row of micro-dots along the cuticle or a cluster near the tip—subtle, sweet, and so quick. No dotting tools yet? A bobby pin or toothpick will hold you over, though the real tools give cleaner circles and help you control placement. Keep your palette neutral for minimalist nails—soft taupes and blushes with white dots—or go playful with two high-contrast shades for impact that still feels refined.
Striping tape brings crisp lines in seconds. Lay thin strips over dry polish to map out a micro-French, a diagonal slash, or a tiny grid, then paint over and peel while the polish is still wet for razor-sharp edges. It’s the ultimate hack for easy nail designs that look salon-level without the stress. Lock everything in with a quick dry top coat, floating a generous layer over your art so the brush doesn’t drag your lines or dots. It speeds up drying, adds a glossy, gel-like finish, and helps your look last beyond the week. With these nail art tools—dotting tools, striping tape, a quick dry top coat, and a go-to nude nail polish—you’ll have a five-minute routine that’s effortless, adorable, and totally beginner-friendly.
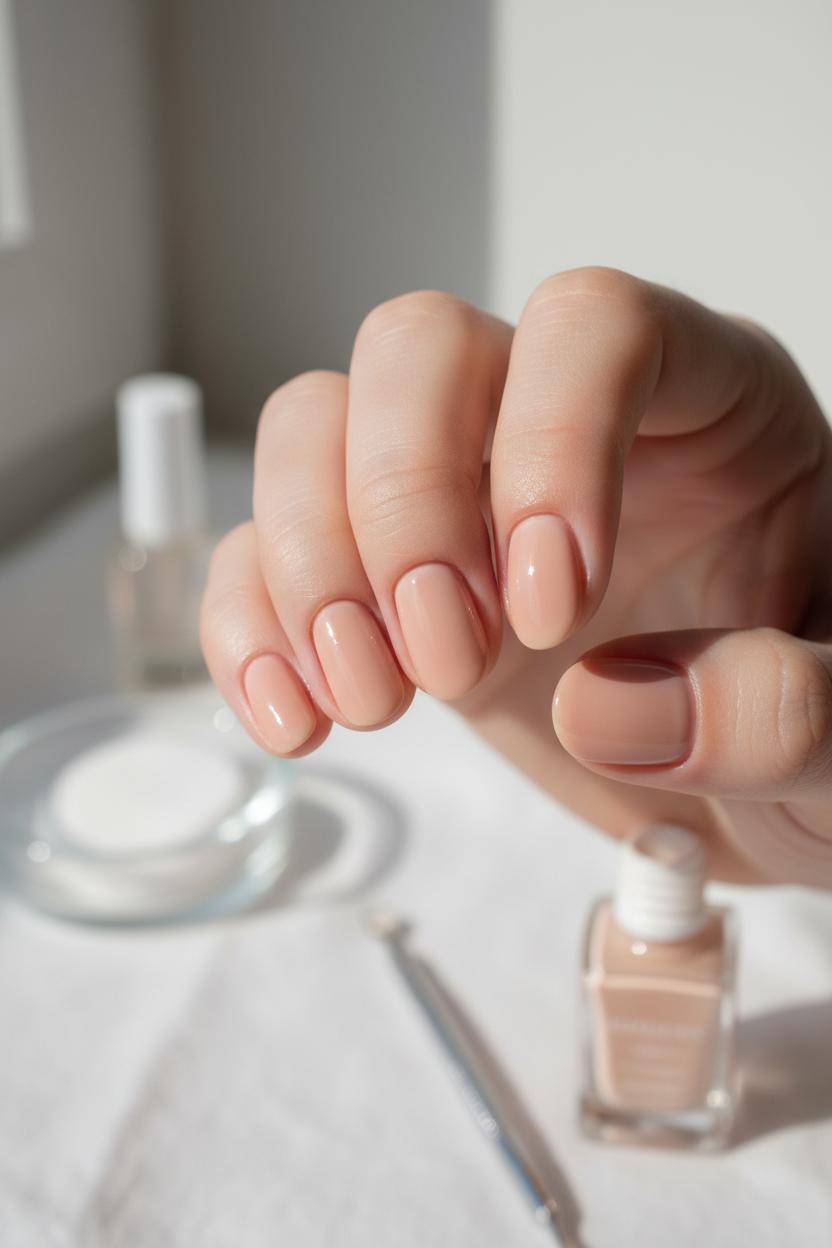
Before any design goes on, the secret to clean, minimalist nails is a flawless nude base that looks like your natural nails—just better. Start by giving your hands a quick wash and swipe nails with a bit of alcohol to remove oils, then gently file into your favorite shape (short and softly rounded is chic and super forgiving for beginner nail art). Push back cuticles, lightly buff ridges, and apply a thin base coat so color glides on and lasts. Think of this step as skin prep for your manicure: a minute here makes everything that follows look intentional and tidy. If you’re collecting nail art tools, keep them nearby, but for now, resist the urge to decorate—this is about setting the stage for simple nail art that feels effortless, not fussy, and works beautifully for short nail ideas.
Choose a nude nail polish that flatters your undertone: soft pink-beige for cool, peachy sand for warm, sheer latte or caramel for deeper tones. Sheer formulas are the most forgiving, while opaque nudes give that editorial, “your nails but polished” finish. Apply two thin coats, capping the free edge to prevent chips; thin layers dry faster and keep everything crisp when you’re working on easy nail designs later. Seal it with a quick dry top coat for instant gloss and a touch-dry finish in minutes—ideal when you’re short on time but still want that salon sheen. This nude canvas is where the magic happens: a single micro dot at the cuticle, a whisper-thin stripe, or a tiny cluster of flowers becomes elevated and modern because the base is quiet and clean. If you’re trying beginner nail art, keep it simple: use dotting tools to place petite polka dots, or lay down striping tape for a barely-there line—both are foolproof upgrades that still read minimal. The beauty of this approach is how adaptable it is; your nude base complements every season and outfit, gives minimalist nails a sophisticated polish, and lets you swap accents on a whim. Refresh with another layer of quick dry top coat midweek, and your neutral base will carry you through rotations of simple nail art without starting from scratch.
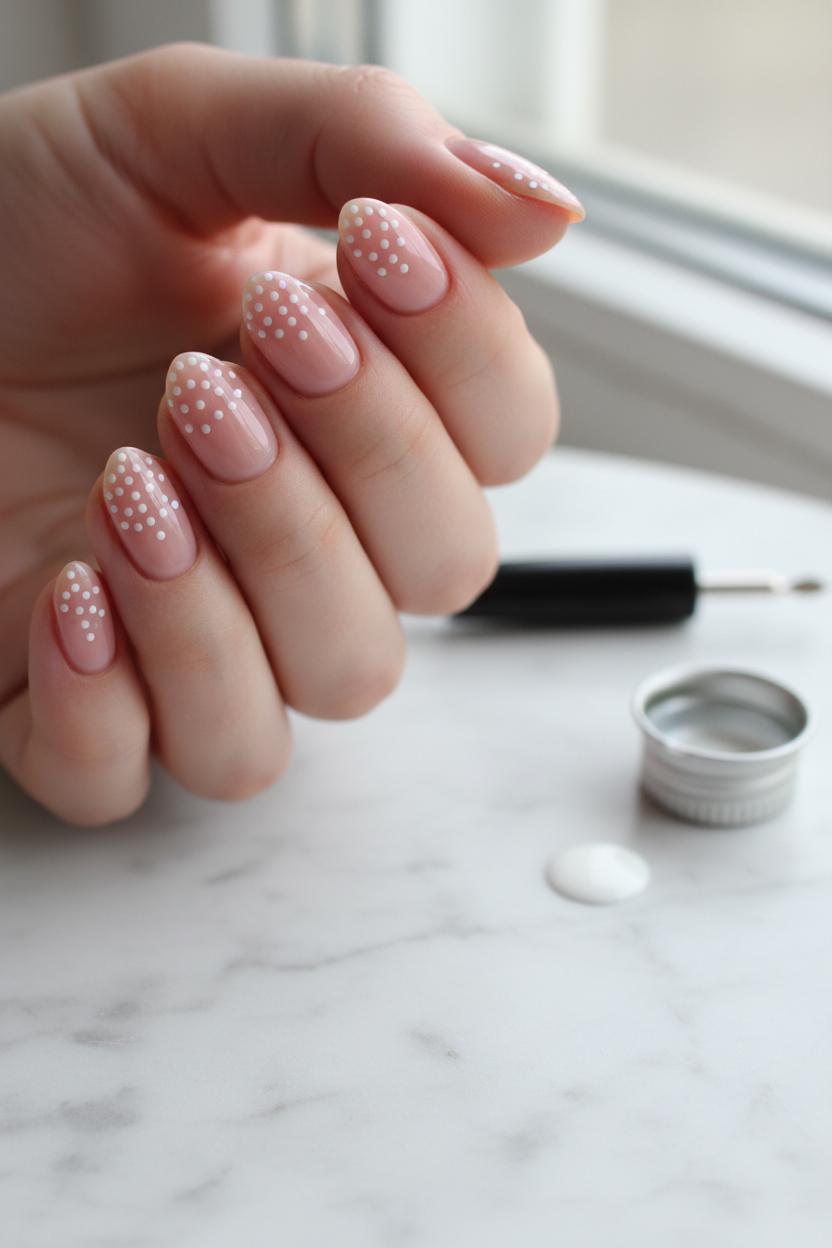
If you have five minutes and a craving for cute, this is your sign to try polka dots. They’re the training wheels of simple nail art—playful, crisp, and surprisingly chic. Dots look amazing on every nail length, but they’re especially flattering on short nails, where a few well-placed spots can make your manicure look intentional and polished. For the most minimalist nails, start with a soft nude nail polish or a sheer pink, then add tiny white or black dots for that clean, Pinterest-perfect vibe. Prefer color? Pastels with white dots feel sweet and fresh, while a glossy navy with gold dots turns into evening-ready in seconds. This is truly beginner nail art that never fails.
Here’s the five-minute flow: Apply your base shade and let it set for a minute. Grab your dotting tools (or the rounded end of a bobby pin if you’re improvising with nail art tools) and place a small puddle of polish on foil or a bottle cap. Lightly dip and touch the tip to your nail—don’t press, just kiss the surface—for crisp, round circles. Mix dot sizes by switching to a smaller tip for a sprinkle effect, or keep them uniform for that perfect, graphic look. If spacing makes you nervous, use a bit of striping tape as a temporary guide to create a dotted French curve or a straight dotted stripe down the center—ideal for short nail ideas that elongate the nail. Clean any slips with a tiny brush dipped in remover, then seal everything with a quick dry top coat so your dots don’t smear and you’re out the door in minutes.
Style-wise, you can’t go wrong with micro-dots scattered at the cuticle like falling confetti, a single accent nail dotted all over, or a chic reversed French with dots hugging the tip. Nude with white dots reads office-friendly; black on nude is fashion-editor cool; metallic rose gold on deep plum is date-night glam. Keep a small set of dotting tools in your bag and you’ll always have an easy nail design at the ready—proof that beginner nail art can be fast, fun, and effortlessly polished.

Meet your new favorite five-minute manicure: sleek stripes made with striping tape. This is the ultimate simple nail art trick for days when you want minimalist nails that still look intentional and chic. Start with a smooth base coat, then a swipe of your prettiest nude nail polish or a sheer pink—something that dries fast and flatters your skin tone. While that sets, pull out a few nail art tools: a roll of striping tape, small scissors, and tweezers to place the tape cleanly. Press a strip (or two!) across each nail—horizontal for a modern feel, vertical to elongate shorter nails, or a subtle diagonal for a little movement. It’s one of those easy nail designs that instantly elevates short nail ideas without requiring a steady hand or a lot of time, which makes it perfect for beginner nail art days.
Once your tape is placed, you’ve got options. Leave it as a negative-space accent for a barely-there look, or paint a contrasting color over the tape—think a cool dove gray or inky navy—then peel the tape back slowly while the polish is still wet for razor-sharp lines. Seal everything with a glossy quick dry top coat to lock in that crisp finish and smooth any edges. Pro tip: de-tack the striping tape by pressing it on your skin first so it won’t lift your base, and work nail by nail to keep lines clean. Want to play? Try a double-stripe at the tip for a micro-French moment, mix metallic striping tape with a creamy nude for understated glam, or add a single tiny dot at the intersection with your dotting tools for a chic punctuation mark. The result is polished, wearable, and endlessly customizable—a small effort with a big style payoff that keeps your simple nail art rotation feeling fresh.
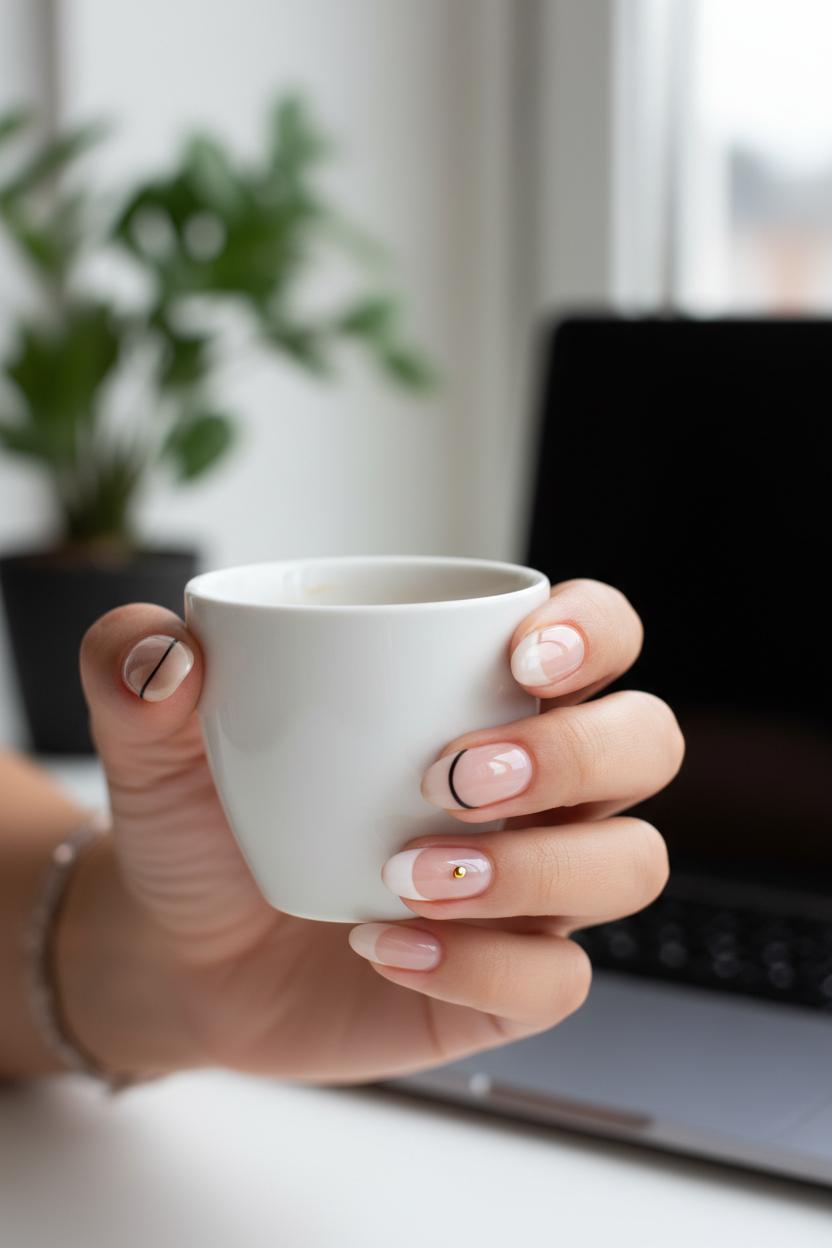
Think of negative space nails as the chic little black dress of simple nail art—clean, modern, and endlessly flattering, especially if you’re working with short nails. Instead of covering the entire nail, you intentionally leave parts bare for that airy, minimalist look that goes with everything. This is where minimalist nails really shine: a single swoop of color, a thin line, or a tiny dot can make your hands look instantly polished in under five minutes. Start with clean, dry nails and a swipe of clear base if you like, then choose a soft shade that flatters your skin tone—nude nail polish, milky beige, or a sheer blush. The contrast of paint against the natural nail makes your design look purposeful, even if you’re brand new to beginner nail art.
The easiest way to get crisp shapes fast is with striping tape. Lay a piece diagonally across the nail and paint one side, then peel to reveal a sharp sliver of bare nail. You can also angle the tape near the tip for a negative-space French, or curve it slightly for a soft crescent that elongates shorter nails. If you don’t have tape, a steady swipe with the edge of the brush creates a pretty side-arc in one coat. Add a tiny dot near the cuticle using dotting tools for a minimalist accent—or use the end of a bobby pin if you’re improvising with basic nail art tools. Stick to one or two colors for easy nail designs that feel elevated without trying: think sheer nude with a single black line, or a whisper of taupe with a gold dot.
Seal everything with a quick dry top coat to melt edges together, add gloss, and lock in your design so it looks salon-smooth. Negative space grows out beautifully and is ultra forgiving, making it one of the best short nail ideas if you’re busy or a bit shaky-handed. Swap shades seasonally—cool gray in winter, peach in spring—or keep it classic with sheer pink and a metallic accent. Five minutes, minimal effort, maximum payoff: proof that the simplest ideas are often the most stylish.
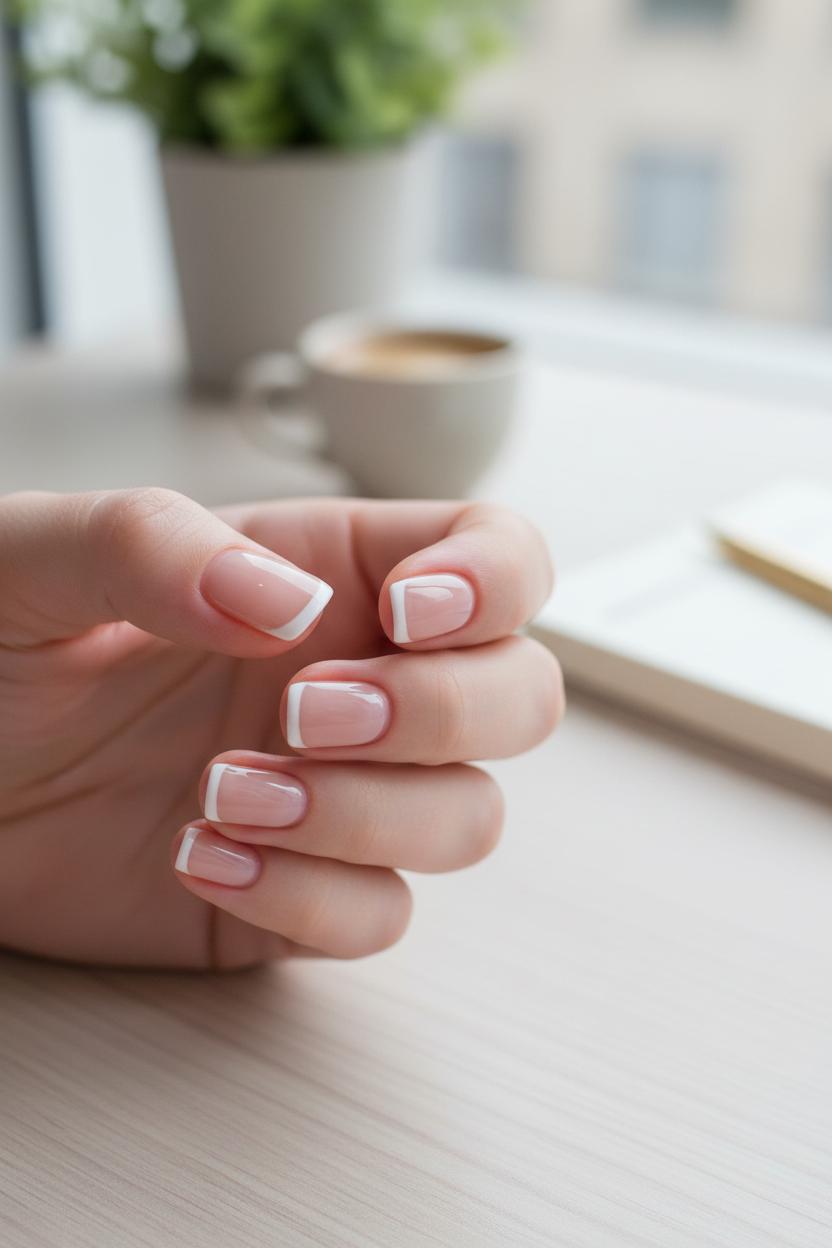
If you’ve got short nails and five minutes, micro French tips are the chicest way to look polished with almost zero effort. Think of them as the whisper-soft cousin of the classic French: a razor-thin line at the very edge that instantly makes your nail beds look longer and your manicure feel intentional. Start with one coat of your favorite nude nail polish—something sheer that evens tone without hiding your natural nail. While that dries, choose your tip color: crisp white is timeless, but a dusty rose, sage green, or soft taupe keeps the vibe modern and minimalist. Because the line is so fine, the result reads like effortless, minimalist nails rather than “nail art,” which is perfect for beginners and busy mornings.
For application, you’ve got options depending on the nail art tools you have. The easiest method for beginner nail art is to hold the brush still and roll the fingertip gently under it, letting the nail move instead of your hand—this keeps the line thin and smooth. If freehand makes you nervous, a sliver of striping tape placed just below the free edge acts like training wheels: paint your tip, peel while it’s wet, and admire that crisp line. No striping tape? Dip the smallest of your dotting tools into polish, make tiny dots across the edge, then connect them like a dotted path. Even a fine liner from a basic nail art brush set works beautifully. Keep a pointed cotton swab or a clean brush dipped in remover nearby to sharpen any wobbles—it’s forgiving, promise.
The real magic is the finish: lock everything in with a glossy quick dry top coat so you’re out the door in minutes. Float it over the nail to avoid dragging the tip, and cap the free edge for extra wear. This combo is the ultimate in simple nail art—fresh, clean, and office-to-brunch ready—while still feeling like easy nail designs you’ll actually repeat. Micro French tips are the little black dress of short nail ideas: understated, lengthening, and endlessly customizable. Swap colors with the seasons, add a single accent nail, or keep it classic. Either way, you’ll have a polished manicure that looks salon-level with almost no time or tools at all.
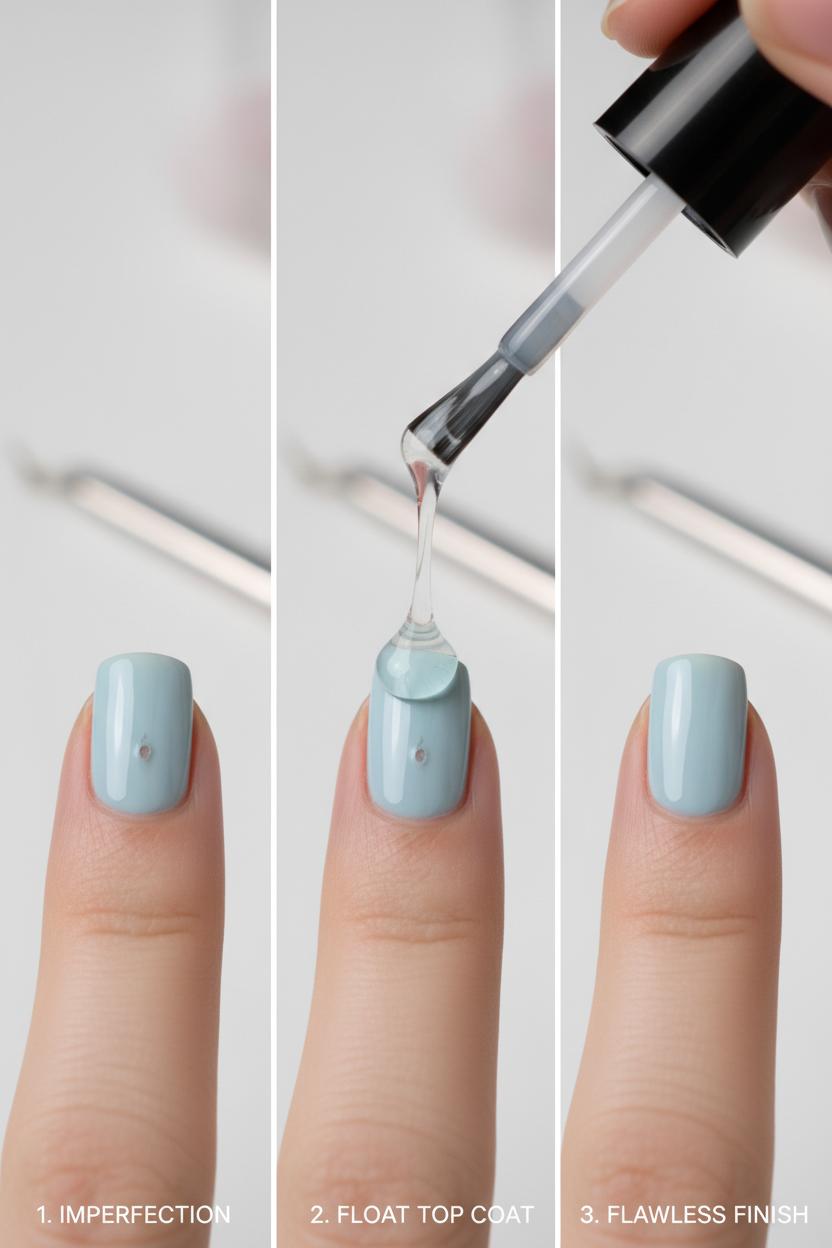
Smudges happen to everyone, especially when you’re excited to admire your handiwork. The quickest fix for tiny dents or fingerprints is to float a layer of quick dry top coat over the nail—load the brush and barely let it touch the surface so it self-levels the imperfection without dragging your design. For bigger smears, let the polish set for a few minutes, then very lightly buff the bump once it’s dry to the touch and seal with another glossy coat. To prevent smudging in the first place, think thin, patient layers and give each coat 60–90 seconds. If you’re doing dots or stripes, let them dry a touch longer than you think. Keep a fan nearby, and paint your dominant hand last. A sheer or nude nail polish base is extra forgiving for simple nail art and looks chic on its own if you need a quick reset.
If you’re seeing bleed—lines feathering or colors seeping—try swapping to slightly thicker formulas and wipe excess polish off the brush before it hits the nail. When using striping tape, press the edges down firmly, paint in light strokes away from the tape, and peel it off while the polish is still wet for those crisp, easy nail designs. For dots that spread, use smaller dotting tools first, let them set, then layer larger dots on top; clean the tip between colors so you’re not introducing extra polish. Minimal pressure is everything. With minimalist nails, less product and steadier, slower moves make the biggest difference, especially on short nail ideas like a single off-center dot or a micro-French.
Clean-up is the secret sauce that makes beginner nail art look pro. Keep a tiny flat brush or angled liner in your nail art tools kit and dip it in acetone to trace the cuticle line, sweeping away mistakes for a salon-sharp edge. A wood stick wrapped in a bit of cotton works in a pinch around the sidewalls. If you’re prone to mess, apply a thin barrier of liquid latex or even a little balm around the nail before sponging or stamping. Finish every look with a fresh layer of quick dry top coat to lock in shine and durability. With a few smart habits—and a couple of helpers like dotting tools and striping tape—you’ll spend less time fixing and more time flaunting.
Here’s your five-minute nail art reset: set out the few things you’ll actually use—nude nail polish, a quick dry top coat, a couple of nail art tools like dotting tools and striping tape, plus a cleanup brush or cotton swab dipped in remover. Give nails a quick swipe with remover to nix oils, file in one direction, and push back cuticles if needed. Then brush on one thin coat of nude; it’s the fastest way to get that polished, “your nails but better” base that makes simple nail art look intentional without trying too hard.
While that first coat sets for a moment, choose a micro-accent. For absolute beginner nail art, place one tiny dot at the base of each nail with a dotting tool—off-center for a chic touch, centered for symmetry. If you crave a whisper of structure, press a sliver of striping tape just above the free edge and paint a skinny tip for a micro-French; peel the tape right away for a crisp line. Prefer soft geometry? Drag the very corner of the brush from midway down one side to the tip for a diagonal veil of color on just two nails. Finish with a generous layer of quick dry top coat, floating it over the nail to smooth any texture and lock in shine. Run that cleanup brush along the edges, wait a minute, and you’re ready to clink coffee cups.
Once you’ve nailed this routine, remix it all week with easy nail designs that still read elevated: swap nude for a sheer pink, dot with metallic, or do a single accent nail and leave the rest bare for minimalist nails that feel fresh, not fussy. These short nail ideas are especially flattering because they elongate the fingers without bulk, and the speedy dry time means no smudges on your way out the door. Keep your mini kit—nude nail polish, striping tape, dotting tools, and a ride-or-die quick dry top coat—in a pouch so five minutes is truly five minutes. With a few steady breaths and a tiny detail or two, you’ll have simple nail art that looks curated and completely doable, even on the busiest mornings.
Five minutes, a few colors, and a steady-ish hand are all you need. From dots and accent stripes to tiny decals and negative space, these easy nail designs prove that simple nail art can be chic and doable in a coffee break. Keep it low-fuss with minimalist nails, quick-dry polish, and a glossy top coat. Whether you’re trying beginner nail art on Sunday night or refreshing between meetings, these short nail ideas make self-care feel cozy and cute. Save your favorites, breathe, and enjoy your tiny works of art.