Physical Address
304 North Cardinal St.
Dorchester Center, MA 02124
Physical Address
304 North Cardinal St.
Dorchester Center, MA 02124
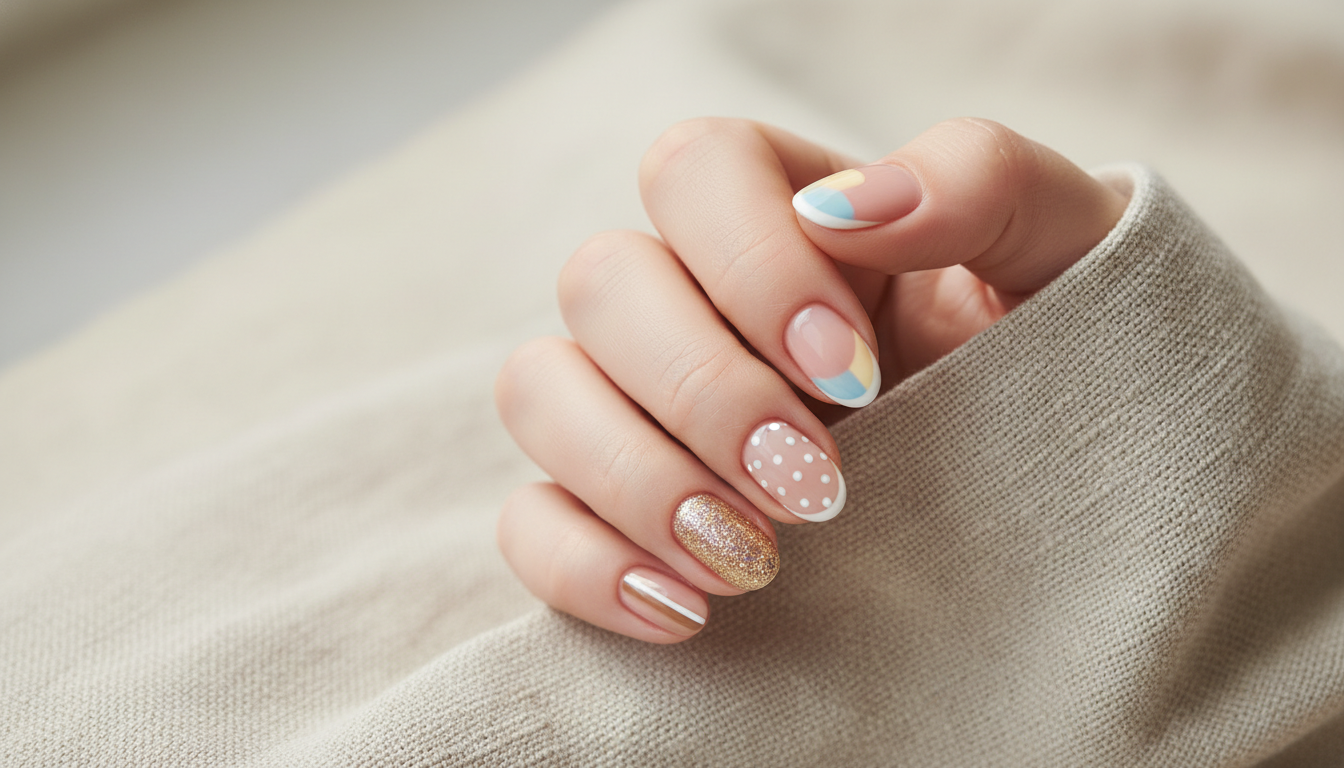
Ready to glow up your fingertips without a salon visit? These 5 easy nail designs are perfect for beginners and totally doable on short nails. From chic dots to minimalist lines, this guide breaks down simple nail art you can master with a quick DIY manicure. Grab a nail art brush set, dotting tools, striping tape, your favorite nude nail polish, and a shiny quick dry top coat, we’ll show you how to create swipe-and-go looks in minutes. Tap in for beginner nail ideas that look pro, last longer, and turn every coffee cup into a mini photoshoot.
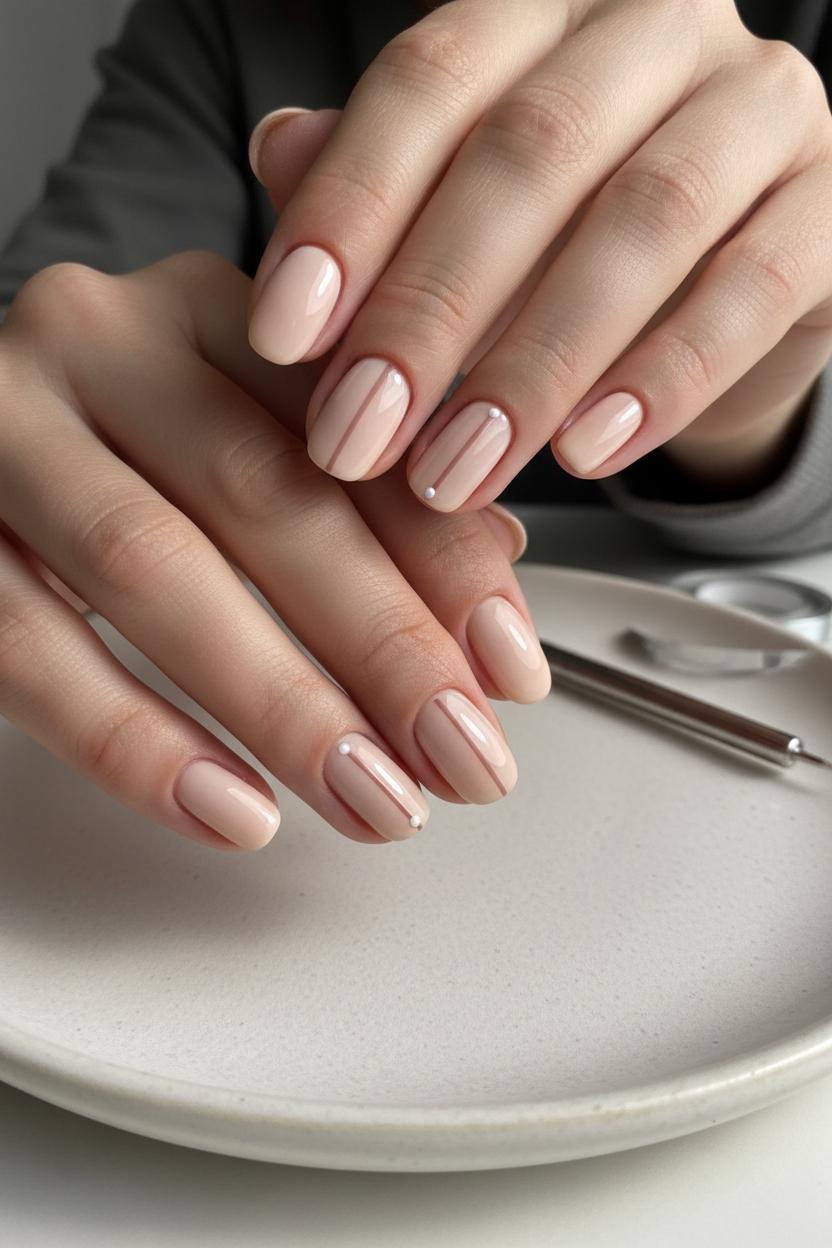
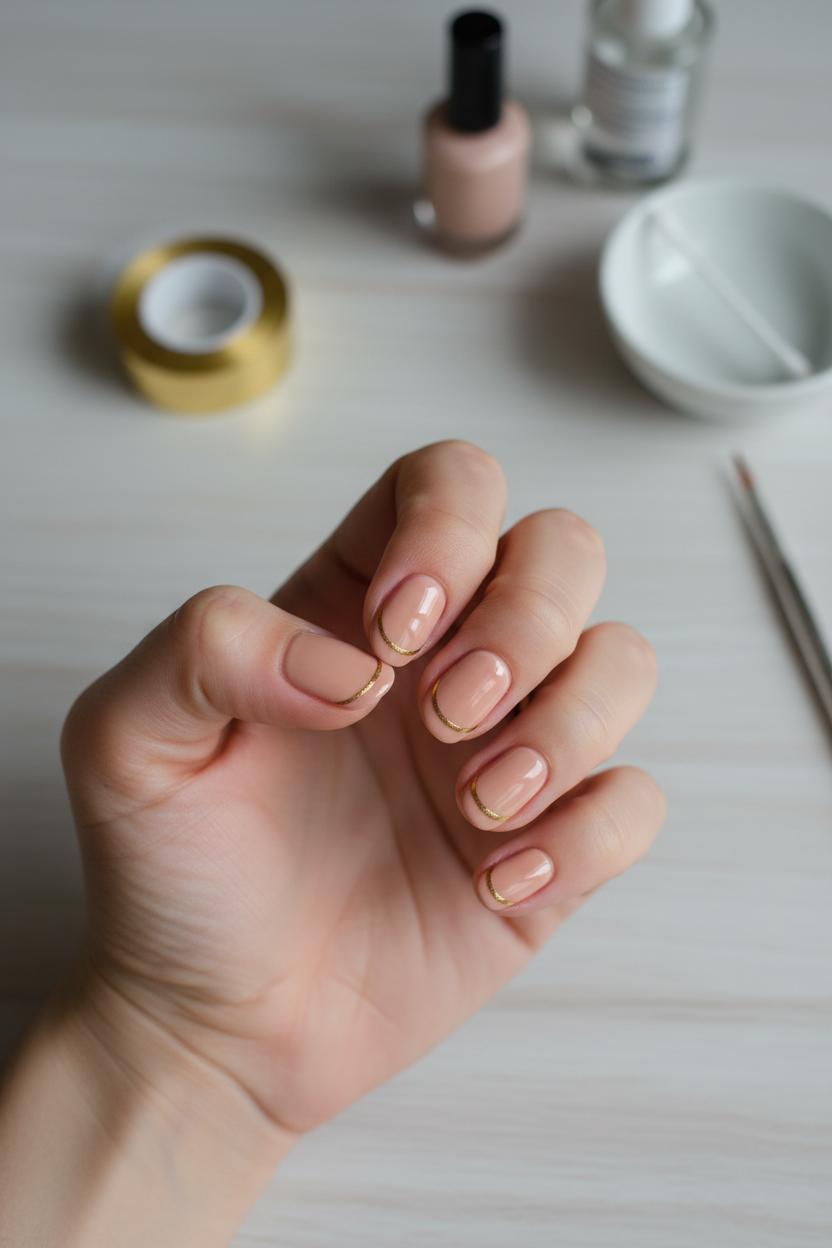
If sleek, barely-there polish is your vibe, this minimalist nude lines look is the calm, polished moment your short nails have been craving. It’s one of those easy nail designs that feels high-end but takes only a few minutes and almost no skill. All you need is your favorite nude nail polish, a roll of striping tape, and a glossy quick dry top coat. Optional helpers like a nail art brush set or dotting tools can add tiny accents, but they’re not required for this simple nail art. Think of it as a foolproof DIY manicure that elongates shorter tips with clean, delicate stripes and a soft, neutral sheen that goes with everything from athleisure to date night.
Start with the basics: tidy your shape, gently buff, and swipe nails clean. Lay down a thin base coat if you love extra wear, then apply two light coats of nude nail polish, letting each layer set. Once touch-dry, place striping tape where you want your lines—off-center verticals to make short nails look longer, or a soft diagonal for an understated, editorial feel. You can leave the tape on as a chic metallic accent or use it as a stencil: paint a slightly deeper nude or sheer white along the edge, then peel the tape back slowly at a 45-degree angle while the polish is still wet for razor-sharp lines. No tape on hand? A detail brush from a nail art brush set can freehand whisper-thin strokes, and dotting tools add a tiny dot at the end of each line for a modern punctuation mark. Pro tip: press tape down firmly to prevent bleeding, and avoid flooding the cuticles for that salon-clean finish.
Seal the look by floating a quick dry top coat over everything—don’t drag the brush—and cap the free edge to lock it in. In five to ten minutes, you’ll have glossy, minimal lines that make short nails look intentionally styled, not short on ideas. Keep it uniform on every finger or add a double-line accent to the ring finger for a subtle twist. Try milky beige for a soft-focus look, rosy sand for warmth, or toffee for a cozy neutral. It’s chic, effortless, and one of my favorite beginner nail ideas to reach for when I want something polished in minutes.
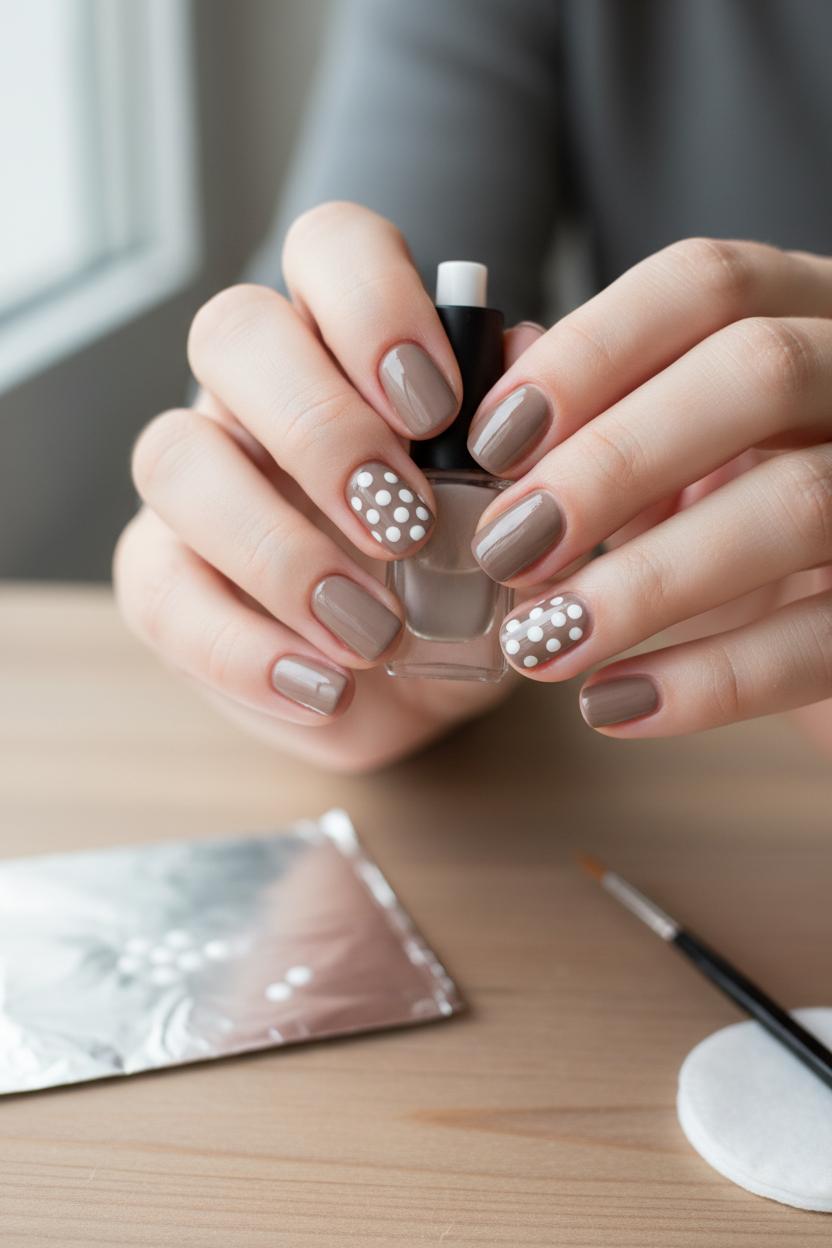
When you want something cheerful but still chic, polka dot accent nails are the ultimate confidence-boosting choice, and they’re perfect for a DIY manicure. Start with a smooth base—two thin coats of your favorite nude nail polish or a pale pastel make the dots pop without feeling loud. Once it’s dry to the touch, pick one or two accent nails (the ring finger is a classic) and reach for your dotting tools. Dip the rounded tip into polish, touch it gently to the nail, and lift straight up to leave a crisp circle. Use a larger tip for a few statement dots and a smaller one to sprinkle in lighter confetti. If you’re working with short nails, cluster the dots near the cuticle or along one side for a flattering, elongated look that reads polished, not busy—an easy nail design that feels grown-up.
Color-wise, you can’t go wrong with white on taupe for office-friendly simple nail art, black and nude for Parisian cool, or a rainbow of tiny brights scattered over a milky base for weekend whimsy. Try a “French dot” by lining up petite dots just along the tip, or let them cascade from one corner like falling sprinkles. If your lines tend to wander, lay down a sliver of striping tape to mask off a half-moon or diagonal and dot within the boundary for a clean, graphic finish. No dotting tools yet? The end of a nail art brush set handle, a bobby pin, or a ballpoint pen cap makes a surprisingly good stand-in until your kit arrives.
A few pro moves keep this in beginner nail ideas territory. Wipe your tool on a cotton pad between dips for consistent dots, and practice a couple presses on foil before committing to the nail. If a dot smudges, don’t panic—use a fine brush from your nail art brush set dipped in remover to nudge the edge back into a circle. Let the design sit for a minute, then float on a generous layer of quick dry top coat, barely touching the surface so you don’t drag the polish. In under 20 minutes, you’ll have a set of playful, polished polka dots that prove simple nail art can look totally pro, even on short nails and done right at home.
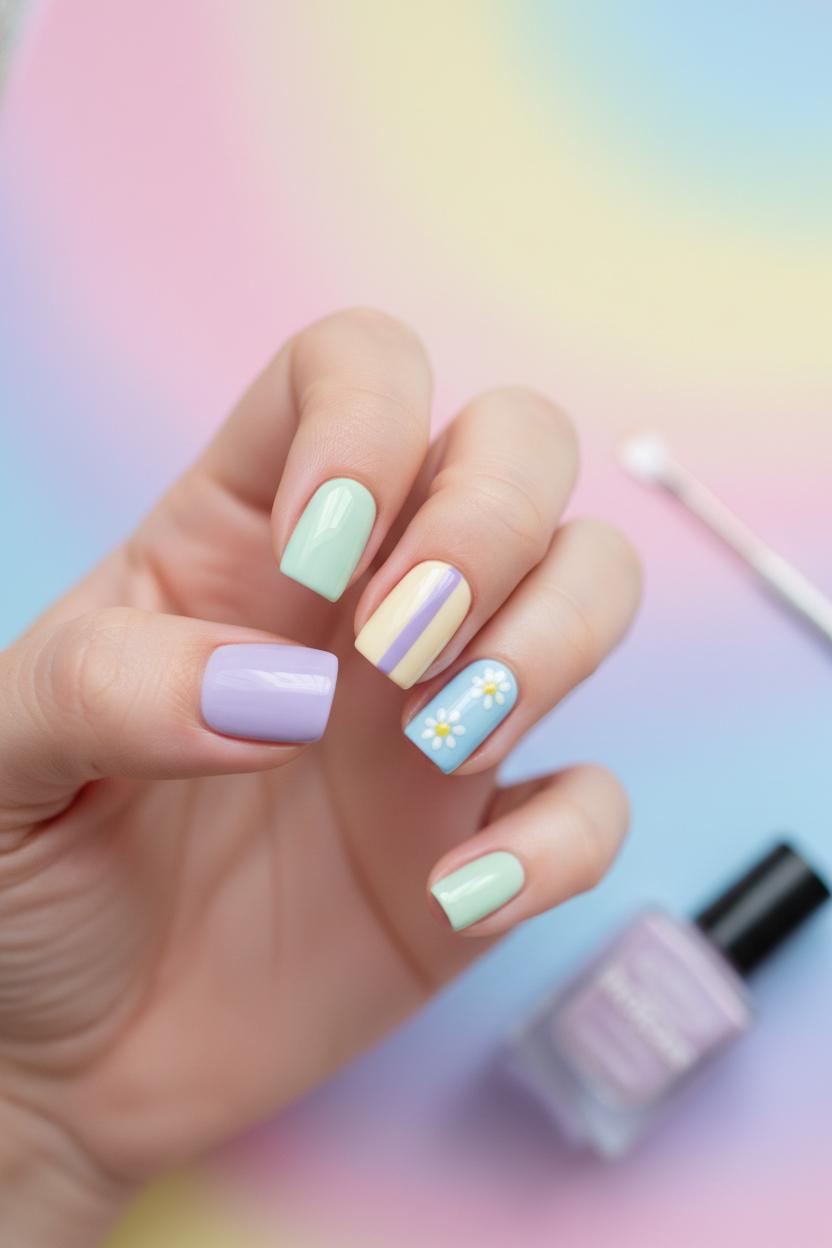
If your mood board is full of sorbet tones and soft gradients, pastel Skittle nails are the sweetest way to try simple nail art without feeling overwhelmed. Think of it as a candy-box lineup: each nail wears a different pastel, and together they read chic, playful, and perfectly polished. It’s one of those easy nail designs that looks curated with almost zero stress—especially on short nails, where the uniform pops of color feel crisp and modern. Consider it the ultimate DIY manicure for anyone who wants instant good vibes and a dose of color therapy.
Start by curating five shades you love—lilac, mint, butter yellow, sky blue, and blush pink are classics. No perfect pastels at home? Sheer out brighter polishes by mixing a drop of white on a palette or layer a single coat over nude nail polish to soften the tone. Apply a thin base, then paint each finger a different hue. Use the flat or angled brush from your nail art brush set to nudge polish cleanly along the cuticle line for that salon-smooth edge. If you’re craving a tiny flourish, grab dotting tools and add micro daisies or confetti dots to one or two nails; or lay down striping tape to create a skinny diagonal tip or a minimalist center stripe. These are beginner nail ideas that still look intentional, and they’re easy to remove or redo if you change your mind mid-mani.
Seal everything with a generous layer of quick dry top coat so the pastels melt into a glassy finish and resist smudges in minutes. It levels out any texture from dots or tape lines and gives that plush, professional shine. For short nails, try leaving the tiniest halo of negative space near the cuticle or keep accents closer to the tip—both tricks subtly elongate. Refresh your top coat every few days to keep colors bright and chip-resistant. Pastel Skittles are endlessly flexible: swap in a muted periwinkle, add a single metallic stripe with your liner brush, or rotate one “accent” nail each week. The result is a mood-lifting, mix-and-match look that proves simple nail art can be joyful, wearable, and totally doable at home.
If you love the crisp, minimalist look of the half-moon manicure but want something that flatters short nails and doesn’t require salon skills, try this negative space version—it’s one of those easy nail designs that looks far more complicated than it is. Start by prepping your nails like a pro: a quick shape and gentle cuticle push, then a thin base coat to keep everything smooth. Pick a nude nail polish that matches your undertone—beige-pink for cool, peachy for warm, or a sheer café au lait for a barely-there vibe. The magic is in leaving that little crescent near the cuticle bare, which elongates short nails and feels chic enough for work but playful enough for the weekend. It’s truly simple nail art you can do during a TV episode, and it’s perfect for anyone collecting beginner nail ideas for a relaxed, low-maintenance DIY manicure.
Here’s the flow: lay a piece of striping tape across each nail in a soft curve, mirroring your natural cuticle line. Striping tape is skinny and flexible, so it bends into a gentle arc; press the edges down firmly so polish can’t sneak underneath. Paint one thin coat of your nude, let it set for a minute, then add a second. While the polish is still slightly wet, peel the tape back slowly to reveal that clean, negative-space crescent—work one nail at a time for the sharpest line. If you need to tidy up, a fine brush from a nail art brush set dipped in a little remover does the trick. Want a tiny flourish? Add a whisper-thin metallic line of striping tape along the moon, or use dotting tools to place petite dots just above the curve. Seal everything with a glossy quick dry top coat to lock in shine and help your design last all week. Pro tip: if you prefer a perfectly uniform arc, you can swap the tape for hole reinforcements or French guides, but the tape keeps it sleek and modern. This airy, polished look proves that easy nail designs can be elevated with the simplest tools—short nails, a nude nail polish, a roll of striping tape, and a few calm minutes at your kitchen table.
Ready to wrap up? With these 5 easy nail designs, your at-home polish session just became a cozy ritual. From simple nail art accents to quick color blocking, these beginner nail ideas prove you don’t need a salon to feel put-together. Grab your favorite shades, a dotting tool or bobby pin, and a glossy top coat—perfect for short nails, too. Mix, match, and repeat as your mood changes. Light a candle, queue a playlist, and enjoy a soothing DIY manicure that looks adorable and lasts. Your next swipe-worthy set starts at your kitchen table.