Physical Address
304 North Cardinal St.
Dorchester Center, MA 02124
Physical Address
304 North Cardinal St.
Dorchester Center, MA 02124
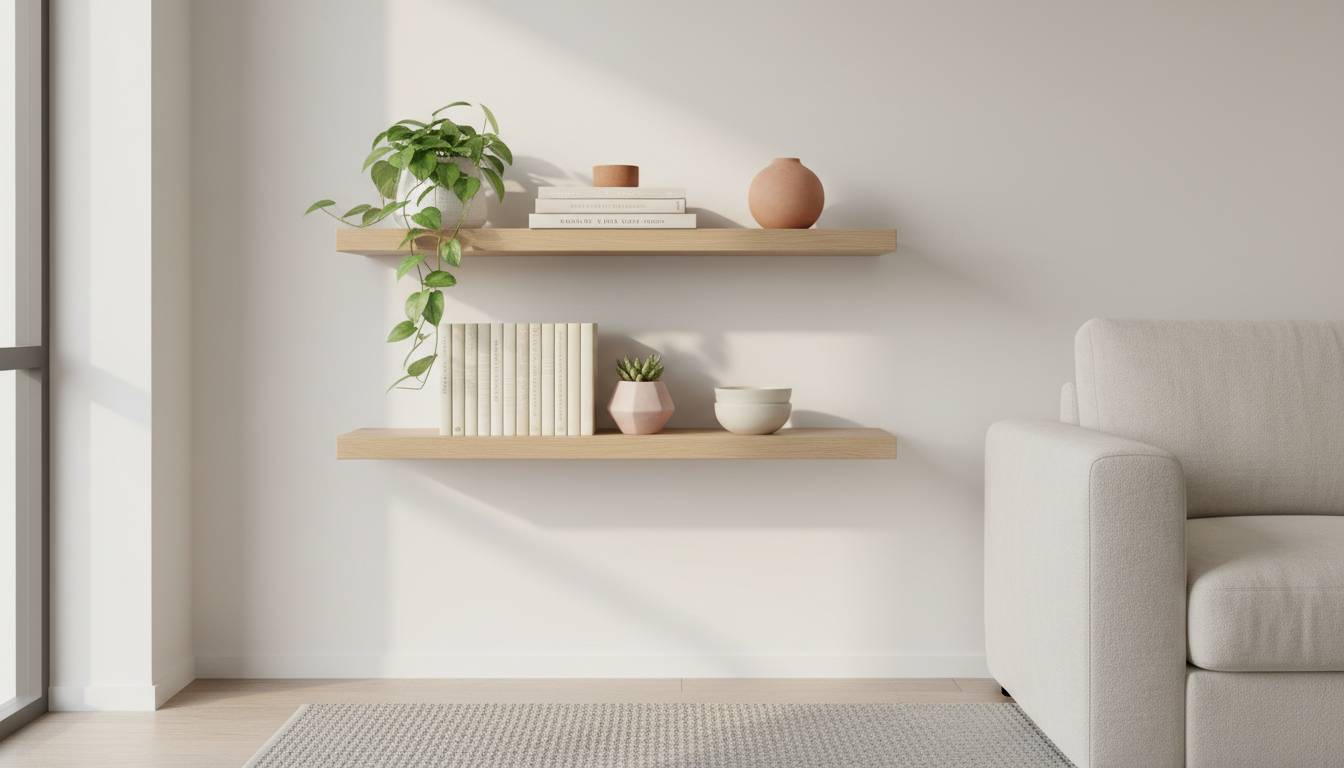
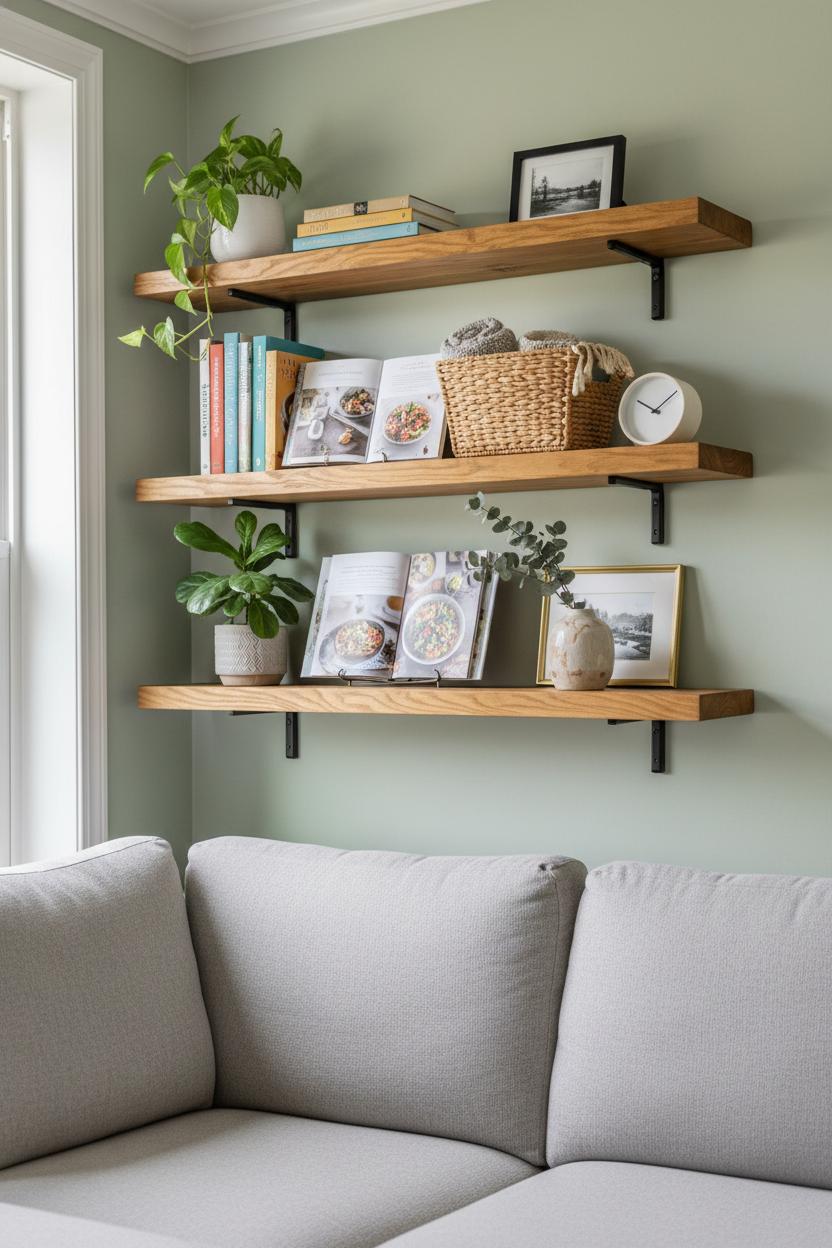
Transform blank walls into stylish, small space storage with these easy DIY floating shelves you can build in a single weekend. Perfect for renters and home decor lovers alike, this simple woodworking project uses affordable pine boards, sturdy floating shelf brackets, and reliable wall anchors for a clean, minimalist look. Grab a cordless drill, sandpaper, and your favorite wood stain to customize the finish. Whether you’re displaying plants or organizing essentials, these diy shelves deliver big impact on a budget—no bulky bookcases required. Let’s measure, mount, and elevate every room with chic floating shelves.
If you’ve been craving a quick upgrade that makes a big impact, this weekend project is your sign to go for it. Floating shelves are the perfect blend of form and function: they carve out small space storage where you didn’t think you had any, and they instantly elevate your home decor with clean lines and warm, natural texture. Even if you’re new to woodworking, this is a confidence-building build with just a handful of steps and budget-friendly materials. Think simple pine boards, sleek floating shelf brackets that disappear like magic, and a finish that complements your room—light and airy, rich and moody, or perfectly rustic. By Sunday evening you’ll have sturdy, custom diy shelves that look tailor-made for your space.
Start by taking a few careful measurements and sketching your layout so the proportions feel right above a sofa, in a kitchen nook, or flanking a bathroom mirror. Gather your supplies: pine boards cut to size, floating shelf brackets, appropriate wall anchors for drywall or masonry, a tape measure, level, and a trusty cordless drill. Give the boards a quick sand to soften the edges, then brush on a wood stain that ties into your existing palette and let it dry while you prep the wall. Locate studs whenever possible for maximum strength, marking level lines where the brackets will sit; if a stud doesn’t line up with your plan, that’s when quality wall anchors save the day. The bracket style you choose does the heavy lifting behind the scenes, keeping the look streamlined and minimal once everything is installed.
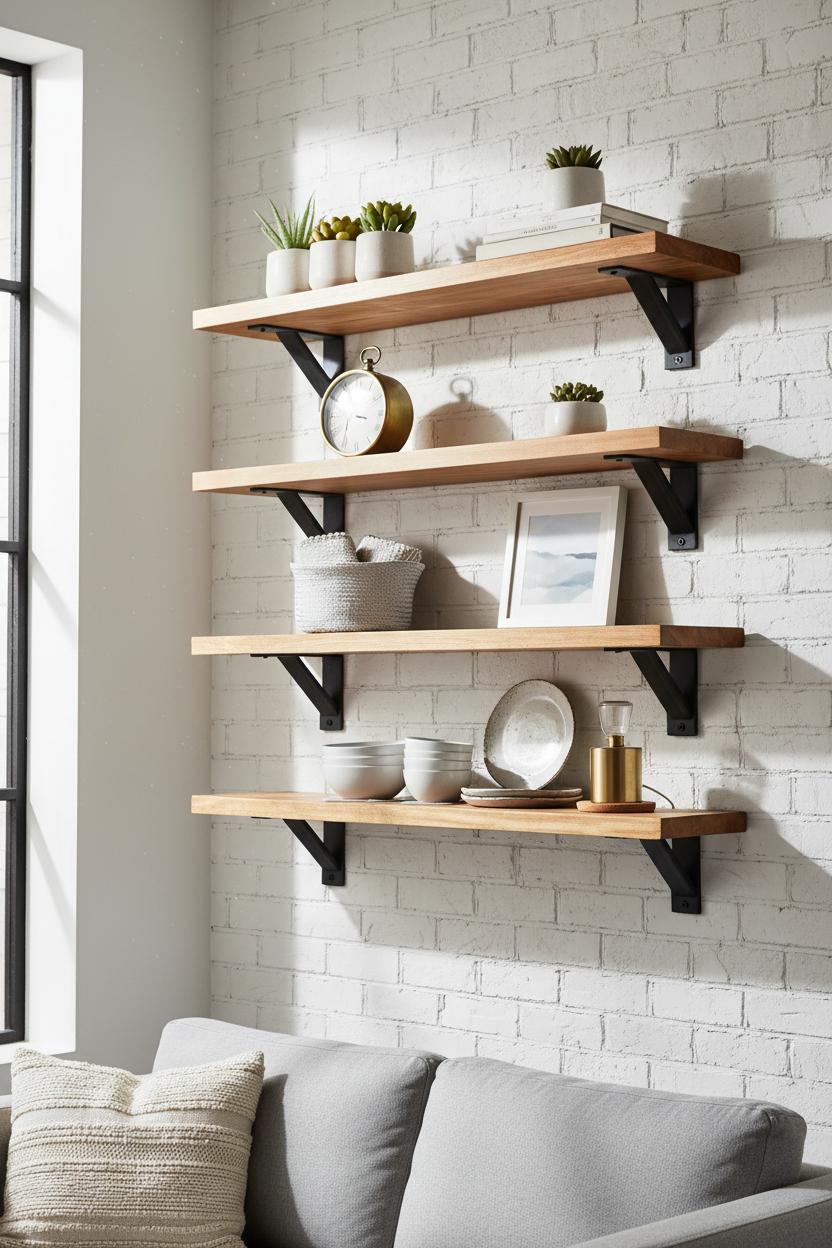
Installation is satisfying and quick: mount the brackets along your level marks, double-check spacing, and slide or set your shelves in place according to the hardware instructions. The beauty of diy shelves is the custom factor—you pick the exact length and depth, so cookbooks, plants, and framed photos all have a happy home. Style with a mix of heights and textures, tuck in a woven basket or two for concealed small essentials, and enjoy how much small space storage you just created without visual clutter. Pro tip: finish both sides of the boards for a polished, pro-made look, and let the stain cure overnight before styling. In a single weekend, you’ll have floating shelves that feel elevated, intentional, and totally you.
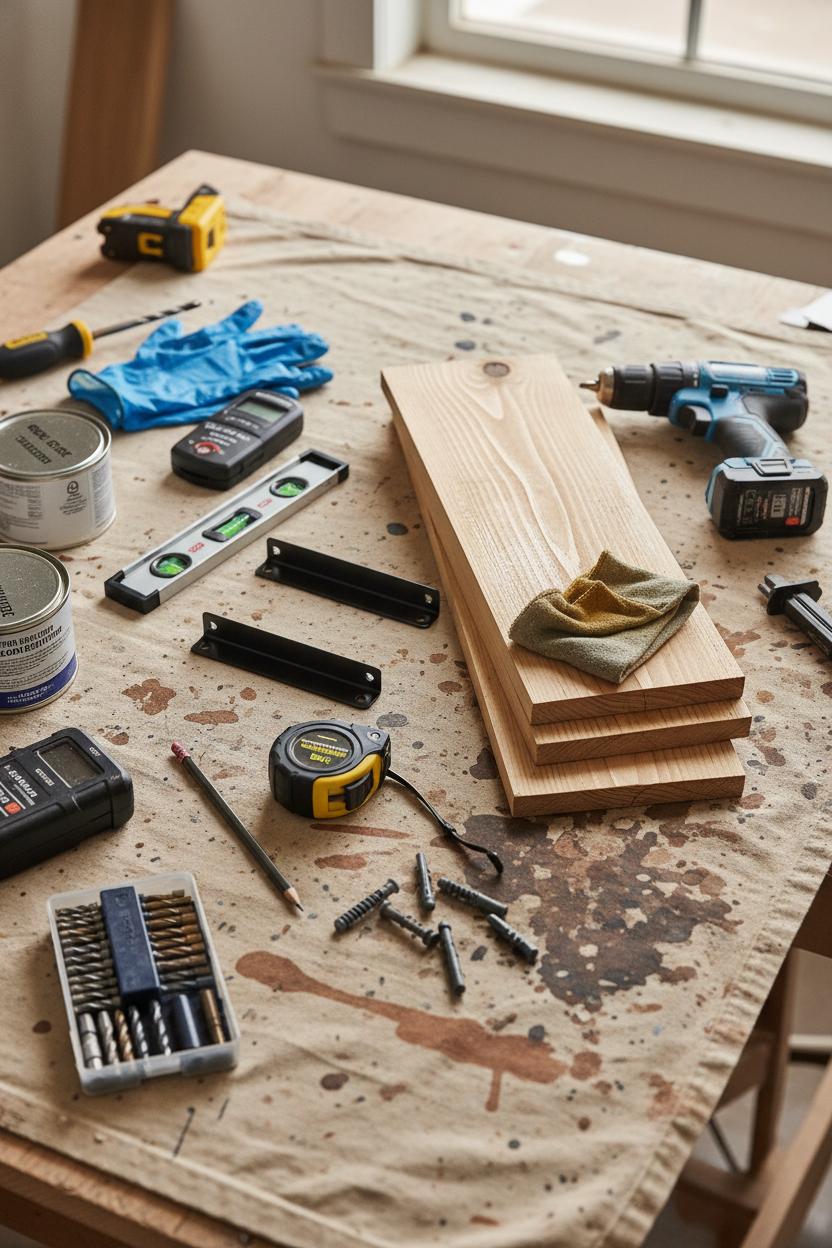
Before you dive into this weekend project, gather a small but mighty toolkit that keeps things simple and budget-friendly. The heart of these diy shelves is a pair (or two) of floating shelf brackets—those clever, low-profile supports that disappear once your boards are in place. You’ll also want a tape measure, a pencil, a level, and a stud finder to map out the safest, straightest path. If your studs aren’t exactly where you need them, plan on using sturdy wall anchors so your floating shelves feel rock solid, even on drywall. Toggle bolts or heavy-duty anchors are great for larger spans; just match the anchor to your wall type and the expected weight.
For the shelves themselves, reach for pine boards. They’re affordable, easy to work with, and packed with character—think gentle grain and the occasional knot that gives homemade charm without fussy woodworking. Choose the width that suits your space, like a 1×8 for a narrow hallway or a 1×10 for a kitchen display. Give the boards a quick sanding (start around 120 grit and finish with 220) so the edges feel silky. Then comes the fun: wood stain. Whether you go moody walnut, honeyed oak, or a coastal gray wash, stain instantly elevates simple pine into custom-looking home decor. A pre-stain conditioner helps prevent blotches, and a clear topcoat keeps everything wipeable for kitchen splatters or bathroom steam.
A reliable cordless drill is your best friend here—use it to pre-drill pilot holes, drive screws into studs or wall anchors, and even countersink for a flush, professional finish. Keep a few drill and driver bits handy, plus a soft cloth for stain, nitrile gloves, and a drop cloth to protect floors. With just these essentials—floating shelf brackets, pine boards, wall anchors, wood stain, and a trusty cordless drill—you’ll have everything you need to turn a blank wall into beautiful, functional small space storage. It’s a satisfying blend of easy woodworking and stylish utility, the kind of project that looks custom, feels sturdy, and instantly adds warmth and purpose to any corner of your home.
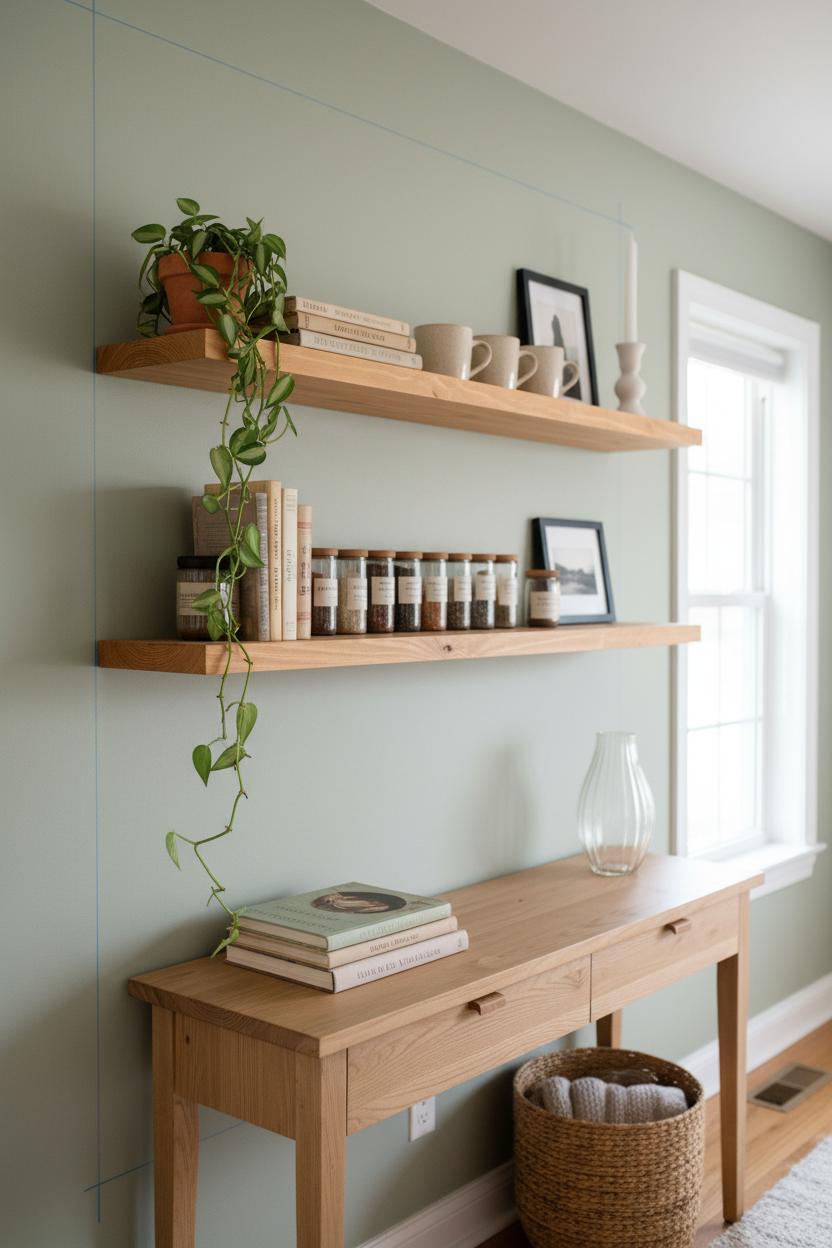
Before you cut a single board, pause to measure and dream a little. Start with your small space storage goals: what needs a perch here—cookbooks, mugs, a line of spice jars, framed photos, that trailing pothos? Jot down your heaviest item and the tallest piece you want to display; those two details will guide the thickness of your pine boards and the spacing between them. Use painter’s tape to sketch the outline of your floating shelves right on the wall, then step back and take a look from different angles—seated on the sofa, walking in from the hall, standing at the kitchen counter. Check clearances around door swings, window trim, and light switches, and decide whether you want the shelves to align with the edge of a console or center on a focal point. This quick “tape mockup” makes it easier to visualize your home decor placement and keeps your diy shelves feeling intentional rather than afterthought.
Next, get practical with the tape measure and a level. Find and mark studs; most are 16 inches on center, which will influence where your floating shelf brackets can go. If your perfect layout doesn’t land on studs, plan to use heavy-duty wall anchors rated for your intended load, and keep heavier pieces over secure points. Measure shelf height based on what you’re storing: 10–12 inches between shelves suits books and canisters; 14–16 inches leaves breathing room for taller vases or art. Leave at least 6–8 inches above a desk or headboard so the display feels airy, not cramped. Choose board length that relates to surrounding furniture—slightly shorter than the console below looks tailored, while extending a few inches past a narrow dresser can maximize storage in tight quarters. As you map drill points, note any outlets, cable runs, or thermostats to avoid, and add a cordless drill and sharp bits to your setup for crisp pilot holes.
Finally, plan the finish work and styling in tandem. Test a wood stain on an offcut to make sure it harmonizes with your floors and frames; a warm honey stain reads cozy, while a deep walnut leans modern. In your woodworking plan, include a gentle sanding of edges so the shelves feel touchable. Sketch your decor composition: an anchor piece (art or a stack of books), a living element (plant), and something sculptural (a candleholder), leaving negative space for everyday grabs. With measurements dialed in and a clear vision for placement, your floating shelves will pull double duty—pretty and practical, exactly what small space storage should be.
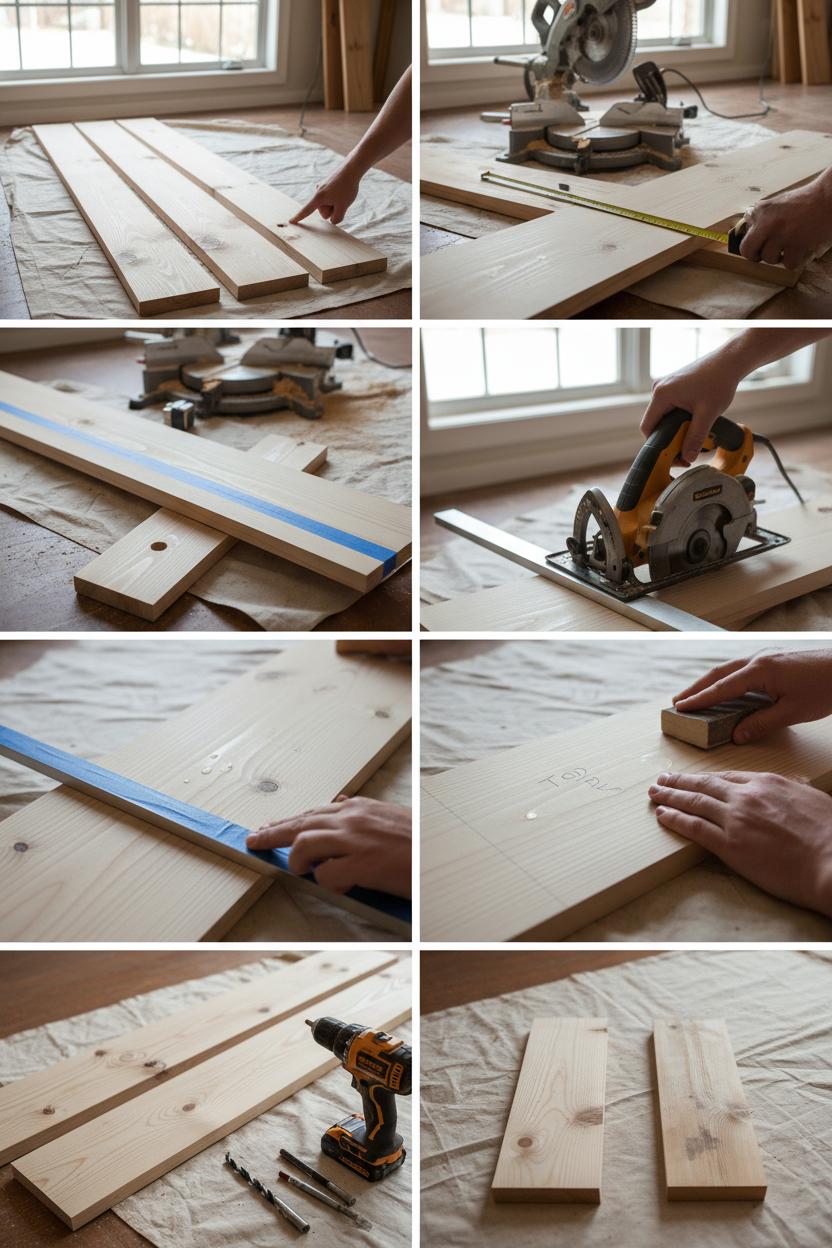
Before anything gets hung on the wall, give your pine boards a little spa day. Lay them out and decide which faces you want showing—knots and grain can be such pretty character in home decor, so pick the best sides to face out. Measure your wall and the spaces you want to fill, then mark your cuts with a sharp pencil and a square. I like to customize depth for small space storage—shallower for tight hallways, deeper for kitchens. Cut your boards with a miter saw or a circular saw guided by a straightedge; a strip of painter’s tape along the cut line helps prevent tear-out. Measure twice, cut once, and keep an offcut or two for later stain tests. If you already have your floating shelf brackets, dry-fit your boards to confirm depth and spacing—those concealed rods should land well within the board for a sturdy, seamless look.
Sanding is where rough lumber turns design-y. Start with 80- or 100-grit to level mill marks, move to 150, then finish at 220 for that silky feel. Wipe off dust between grits, and don’t forget the edges. Easing the edges (just a soft round-over with a sanding block) makes diy shelves look custom and helps the finish wear beautifully. For a crisper vibe, a light hand-cut chamfer works too—whatever matches your style. Pine can be knotty, so spot-sand resinous areas and consider a dab of wood filler if you want an ultra-smooth front face. A quick water wipe to raise the grain, then a final pass with 220, sets you up for an even finish later.
Before finishing, label the backs of your boards and mark a light centerline where your floating shelf brackets will sit; this makes install day faster. If you’ll be using a cordless drill to pre-drill for bracket rods or to drive screws, now’s a great time to plan those holes on scrap and practice your depth. Pine loves to blotch, so test a pre-stain conditioner and your chosen wood stain on those offcuts. When everything feels smooth and ready, you’ve got beautifully prepped boards that will slide onto brackets cleanly, play nicely with studs (or heavy-duty wall anchors if needed), and look like high-end floating shelves—all with approachable, weekend-level woodworking that upgrades your home decor and small space storage in one go.
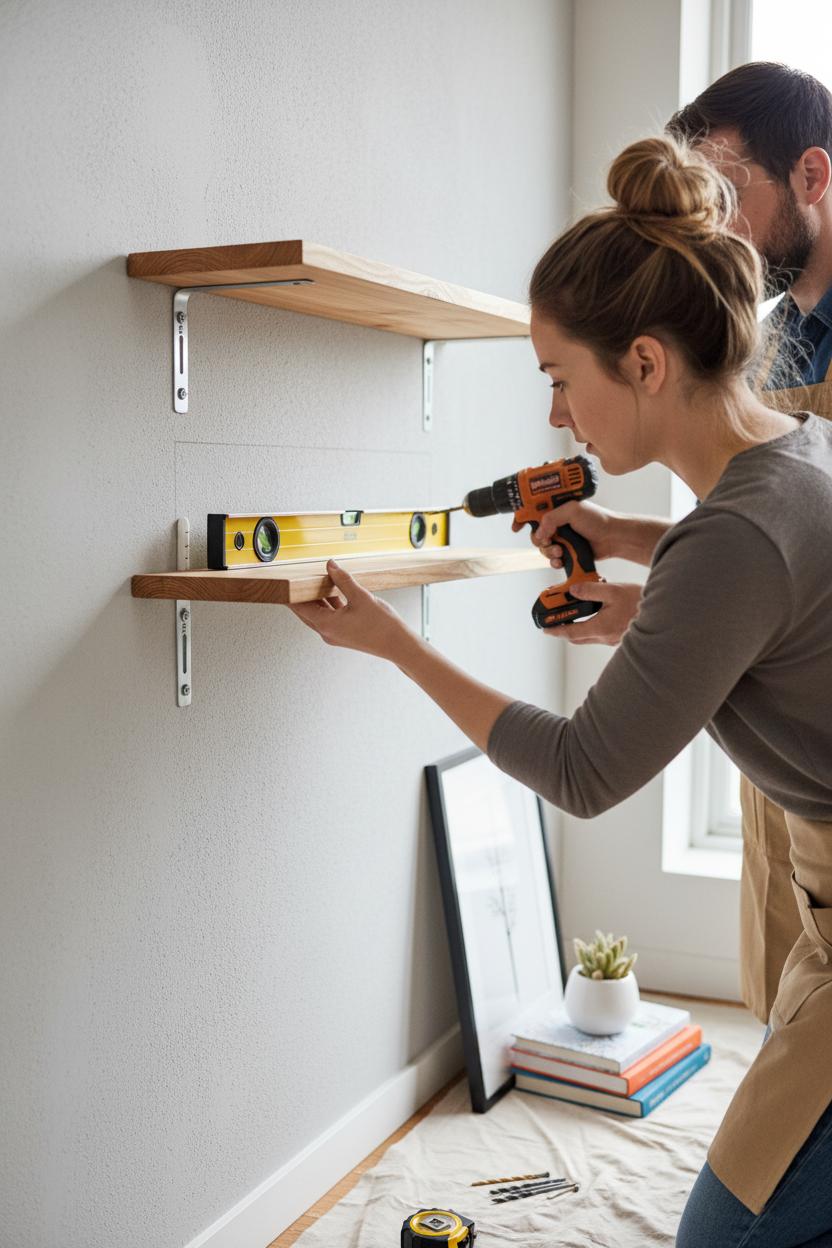
With your pine boards sanded smooth and dressed in a cozy layer of wood stain, it’s time to give the room its quiet “wow” moment by mounting the hardware. Gather your level, tape measure, pencil, floating shelf brackets, wall anchors, and a trusty cordless drill. Decide on the finished height for your floating shelves by loosely styling the space with a few props—plants, frames, a stack of cookbooks—and mark a light guideline with the level. For balance and support, plan to place brackets a few inches in from each end of the board, and if you’re spanning a longer run, space additional brackets evenly. This step sounds simple, but it’s the secret sauce for diy shelves that look designer and pull their weight for small space storage.
Hold your first bracket up to the guideline and mark the screw holes. If you’re drilling into drywall instead of studs, go straight to wall anchors designed for your wall type; they’re the behind-the-scenes heroes. Pre-drill a pilot hole where each mark is, then tap or drive in the anchors until they’re flush—self-drilling anchors bite in easily with a slow, steady squeeze of the cordless drill. Fasten the bracket with the included screws, checking that it sits snug and square. Now measure across for the second bracket, using your level to draw a light, straight reference line so both brackets live on the same plane. Before tightening everything fully, do a quick dry fit: slide the bracket rods into the back of your pine board to confirm the spacing matches the holes. It’s a tiny woodworking moment that saves big frustration.
Once all brackets are anchored and tightened, slide the stained boards into place, easing them until they sit flat against the wall. If your brackets include set screws, snug them up for a wobble-free finish. Step back and check the level one more time—micro-adjustments now make your floating shelves look custom. Start loading gradually to get a feel for the weight rating, then style with pieces that make your home decor sing. In one easy weekend, you’ve created floating shelves that work as beautiful small space storage and a polished diy shelves upgrade you’ll admire every day.
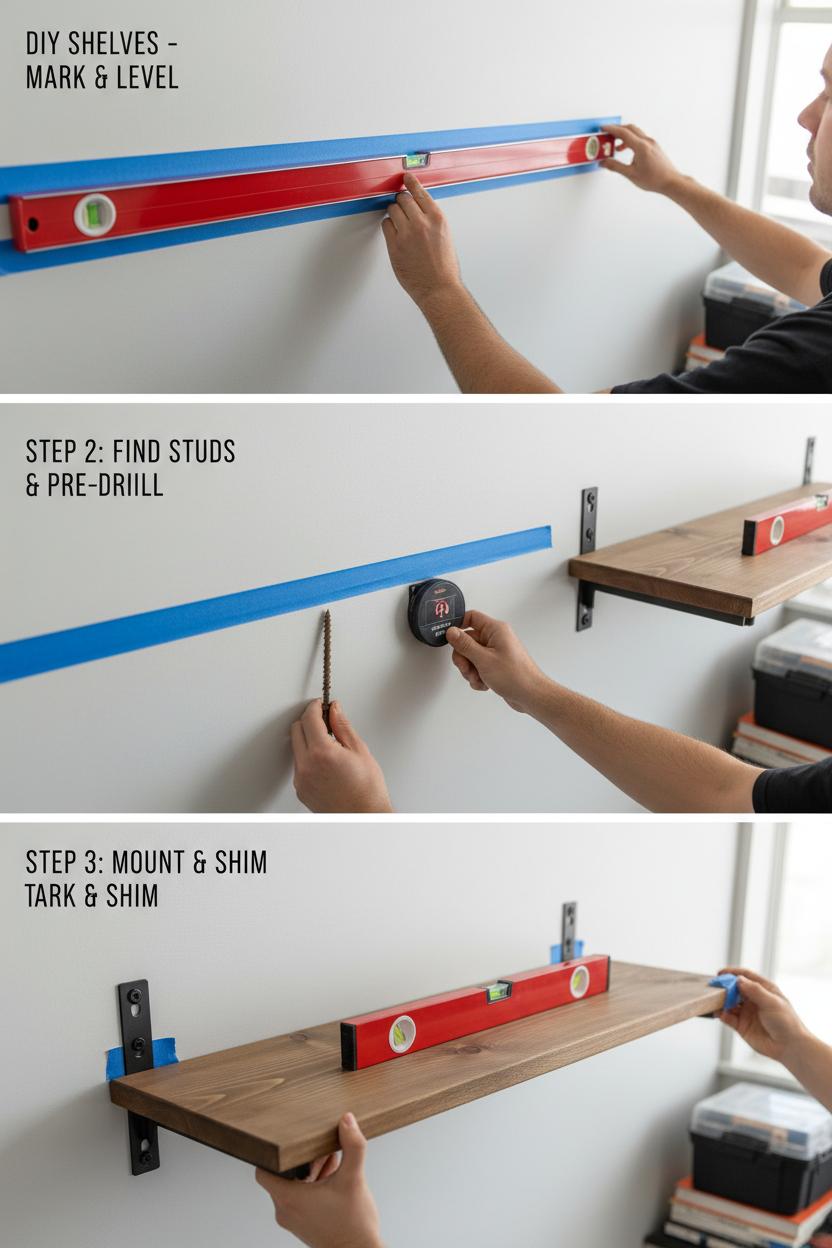
You’re so close you can taste it—time to hang and level. Start by marking your shelf height with painter’s tape so you have a clean visual line to work from, then hold your floating shelf brackets to the wall and check for studs. A quick stud-and-wiring scan is a must; you don’t want to meet a pipe or cable mid-project. Pre-drill your pilot holes with a cordless drill and use long wood screws into studs whenever possible—this is the backbone of strong diy shelves. No stud? Choose heavy-duty wall anchors rated for the total load you expect to carry, and follow the manufacturer’s instructions to the letter. Keep your level handy and confirm it twice: once with the brackets alone and again after the shelf is on. A strip of tape under your marks catches drywall dust and makes cleanup satisfyingly easy.
Before you slide on those pine boards, do a quick dry fit to be sure the bracket rods reach deep enough—ideally most of the shelf’s depth—to prevent sag. If you’re working with softer woods like pine, pre-drill and lightly countersink any set screws to avoid splitting. If you stained your boards, make sure the wood stain is fully cured so fingerprints don’t mar the finish while you wrestle them into place. After mounting, check level front-to-back and side-to-side; if your wall waves (they all do a little), a whisper-thin shim—think playing card or folded painter’s tape—behind a bracket can take out a wobble. For long floating shelves, space brackets over at least two studs to spread the load, keeping things sturdy for everyday small space storage and pretty home decor styling.
Now for quick strength and safety checks. Give the front edge a gentle push and pull; there should be no racking or clicking. Slowly add weight—stack a few books or set down a couple of pantry cans—and watch for any tilt. If it stays level, add more until you reach your planned display load, always staying within your bracket and anchor ratings. Tighten all screws once more after an hour; materials can settle. If kiddos climb or the shelf sits over a high-traffic zone, keep heavier items toward the back and lighter decor up front. With a few mindful checks and a dash of woodworking care, your floating shelves will look effortless and feel rock solid for years.
If your floating shelves feel a little wobbly or a wall anchor starts to spin, don’t panic—this is just part of the DIY journey. Most hiccups trace back to mismatched wall anchors or missing studs. If an anchor pulls out, back it out gently, patch with a bit of spackle, and shift your hole over 1–2 inches to catch fresh drywall or, better yet, a stud. Use sturdy wall anchors rated for your load, or toggle bolts if you can’t land on a stud. When possible, tie your floating shelf brackets into at least two studs for strength. Pre-drill pilot holes with a cordless drill and a sharp bit; it reduces tear-out and helps screws bite. If your bracket holes don’t line up perfectly, loosen them slightly, level the bracket, and retighten—most systems have a whisper of wiggle room to fine-tune.
To prevent sag, think like a woodworker before you mount. Choose boards that are thick enough for the span—1 1/2-inch pine boards work beautifully for most small space storage, but go thicker or switch to hardwood if you plan to store heavy dishes or books. Deep, sturdy floating shelf brackets that extend at least two-thirds of the shelf depth make a world of difference. Keep your shelves under 36 inches unless you can hit three studs, and spread weight evenly once styled. A quick rule of thumb: if you’d hesitate to sit on it, don’t load it like a library.
Basic woodworking care keeps your diy shelves looking like custom home decor for years. Dust with a soft, dry cloth and spot-clean with a barely damp microfiber—no harsh cleaners. If you used a penetrating wood stain and clear topcoat, refresh high-traffic edges with a light buff and a touch-up coat once a year. Wood moves with the seasons, so give screws a gentle snug after a few months; you’ll often feel a tiny turn as the fibers settle. Avoid direct steam from kettles or diffusers beneath the shelf, add felt pads under ceramics, and rotate heavy pieces now and then to prevent compression marks. With these simple habits, your floating shelves stay level, lovely, and totally weekend-project proud—small investments for a big, lasting upgrade in your home decor and woodworking confidence.
And there you have it—simple diy shelves you can finish in a weekend. Sleek floating shelves bring style and function, turning blank walls into small space storage and display. From measuring to mounting, the steps are beginner-friendly, budget-conscious, and totally customizable with stain or paint. A little woodworking goes a long way toward cozy, collected home decor. Brew something warm, cue a playlist, and enjoy the moment you slide your favorite books, plants, and frames into place. Your walls—like your weekend—just got wonderfully well-spent.