Physical Address
304 North Cardinal St.
Dorchester Center, MA 02124
Physical Address
304 North Cardinal St.
Dorchester Center, MA 02124

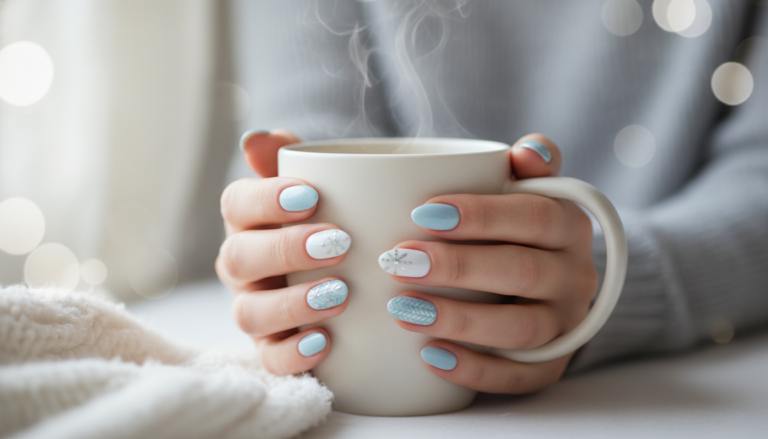
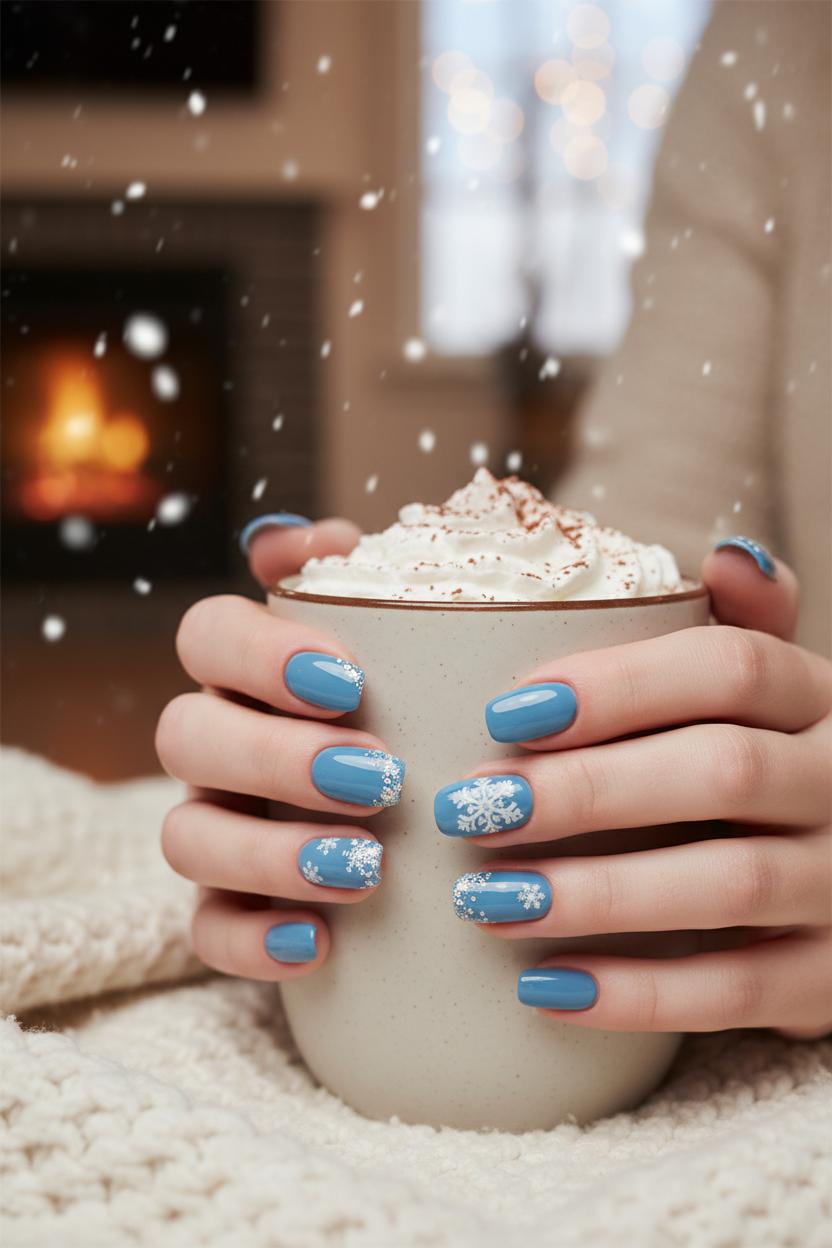
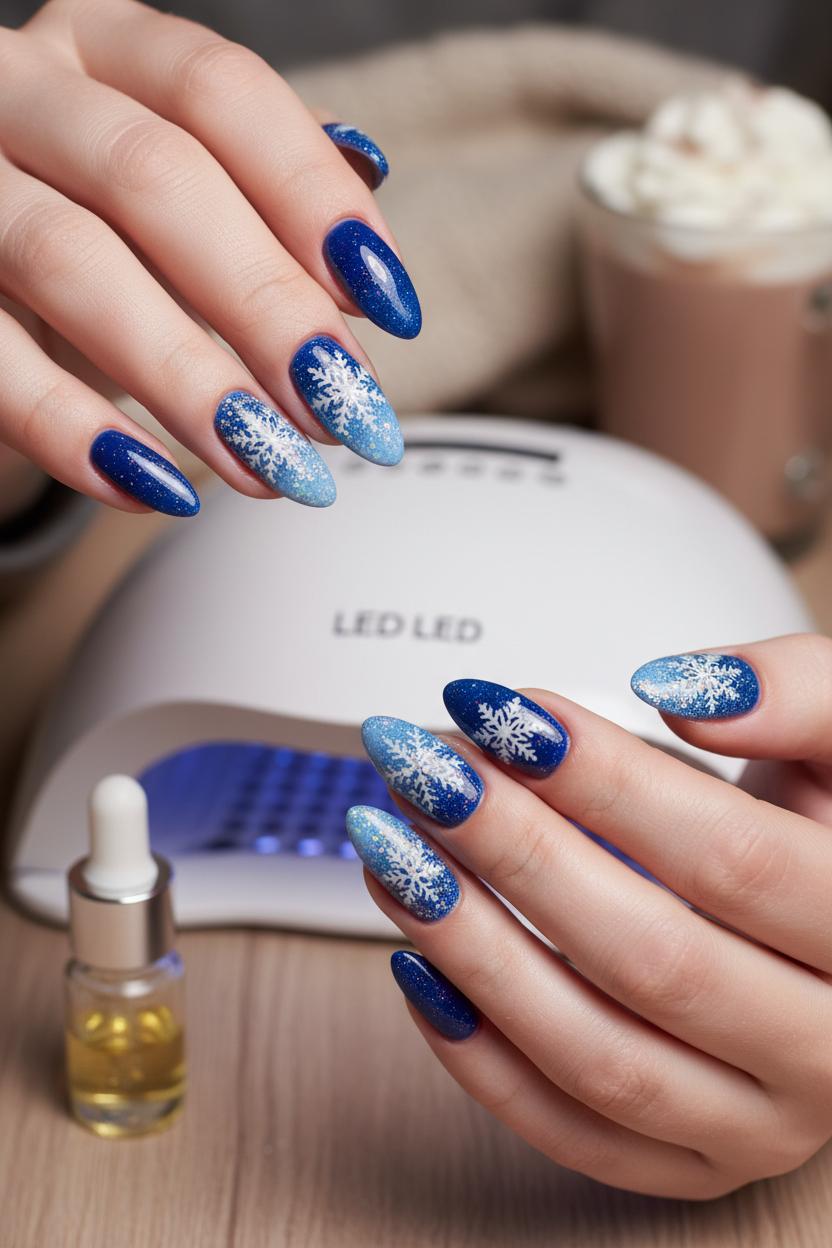
Ready to wrap your fingertips in winter magic? These cozy snowflake nails blend dreamy blue nails, chic gel nail designs, and twinkling accents for the perfect holiday manicure. From minimalist winter nail art to statement sparkle, try snowflake nail decals or a nail stamping kit for crisp flakes, layer a gel polish set blue, dust with fine holographic glitter, and cure under a UV LED nail lamp. Save this inspo for your next at-home set or salon visit—because every snowfall deserves a fresh mani.
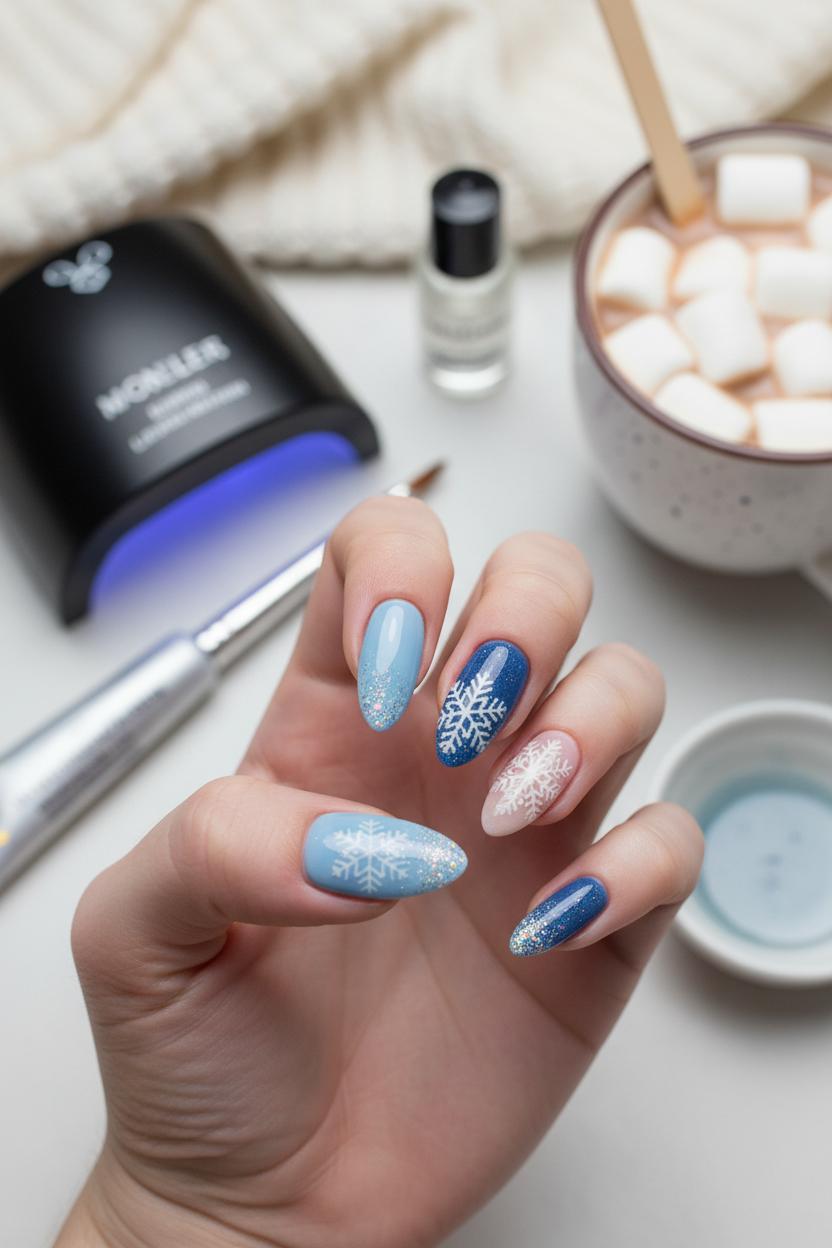
Before you dive into creating cozy snowflake nails, gather a few winter nail art staples that make the process feel effortless and spa-level at home. Start with a smooth base: a gentle file, cuticle oil, and a dehydrator or alcohol wipe to keep lifting at bay. For color, a gel polish set blue is the perfect winter palette—think icy sky, denim dusk, and deep midnight—so you can layer gradients or keep it chic with solid blue nails. If you love crisp, delicate details, a nail stamping kit is a game-changer; those intricate snowflake plates stamp on flawlessly, giving your holiday manicure that “how did you do that?” finish without hours of hand-painting. On days you want quick and cute, snowflake nail decals are your best friend—just float them onto tacky polish and seal. A whisper of fine holographic glitter over the tips or scattered like frosty dust adds that magical snow-globe sparkle, especially when it catches the light on a chilly morning walk.
For staying power and that glassy, salon shine, gel is the move. After painting your gel nail designs, cure each layer under a UV LED nail lamp for the recommended seconds, keeping layers thin so everything hardens evenly and stays chip-free through cocoa mugs and mitten weather. A glossy top coat will make your snowflakes gleam like ice, while a matte top coat turns them velvety and modern—try mixing finishes for dimension, like matte blue nails with glossy glitter accents. Keep a tiny detail brush and a bit of acetone nearby for clean edges, plus a peel-off barrier if you’re going bold with glitter gradients. The best part is how customizable it all is: stamp a blizzard over a sheer blue base, place a single delicate decal on a milky nude, or build a starry night with a deep navy and twinkling holographic dust. With a few well-chosen tools and textures, winter nail art becomes a cozy ritual—one that turns your fingertips into little snow-kissed stories you’ll want to show off all season.
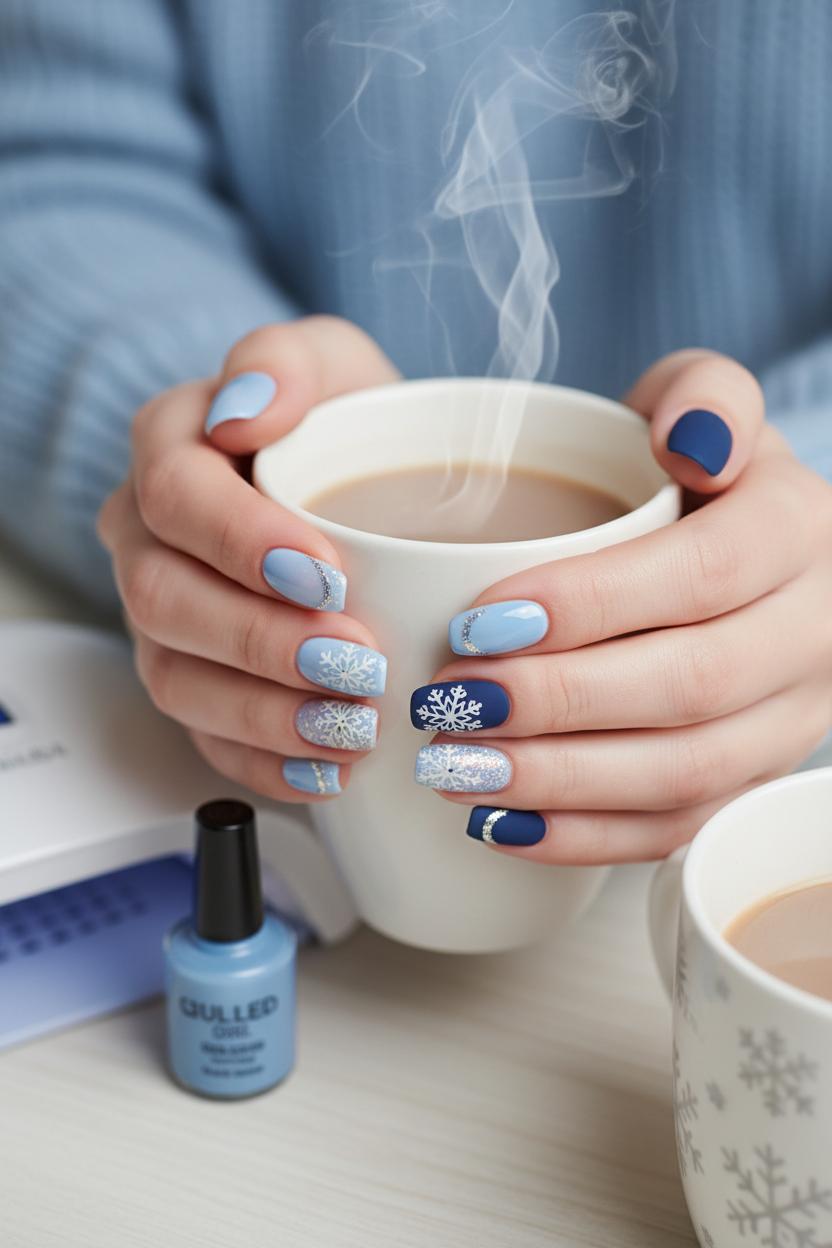
When you’re dreaming up cozy snowflake nails, start by curating a spectrum of blues that feel like a walk through fresh powder. Think icy pastel, soft cornflower, misty denim, and a midnight navy for contrast, then mix in a whisper of milky white or silver to keep the palette crisp. The magic of winter nail art is all about depth, so play with finishes: a creamy base on a few nails, a sheer jelly wash on others, and a subtle pearl or shimmer layered on top to mimic twinkling frost. Blue nails look especially elegant when you vary the tones hand to hand—lighter shades on the left, deeper on the right—or gradient them from cuticle to tip for a sky-at-dusk effect. If you love gel nail designs, this is your moment to build thin, glowy layers that catch the light like snow crystals but still feel soft and wearable with sweaters and cocoa mugs.
For application, reach for a gel polish set blue so you’ve got coordinated shades ready to blend. Lay down a sheer or milky base, cure under a UV LED nail lamp, then feather on your medium blue, sponging it at the tip for a gentle ombré. Tap a bit of fine holographic glitter just along the free edge or in a crescent near the cuticle—like a dusting of frost where the sun hits. For delicate, consistent flakes, use snowflake nail decals or a nail stamping kit; they keep lines crisp and symmetrical so your holiday manicure reads polished instead of busy. Seal with a glossy top coat for a glassy, icicle shine, or try a velvet matte finish to make the blues look like brushed suede—either way, the contrast sets off the flakes beautifully. Finish with a tiny silver dot at the center of each snowflake and a swipe of cuticle oil; the result is a calm, cool palette that turns everyday blue nails into quiet-luxe snow poetry you’ll want to wear all season.
If you’ve been craving that cozy, snow-dusted look without spending hours at the salon, snowflake nail decals are the easiest shortcut to magical winter nail art. Start by choosing your base—soft milky white, silvery nude, or go full ice-queen with blue nails. If you love a glossy, long-wear finish, swipe on two coats from a gel polish set blue and cure each layer under a UV LED nail lamp for that glassy, chip-resistant foundation. Prep matters here: gently buff, wipe with alcohol for a squeaky-clean surface, and keep a pair of tweezers handy to place your decals precisely. Think about balance—one larger snowflake off-center on the ring finger, a cluster of tiny flakes drifting diagonally on the index—and leave some negative space so your design feels airy and elegant.
Applying the decals is surprisingly satisfying. Float the snowflake nail decals off their backing (or peel, depending on the type), then set them onto the tack-free surface, pressing with a silicone tool or fingertip to smooth out any bubbles. To add that frosty sparkle, tap a whisper of fine holographic glitter along the cuticle curve or at the tips like a shimmering snowfall; a thin layer of clear builder gel can sandwich the glitter and decals perfectly before you seal. Finish with a glossy top coat, carefully capping the free edge so your holiday manicure stays crisp for days. The result reads like delicate lace on ice—cozy, polished, and totally selfie-ready.
Prefer stamping? A nail stamping kit is a great alternative for crisp, repeatable flakes and mix-and-match patterns. You can layer stamped snowflakes over sheer bases or blend them into gel nail designs with ombré blues for a stormy-sky effect. Short squovals look chic with a single subtle flurry, while almond and coffin shapes can handle more drama—try a gradient of winter blues with one bold statement nail. Whatever your vibe, the trick is restraint and shine: a few thoughtfully placed flakes, a hint of twinkle, and a high-gloss seal. Finish with cuticle oil, wrap your hands around a mug of cocoa, and enjoy every compliment that comes your way—your snowflake nails just became the coziest accessory of the season.
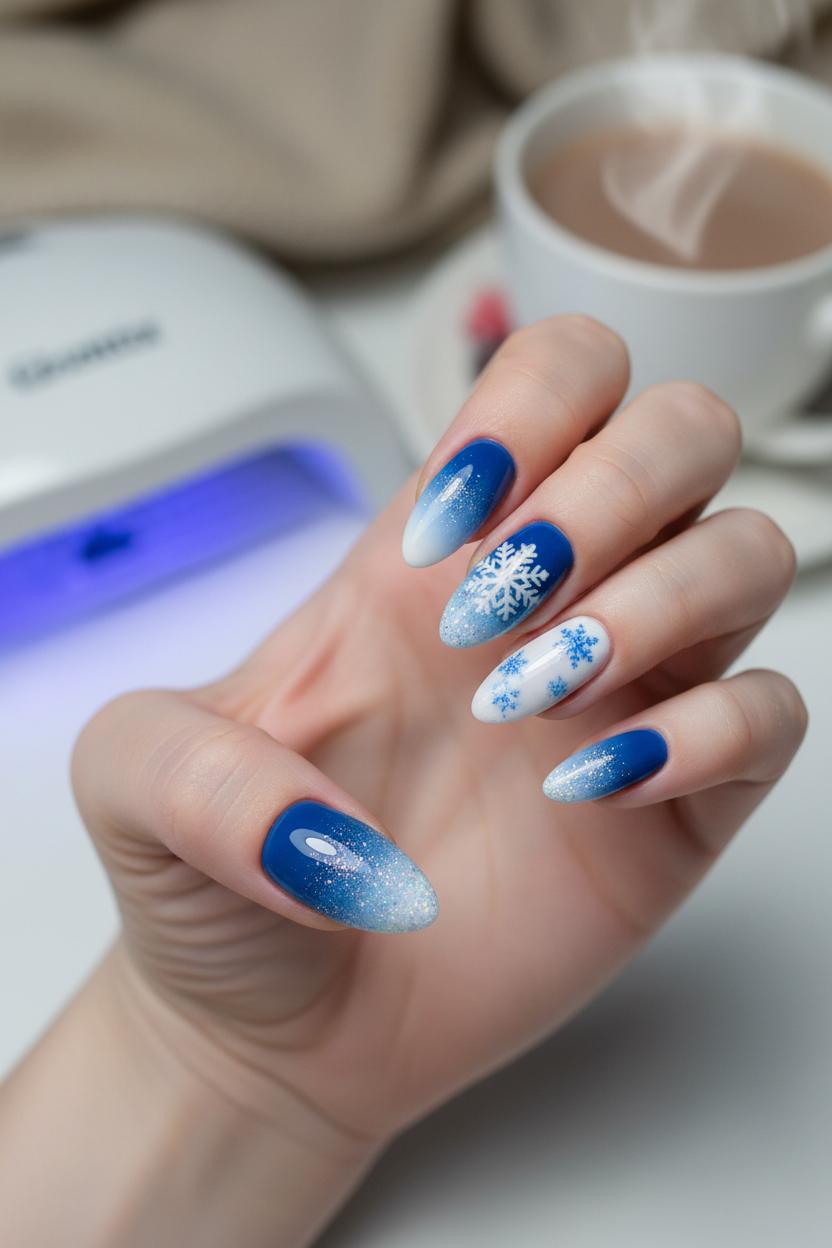
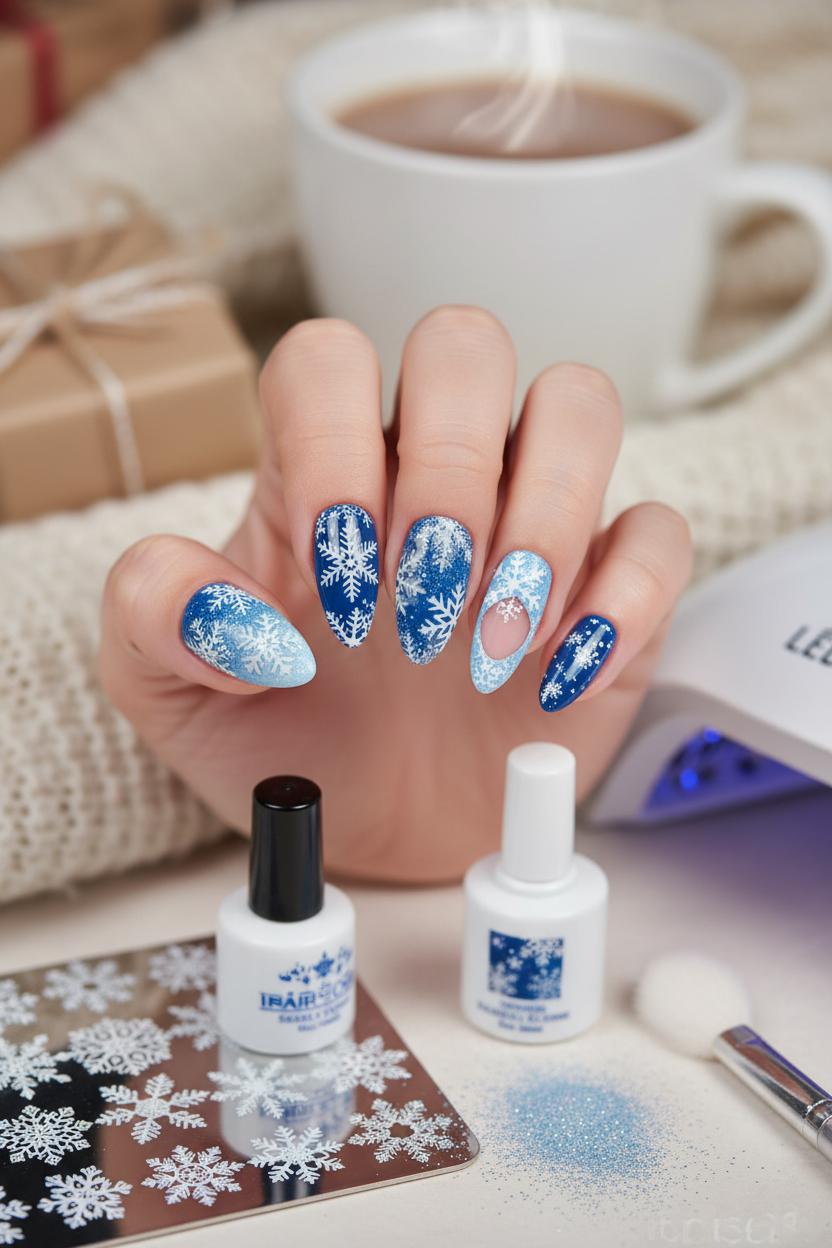
When the thermostat dips, let your nails do the cozy talking with gel nail designs that feel like soft knits and snowfall. Start with an ombré that fades from milky white to twilight blues—think frost meeting evening sky. A gel polish set blue makes it easy to layer sapphire, cornflower, and icy pastel, blending with a sponge or fluffy brush before curing under a UV LED nail lamp. Dust the tips with fine holographic glitter so they catch light like fresh snow, then seal with a glossy top coat. If you’re craving snowflake nails without the hand-painting, press on snowflake nail decals over the gradient or reach for a nail stamping kit to float a single delicate flake on an accent nail. The result is crisp, wintry, and quietly luxe—perfect winter nail art that wears like a cozy sweater.
French tips feel brand-new in winter when you swap classic white for rich blues. Try a sheer, milky base with a skinny navy tip, or go bolder with cobalt and a line of micro silver sparkle tracing the smile line. For a softer holiday manicure, keep the tip barely-there and add one tiny stamped snowflake to the ring finger; the contrast of graphic tip and airy motif is so elegant. Want extra dimension? Matte your base and leave the tips glossy, or vice versa, for a velvet-and-satin effect that looks expensive without trying. These French twists play beautifully with blue nails and pair with everything from puffer coats to sequined party dresses.
Negative space is your minimalist secret weapon for winter nail art that still feels festive. Leave slender cutouts at the sidewalls, carve a clear half-moon at the base, or design floating windows that show a hint of natural nail beneath slate, pearl, or powder-blue gel. Whisper a trail of fine holographic glitter across the open areas like a flurry drifting past a window, then add one dainty flake using a nail stamping kit or a single snowflake nail decal for a curated, editorial look. Because these designs are built with gel, they stay pristine through gift-wrapping marathons and cocoa refills—just remember to cure every layer under your UV LED nail lamp for that glassy, long-wear finish.
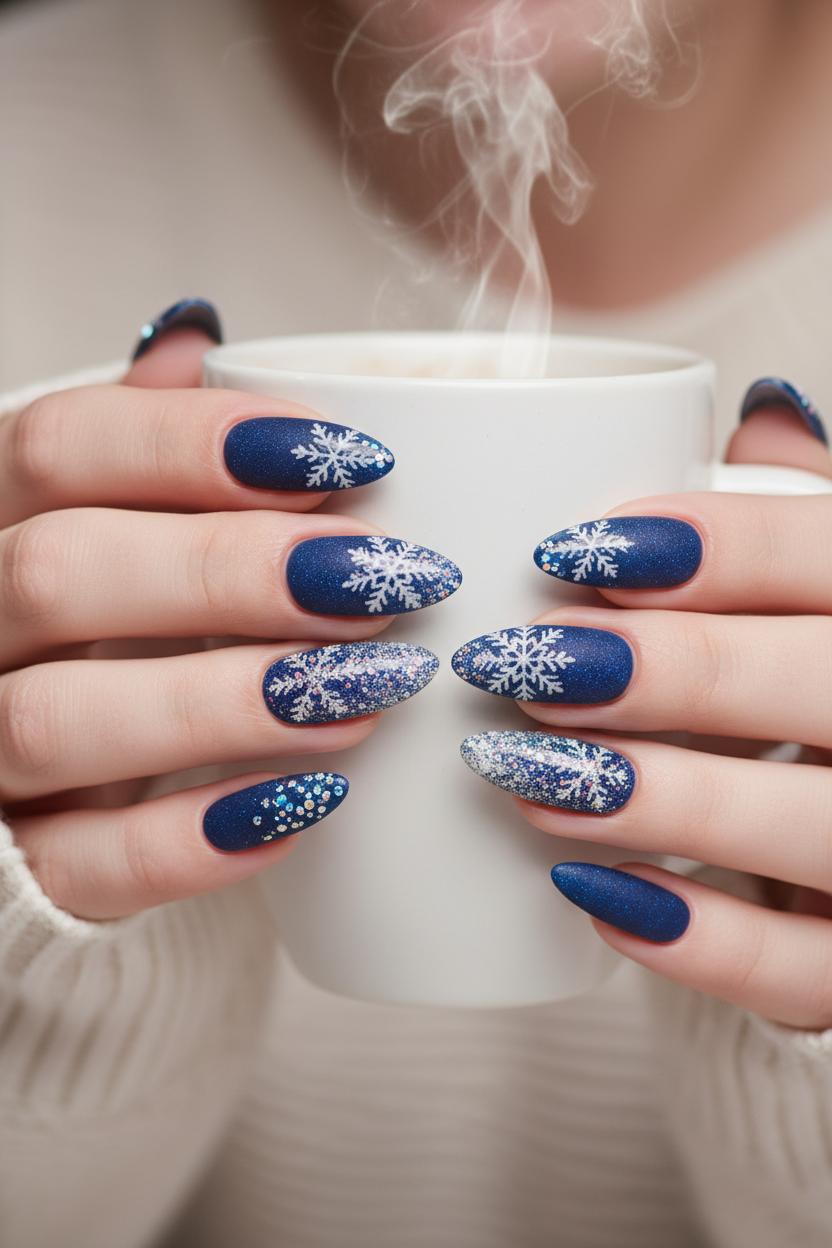
There’s a special kind of winter magic that happens when fine holographic glitter meets a cool blue base, and it’s the quickest way to make your snowflake nails look like they were dusted with fresh frost. Start with your favorite gel polish set blue and pick a shade that feels like an icy sky or cozy midnight, then think about how the sparkle will float on top like twinkling crystals. Because glitter catches light at every angle, even the simplest winter nail art suddenly looks multidimensional, and you get that dreamy, cozy-meets-chic vibe that makes a holiday manicure feel extra special. Whether you prefer soft baby blue nails with a whisper of shimmer or deep navy with starry flecks, glitter turns your gel nail designs into little snow globes.
Application is where the magic really shows. After two coats of color, cure under your UV LED nail lamp, then add a thin layer of no-wipe top coat. While it’s still warm from curing, gently burnish fine holographic glitter onto the surface with a sponge applicator for that mirrored sparkle, or tap it as a gradient from the tip toward the center for an icy ombré. If you love delicate details, stamp or place snowflake nail decals first, then sprinkle glitter over the design and cure again for a sugar-frosted effect that looks like real snow dust. A nail stamping kit makes it easy to layer crisp, lace-like flakes in white or silver, and you can even sandwich a tiny pinch of glitter between layers of clear gel to create suspended snowfall that looks like it’s drifting through your nails.
Finish with a glossy top coat to seal in the shine, or try a velvet matte top coat over the base and keep the glitter glossy for a chic contrast that really spotlights the flakes. Clean up the cuticles with a soft brush, add a cozy sweater sleeve in your photo, and you’ve got the kind of winter nail art that steals the scene at cocoa night. These sparkling, blue nails are the perfect cold-weather companion and a timeless holiday manicure you’ll want to wear straight through the first snowfall.
If you love the look of perfectly symmetrical snowflakes but don’t love freehand painting, a nail stamping kit is your new cozy-season secret. For crisp snowflake nails that feel dreamy and polished, start with a frosty base—think an ombré of icy to midnight from a gel polish set blue, or a single chic denim-blue shade. Apply your base coat and color in thin layers, curing each one under a UV LED nail lamp for that glassy, long-wearing finish. Blue nails instantly set the mood for winter nail art, and they make white or silver snowflakes pop like fresh flakes against a twilight sky.
Now for the magic: choose a stamping plate with delicate snowflake patterns and load a rich, opaque polish onto the design. Scrape at a 45-degree angle, press a squishy stamper to pick up the image, then gently roll it over the nail for a clean transfer. Vary your flakes from tiny to bold and scatter them across the nails for a “snowfall” effect, or line them up like a knit-sweater motif for a cozy, curated vibe. For extra depth, layer a pale gray or ice-blue snowflake first, then stamp a crisp white on top. Tap a whisper of fine holographic glitter into the centers while your gel is still tacky for a subtle twinkle, or veil the entire nail in a glitter wash for that snow-globe shimmer. If you’re short on time, mix and match by adding a few snowflake nail decals on accent nails—decals blend beautifully with stamped designs and make your holiday manicure feel custom. Quick tip: clean the plate with acetone and the stamper with tape between stamps to keep edges sharp.
Seal your artwork with a glossy gel top coat, floating it lightly to avoid smearing and curing again under the UV LED nail lamp. Prefer something soft and sweater-like? A velvet matte top coat turns your gel nail designs into frosted sugar. Finish with one statement nail—maybe a negative-space cutout or a French tip with a snowy stamp—and you’ve got winter nail art that looks boutique-level and lasts through cocoa runs, gift wrapping, and every sparkling moment of the season.
Long-lasting snowflake nails start with thoughtful curing, and a reliable UV LED nail lamp is the quiet hero behind every chip-free, cozy set. After your prep (gently push back cuticles, remove the invisible cuticle film, dehydrate, and add bonder if you like), work in whisper-thin coats. Thin layers cure more evenly and prevent wrinkling, especially with deeper blue nails that can be more opaque. Flash-cure each finger for 5–10 seconds to keep polish from flooding, then give the whole hand its full cure according to your brand’s directions—usually 30–60 seconds for color, 60–90 for top. Place your hand flat and centered, then cure thumbs separately so the bulbs can hit them head-on. If you’re shopping for tools, look for a UV LED nail lamp that’s at least 36–48W with dual wavelengths (365/405 nm) for efficient curing across gel nail designs.
When you add sparkle or art, think “seal and sandwich.” Fine holographic glitter looks dreamy on winter nail art, but reflective particles can slow curing, so keep those glitter coats extra thin and extend the cure by 15–30 seconds. Apply snowflake nail decals onto the cured color (the tacky layer helps them grip), smooth out any bubbles, then lock them in with a thin “grip” layer of top coat. For stamped details, a nail stamping kit gives crisp, delicate flakes; stamp onto a smooth surface, then float your top coat so the brush barely touches the art. Always cap the free edge with every layer to keep your holiday manicure from peeling at the tips.
Let your nails cool for a minute after the final cure—gel tightens as it cools—then finish with cuticle oil to keep the skin supple. Daily oiling, plus wearing gloves for dishes and winter chores, will stretch that fresh-from-the-salon look to two weeks or more. If you’re building a palette, a gel polish set blue is perfect for frosty ombrés and midnight-sky bases; add a dusting of fine holographic glitter and a few decals for effortless, snow-dusted elegance. With patient, even curing and these little longevity tweaks, your winter nail art will stay glossy, glassy, and photo-ready for every cocoa run and festive outing.
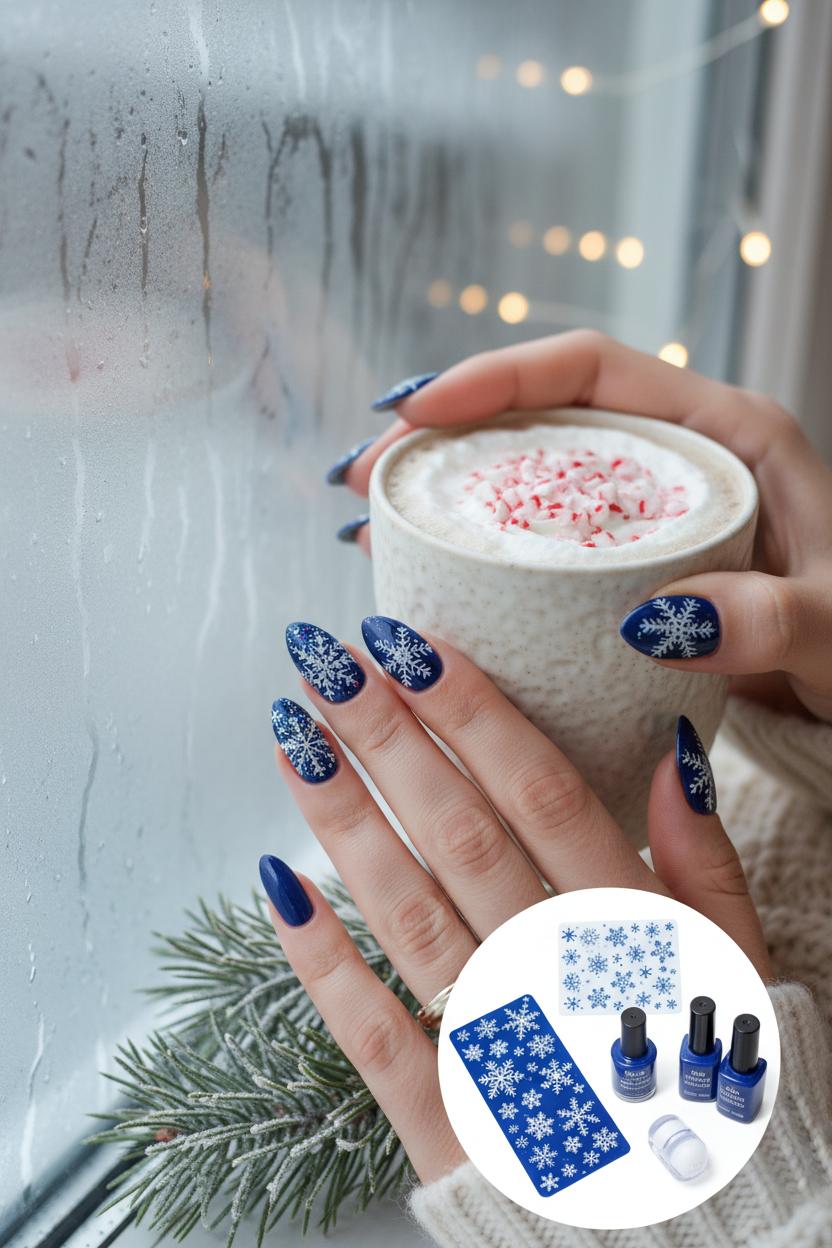
Before you sip that peppermint mocha, give your cozy snowflake nails their moment. Natural light is your best friend—sit by a window and let the soft winter glow highlight the shimmer and shine in your winter nail art. Hold a mug, a knit scarf, or a sprig of pine to add texture and a seasonal vibe, and keep your background clean so your blue nails can pop. For crisp details, switch on your phone’s macro mode or tap to focus on the nail with the most intricate snowflake. If you layered fine holographic glitter over your gel nail designs, tilt your hand slightly so the sparkle catches the light, and avoid harsh flash that can flatten color. A fresh top coat helps the surface look glassy on camera, especially if you cured under a UV LED nail lamp. Moisturize your hands and cuticles beforehand for that magazine-finish close-up; a touch of hand cream or cuticle oil makes every photo feel extra luxe.
Tell the story of your holiday manicure with props and process. Style a mini flat lay with your tools—snowflake nail decals, your nail stamping kit, the gel polish set blue you used—so followers can see how the magic happened. Snap a before-and-after, or a “thumb close-up + full hand” duo to show both detail and overall aesthetic. Think composition: frame the nails along the rule of thirds, angle your fingertips slightly toward the lens, and keep your wrist relaxed for an elegant line. If your color palette leans icy, place your hand against a cozy cream sweater; if it’s deep midnight blue, try twinkle lights or a frosted window to echo that moody winter night vibe. Edit lightly—bump brightness, nudge contrast, and keep colors true so your snowflake nails look as dreamy on screen as they do in person. Then share away: pin your favorites, post a swipe-through tutorial, and tag your inspo sources. Whether you went minimalist with one delicate flake or full blizzard with layered stamping and glitter, your winter nail art deserves the spotlight—and your photos will inspire someone else’s next snowy set.
From delicate snowflakes to shimmering blues, your winter mani can be cozy and chic. Whether you love minimalist snowflake nails, frosty blue nails, or sparkly gel nail designs, let your winter nail art tell your story. For your next holiday manicure, mix soft neutrals with icy accents, matte finishes, and a touch of glitter for fireside sparkle. Save your favorites, screenshot color combos, and bring them to your nail appointment—then wrap your hands around a mug and enjoy the season, one snug swipe of polish at a time.