Physical Address
304 North Cardinal St.
Dorchester Center, MA 02124
Physical Address
304 North Cardinal St.
Dorchester Center, MA 02124

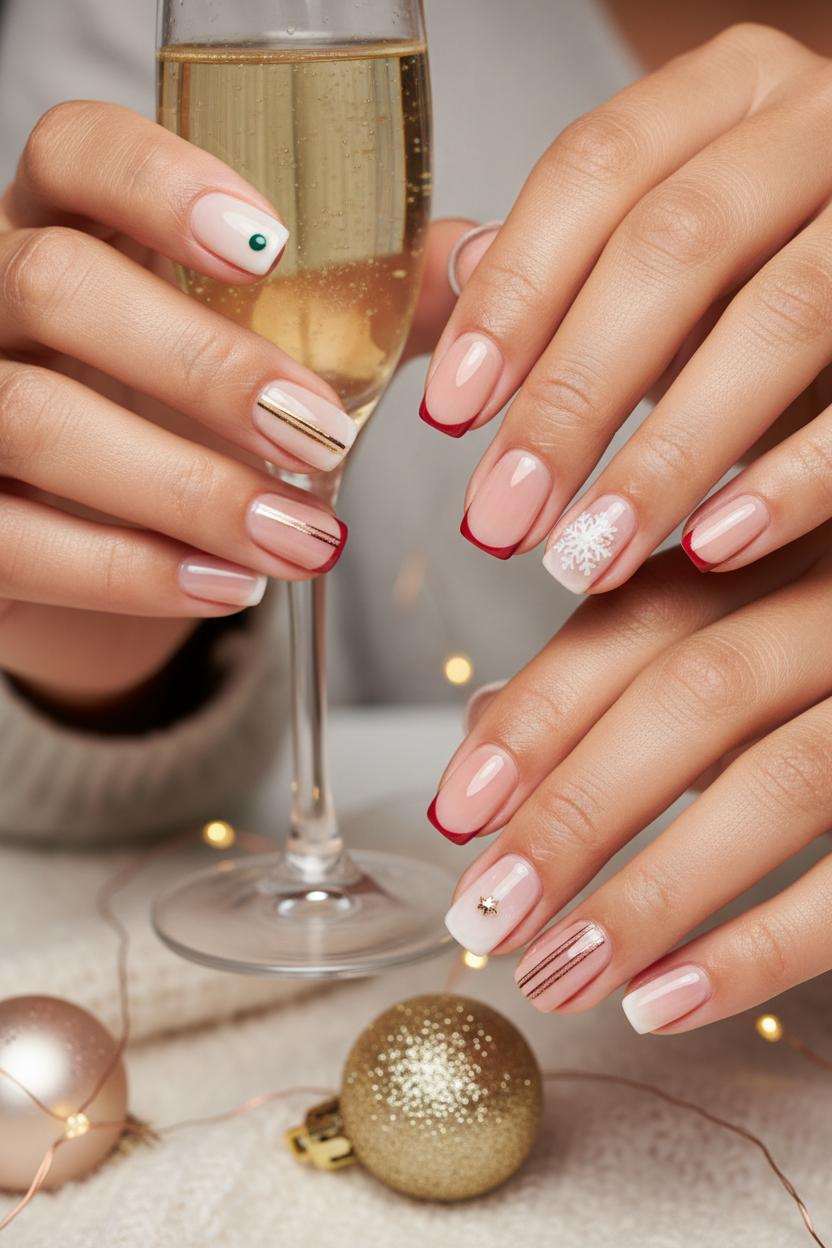
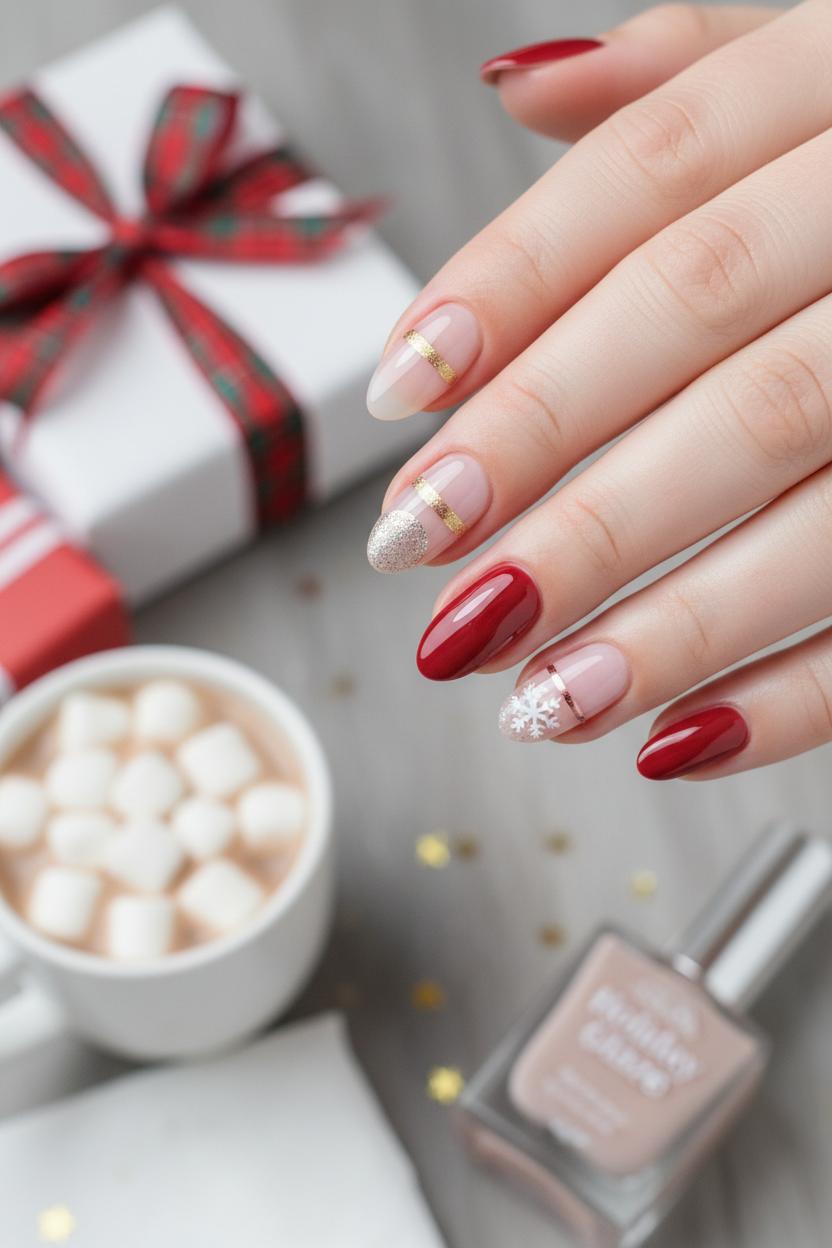
Craving festive but fuss-free? These simple christmas nails deliver chic, polished vibes without the clutter. Think minimalist holiday nails you can DIY in minutes: soft nude holiday nails with a single sparkle, crisp short christmas nails with a tiny stripe, or a barely-there snowflake accent. Try nude nail polish as your base, add a gel nail polish red micro-French, or line with nail art striping tape. Pop on delicate snowflake nail stickers, then seal with a quick dry top coat. Ready for an easy christmas manicure that looks timeless and totally pin-worthy?

When the season gets loud with glitter and to-do lists, simple christmas nails feel like a deep breath. Minimalist holiday nails don’t compete with your outfit or your schedule; they quietly elevate both. Think of a soft, creamy base of nude nail polish kissed with a single red accent—one dot at the cuticle, a thin micro-French, or a tiny heart tucked at the side. It’s polished without trying, and it works beautifully on short christmas nails where every millimeter matters. A whisper of gel nail polish red reads festive in any light, while nude holiday nails make hands look clean and expensive, the way a perfect white tee makes denim feel designer. Even better, minimal designs grow out gracefully and chip less noticeably, which is basically holiday magic when you’re wrapping gifts and clinking glasses back-to-back.
The best part: a truly easy christmas manicure is wonderfully DIY-friendly. Start with two sheer coats of nude nail polish, then add a skinny metallic line using nail art striping tape or place a single snowflake on an accent finger with snowflake nail stickers. If you want just a hint of classic cheer, dot the center of each nail with gel nail polish red or paint a micro-French tip in crimson only on the thumbs. Seal everything with a glossy quick dry top coat and you’re out the door before the cookies cool. Minimalism also means maximum versatility—your nails will glide from cozy knit errands to candlelit dinners without a second thought. Consider them the capsule wardrobe of December: refined, effortless, and quietly festive. That’s why simple christmas nails win the holidays—because they let you shine, not just your manicure.
Think of minimalist holiday nails as the pared-back palette of the season: soft whites, creamy ivories, cozy taupes, and sheer blushes that whisper winter rather than shout it. Start with nude holiday nails that flatter your skin tone—cool pinky-beige if you run rosy, golden almond if you’re warm, a neutral latte if you’re somewhere in between—and choose a finish that feels elevated, like glossy glass or a soft satin sheen. Keep shapes clean and short; short christmas nails in a rounded or squoval silhouette look modern and make every tiny detail feel intentional. Negative space is your best friend here, so let the natural nail peek through at the cuticle or as a slim stripe to add airiness without adding “more.”
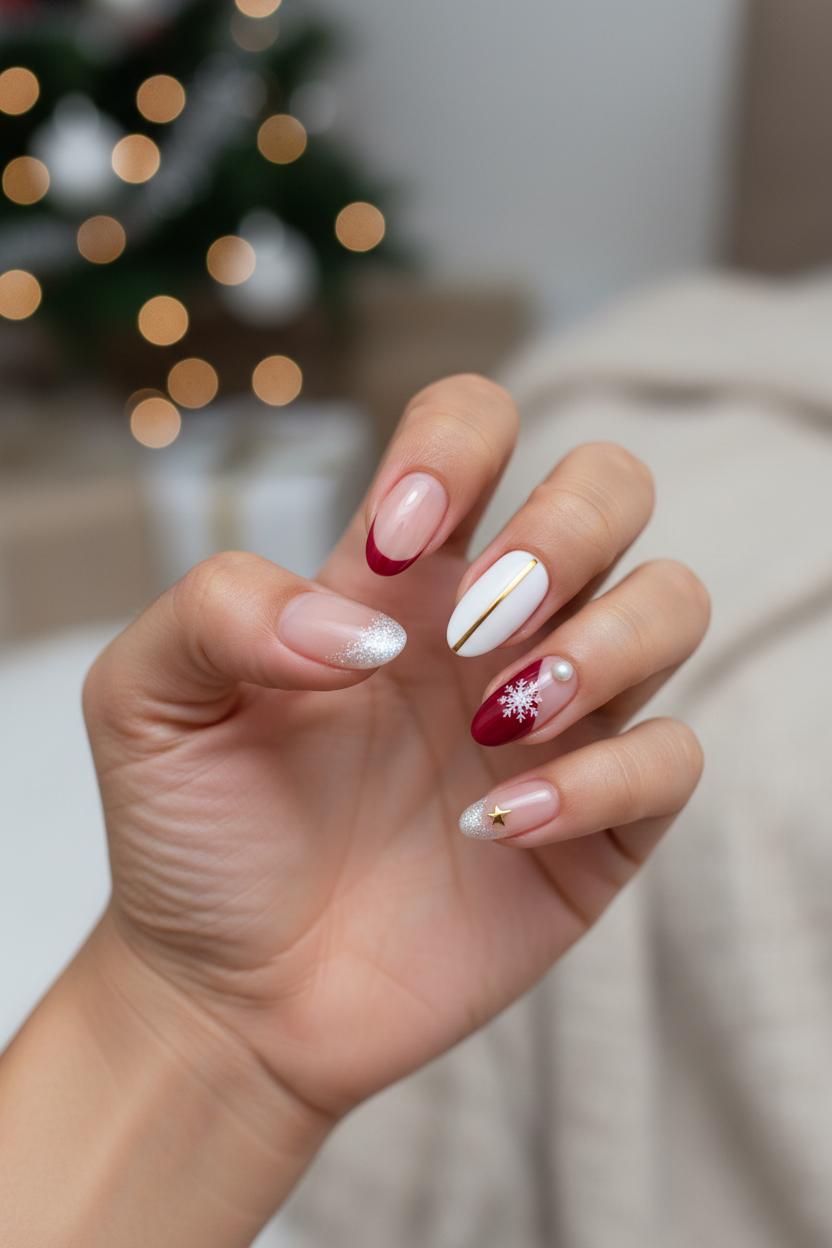
For color, let a single accent shade carry the festive mood. A micro-French in gel nail polish red over a sheer nude is the chicest nod to ribbons and berries—crisp, slim, and so wearable. If you’re craving green, pair a transparent milky base with a tiny evergreen dot at the tip of each nail, or a lone vertical pinstripe using nail art striping tape in gold for a quiet sparkle. Love snow motifs but hate fuss? One tiny decal on a single nail—snowflake nail stickers nestled over a milky “snow-globe” base—turns simple christmas nails into something storybook without clutter. Think in pairs: nude + cherry red, milk + champagne, cocoa + rose gold; let neutrals dominate and color play the supporting role so the look reads like polished winter minimalism.
The aesthetic basics are as much about restraint as they are about shine. Aim for an 80/20 rule—eighty percent neutral, twenty percent festive—and limit yourself to one motif per hand to keep an easy christmas manicure effortlessly cohesive. Prep is everything: smooth cuticles, an even layer of nude nail polish, then your single statement—micro-French, skinny stripe, or one delicate sticker. Seal with a high-gloss quick dry top coat to blur edges and add that glassy, gift-wrap-fresh finish. The result is polished yet comfortable, the kind of simple christmas nails that move from office to ornament-trimming to clinking glasses, carrying the season’s sparkle in a soft, refined whisper.

If your calendar is stuffed and your hands are full, try an easy christmas manicure you can swipe on between errands. Start with the classics: one coat of gel nail polish red followed by a quick dry top coat looks intentionally glossy and festive, no art skills required. For a softer spin, go for nude holiday nails—two thin layers of your favorite nude nail polish, then add a single gold dot at each cuticle using a bobby pin. It reads delicate and wintery, especially with a shiny finish. Prefer sheer and chic? Do a milky base and top just the ring finger with fine glitter for that twinkle-light effect. These simple christmas nails feel pulled-together with zero fuss.
When time is tight and nails are short, think clever accents. For short christmas nails, try a skinny negative-space stripe: lay down nail art striping tape near the tip, paint a thin line of red or champagne above it, peel, and seal—crisp, minimal, done. Or do a micro French by tipping only the very edge in ruby; the sliver of color keeps it elegant and quick. Feeling playful? A candy-cane diagonal on one nail (use striping tape and the same gel red) becomes a tiny statement next to otherwise minimalist holiday nails. If you love snow motifs but not hand-painting, place one or two snowflake nail stickers on a neutral base and instantly get that “first snowfall” vibe.
Lean into ten-minute layering tricks that look considered. Try a tonal “latte” skittle—five cozy neutrals from beige to cocoa across each hand—then anchor everything with a single red accent nail. Dot on a few tiny white “snow” specks over nude nail polish for a soft flurry and top with a quick dry top coat to lock it in before you’re out the door. A half-moon in champagne at the cuticle (trace with striping tape, paint, peel) feels vintage but simple. Whatever you choose, keep the coats thin, stick to one or two details per hand, and finish glossy; your easy christmas manicure will look polished, modern, and totally week-proof.
Short nails are having a moment, and holiday polish looks especially chic on a neat, cropped manicure. If you’re craving simple christmas nails that still feel special, start with a sheer base and let tiny details do the talking. A micro-French is the easiest way to make short christmas nails look intentional: sweep the thinnest whisper of gel nail polish red across the tips of a nude nail polish base and you’ve got instant polish with a festive wink. Keep the curve delicate and glossy so the overall effect reads like minimalist holiday nails—clean, modern, and quietly celebratory.
Love nude holiday nails? Try a milky wash with a single metallic accent: lay down one skinny gold line with nail art striping tape off-center on just one or two nails. Or dot a tiny cherry-red or white bead near the cuticle for a snow-kissed look that’s office-appropriate and party-ready. Negative space is your friend here—paint a diagonal corner in red or champagne and leave the rest bare for an easy christmas manicure that feels graphic yet soft. If you want a little whimsy without clutter, place one delicate snowflake nail sticker on a ring finger and seal it with a glossy quick dry top coat so it looks embedded and refined rather than sticker-like.
Prefer a pop of color? A full set in a classic cranberry or blue-toned gel red feels luxe on short nails, especially when you add a single micro-accent: a razor-thin gold stripe at the sidewall, a tiny star at the base, or one frosted tip on the thumb. Keep edges crisp and cuticles hydrated so the silhouette stays sleek, and finish everything with a quick dry top coat for that high-gloss, glassy seal and speedy out-the-door dry time. The beauty of these looks is how effortless they are to DIY—small touches, big holiday payoff, and zero fuss, proving that short christmas nails can be just as festive and modern as any elaborate set.
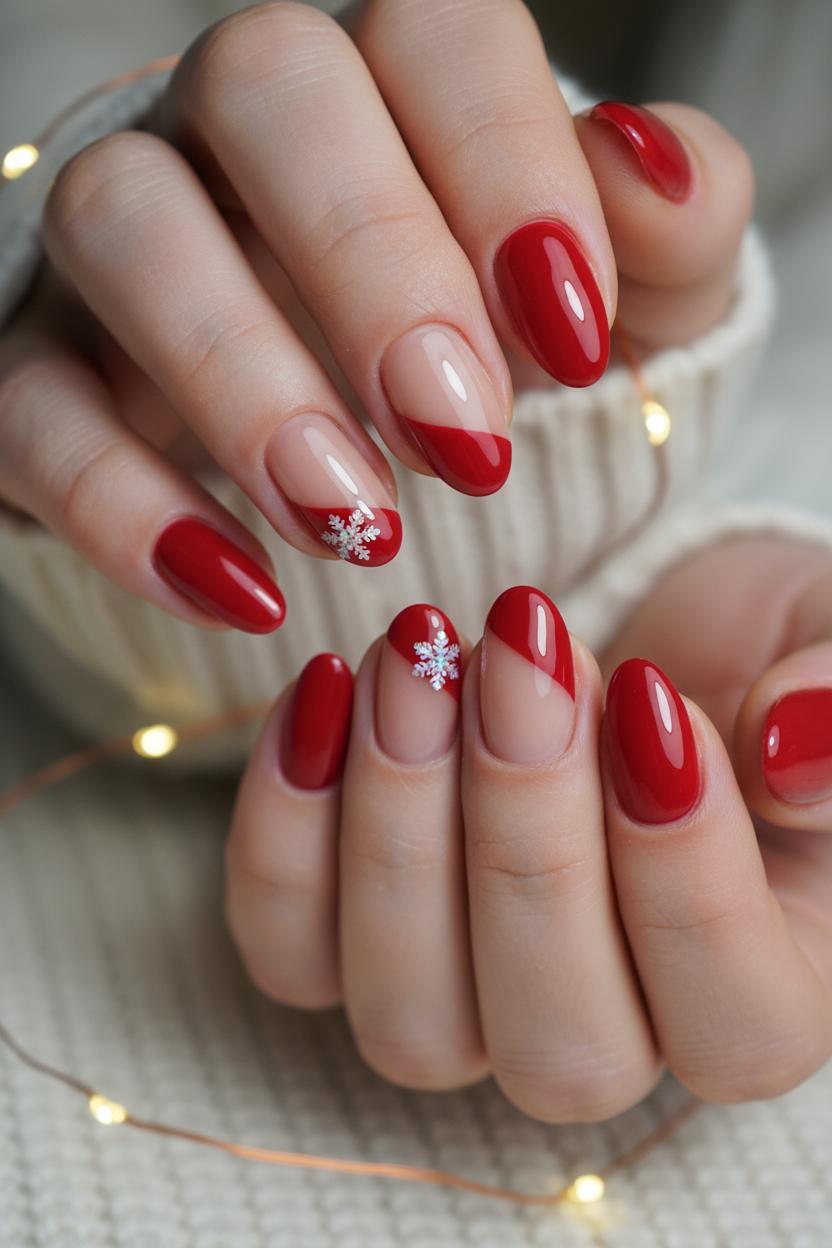
There’s something so festive about a crisp pop of gel nail polish red framed by a whisper of bare nail. It feels like ribbon on a gift—simple, classic, and totally chic. This look is a dream for minimalist holiday nails because the negative space keeps things airy while the red adds that merry little wink. If you’re after simple christmas nails that still feel polished for every event on your calendar, try a single, saturated coat of a true cherry or cranberry red and let the natural nail peek through. You can leave the negative space bare or brush on the sheerest veil of nude nail polish for a softer, nude holiday nails moment—either way, it reads elegant and effortless.
Here’s how I like to build it for an easy christmas manicure. Start with clean, shaped nails and a thin base. Map out your negative space using nail art striping tape—think a slim diagonal band across the tip, a curved side arc, or a half-moon at the cuticle. Paint one even coat of gel nail polish red on the exposed area, then cure. Gently remove the tape for those razor-sharp lines, and if you want a little sparkle, add the tiniest cluster of snowflake nail stickers in the corner of one accent nail. Seal everything with a glossy gel top coat; if you’re working with regular polish instead, a quick dry top coat will give you that glassy finish in minutes. This design is especially flattering on short christmas nails, because the negative space tricks the eye and elongates the nail bed, making the red pop even more.
What I love most is how wearable it is. By day, the negative space keeps it light and modern; by night, the red flashes like a bow under fairy lights. If you crave variety, swap the accent shape: a slim vertical stripe down the side for a runway feel, a delicate crescent for something softer, or alternate nails with a tiny red corner—still minimal, still festive. And if you ever need to dial it down, replace the red with a cozy, blushy nude nail polish and keep the same layout; you’ll have the subtlest nude holiday nails that pair with chunky sweaters, satin dresses, and everything in between.

When the world outside is sparkling with frost and twinkle lights, nothing feels chicer than a whisper-soft neutral on your fingertips. Nude holiday nails are the candlelight of manicure shades—soft, flattering, and unfailingly elegant. The secret to that winter glow is choosing a nude nail polish that echoes your skin’s undertone rather than matches it exactly. If you’re cool-toned, think ballet pinks and rosy beiges; warm undertones sing with peachy nudes and honeyed taupes; neutral undertones can glide between milky creams and cashmere beiges. Sheer formulas give that barely-there tint that makes hands look plush and moisturized, while an opaque, satin-cream nude brings instant polish with zero effort. Either way, neutrals are the easiest route to simple christmas nails that feel modern and cozy, especially on short christmas nails where clean edges and soft color look extra refined.
Keep the application airy and light for the most wearable finish. A smoothing base coat and a gentle buff set the stage, then float on two thin coats, letting the undertone do the heavy lifting. Seal with a glossy quick dry top coat to dial up that glassy, just-moisturized shine. If you want a hint of festive magic without breaking the minimalist spell, add a delicate metallic line with nail art striping tape at the tip for a micro-French, or place a single snowflake nail stickers accent on one nail—tiny, twinkly, and done. Craving a touch of tradition? Pair your nude with the slimmest whisper of gel nail polish red as a side stripe or dot near the cuticle. It’s the subtlest nod to the season that still reads as minimalist holiday nails.
Choosing the right nude is also the smartest shortcut to an easy christmas manicure that looks intentional with zero stress. Fair skin glows with milky blush; olive tones love beige with a pinch of peach; deeper complexions look luminous in caramel, cocoa, and espresso-tinted sheers. Layering a sheer over an opaque base can create that “lit from within” effect, like cashmere for your nails. And because nude nail polish is the manicure equivalent of a capsule wardrobe, it pairs with cable knits, sequins, and everything in between—proof that simple christmas nails can feel quietly luxurious all season long.

If you love the look of perfectly clean edges but don’t have the patience for freehand art, nail art striping tape is your secret holiday superpower. Think of it as a chic stencil in sticker form: lay, paint, peel, and suddenly your nails look salon-precise with almost no effort. Start with a soft base—nude nail polish or a sheer milky pink gives that cozy, nude holiday nails vibe—and then add one or two ultra-thin metallic lines for a whisper of sparkle. It’s the simplest way to get simple christmas nails that still feel special, especially if you’re keeping things office-friendly or planning a last-minute party look. Bonus: the ultra-slim lines make short christmas nails look longer and more sculpted.
Here’s the easy christmas manicure formula: paint your base and let it fully dry, then place nail art striping tape wherever you want your crisp line—vertical for elongation, diagonal for a modern wrap, or a single micro-French tip that’s festive without shouting. Brush a swipe of gel nail polish red across the tape edge for instant candy-cane energy, or keep it monochrome with charcoal, forest green, or champagne. Peel the tape while the color is still wet to reveal a razor-sharp stripe, and if you want a tiny accent, press on a single snowflake nail sticker off-center so it feels intentional and minimalist. Because the tape does the precision work for you, this trick is ideal for minimalist holiday nails that look designed, not DIY.
Seal everything with a glossy quick dry top coat so the lines melt smoothly into the surface and your shine lasts through cookie-baking and gift-wrapping. A few combos to try: milky nude with a single chrome gold stripe on each nail; blush nude holiday nails with one deep oxblood line; a negative-space tip outlined by silver tape over a sheer base; or one accent nail with a double red stripe and the rest kept bare and glossy. You can even make it moodier with a matte top coat and keep one glossy stripe for contrast. However you mix it, striping tape turns minimal ideas into polished, simple christmas nails in minutes—no fuss, all impact.
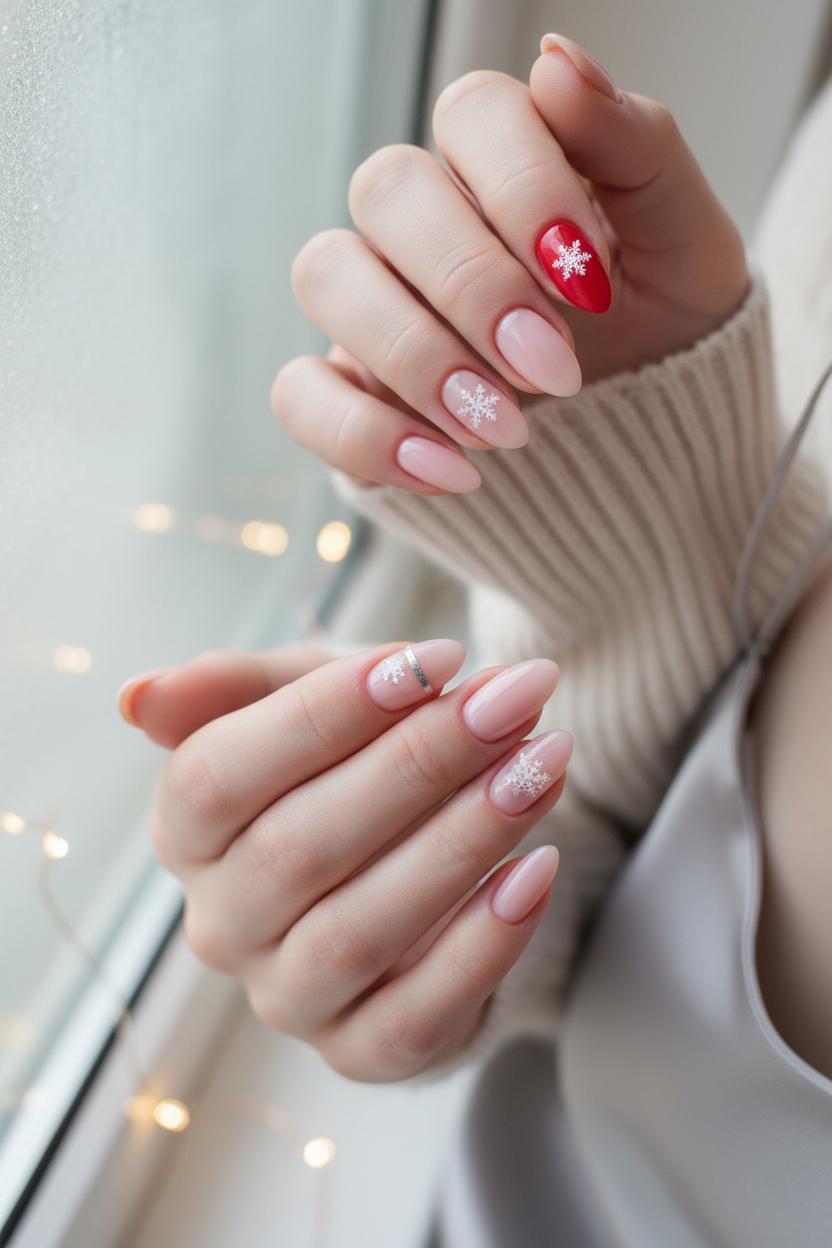
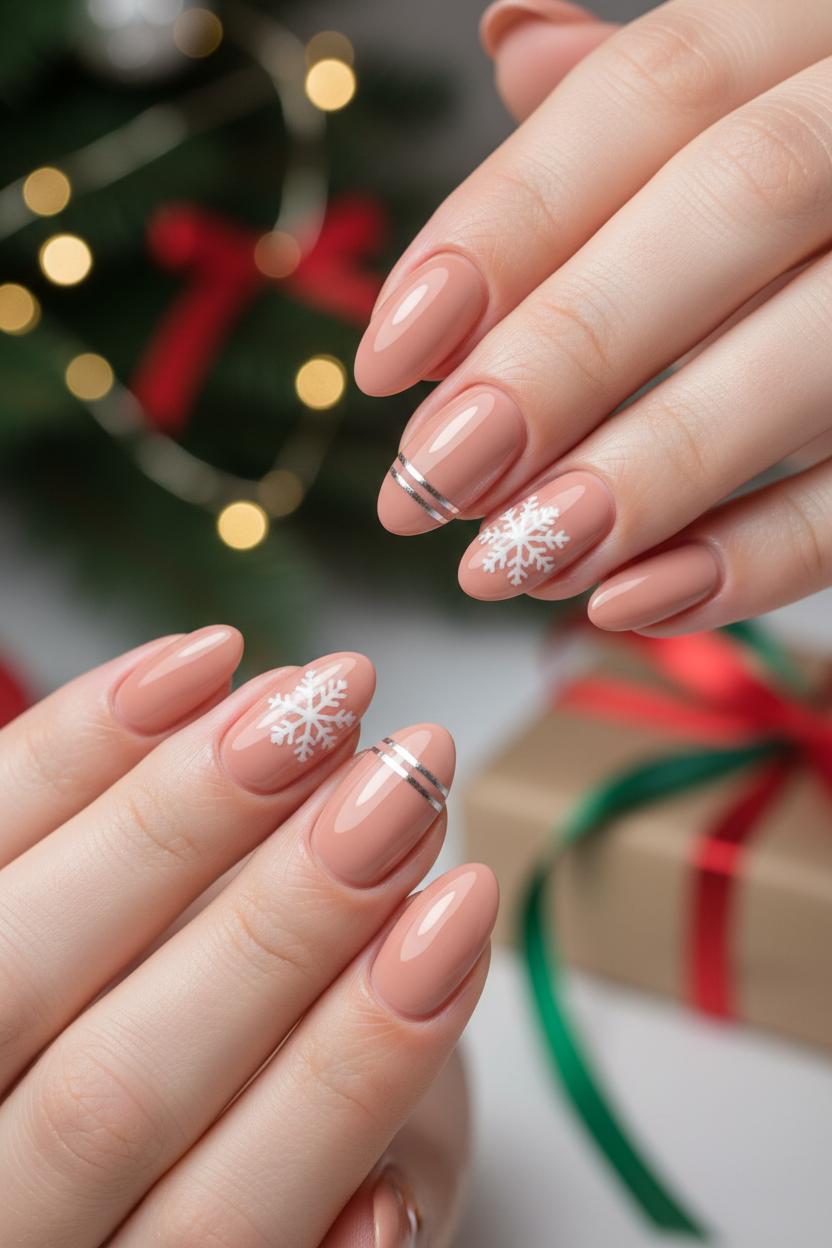
When you want that whisper-of-winter look without committing to a full-on nail art session, snowflake nail stickers are the easiest way to add a touch of magic to simple christmas nails. Think: a sheer wash of nude nail polish, one teeny snowflake floating near the cuticle, and plenty of negative space so your nails still feel clean and wearable for every holiday plan on your calendar. For nude holiday nails, try a soft beige or milky pink base and place one small sticker off-center on each ring finger; the asymmetry keeps it modern and makes even short christmas nails feel intentional and chic. If you’re craving a hint of color, anchor the look with a single accent nail in gel nail polish red and keep the rest whisper-light—one snowflake per hand is enough for minimalist holiday nails that still read festive.
Application is blissfully low-effort, which is why this is my favorite easy christmas manicure. Paint your base and let it dry completely, then gently peel and place the snowflake nail stickers with tweezers. If you want that crisp, runway-level precision, add a hairline metallic stripe at the tip or sidewall using nail art striping tape first, and then tuck a tiny snowflake just above it—like snowfall skimming a city skyline. Scale matters here: choose the smallest stickers for petite nails so the design feels delicate, not busy, and leave at least a sliver of bare nail around each flake so the details don’t blur together. For a frosted veil effect, layer a sheer, milky topper over the sticker before sealing everything with a glossy quick dry top coat; it softens the edges the way real snow diffuses light. Prefer an ultra-crisp, glossy pop? Top coat directly after placing the sticker to keep every little arm and point gleaming. The result is polished, cozy, and incredibly versatile—pretty with a cashmere sweater, sleek with a satin slip dress, and perfectly aligned with the spirit of simple christmas nails you can actually pull off between holiday errands.
A flawless finish is the secret to making simple christmas nails look intentional instead of unfinished, and that’s where a truly great quick dry top coat earns its place on your vanity. Think of it as the glossy cardigan that pulls your whole outfit together: it smooths out tiny brushstrokes, locks in color, and gives that just-went-to-the-salon shine in minutes. For minimalist holiday nails—whether you’re doing a single shimmer stripe, a negative-space crescent, or a whisper of sparkle over nude holiday nails—you want a formula that self-levels, resists dents, and doesn’t dull your delicate details. I love a top coat that “floats” over designs instead of dragging them; this makes an easy christmas manicure feel chic and smudge-free, even on busy days of wrapping presents and hot cocoa runs. It’s especially flattering on short christmas nails, where a glassy seal makes clean lines and soft shades pop without extra fuss.
Application matters as much as the bottle. Lay down your base (try a sheer nude nail polish or a single accent of gel nail polish red for that understated berry moment), let it settle for a minute, then glide on your quick dry top coat with light, even strokes—think featherweight pressure so you’re not disturbing the color. Cap the free edge to help prevent chips, and let it sit still while it becomes touch-dry; the best formulas are quick to the touch but continue curing to full strength as you move on with your day. If you’ve added slim metallic lines with nail art striping tape or tucked a tiny sparkle onto a corner with snowflake nail stickers, seal them in with one generous, floating layer, and, for extra staying power, a second thin coat after everything sets. The result is that glossy, crystal-clear shield that makes minimalist holiday nails look expensive with almost no effort—and it works just as beautifully over nude holiday nails as it does over a single gel nail polish red accent. Keep the bottle handy for a midweek refresh, and your easy christmas manicure will carry you from cookie swaps to New Year’s toasts without a smudge in sight.
The secret to making an easy christmas manicure look fresh from tree-trimming to New Year’s toast is all in the prep and the seal. Start with super clean nails: shape, gently buff, and push back cuticles, then swipe with alcohol to remove oils so polish grips. A thin base coat is your insurance policy, especially if you’re choosing gel nail polish red for that classic pop or a soft nude nail polish for chic nude holiday nails that camouflage wear. Apply color in thin, even layers and “wrap” the free edge to prevent tip wear. If you live for minimalist holiday nails, consider short christmas nails; they’re less likely to snag while you’re baking cookies, wrapping presents, and hauling decor, and they look impossibly polished with simple christmas nails designs.
If you’re using gel, cure each coat fully—don’t rush the lamp time. With regular polish, patience pays: allow a couple minutes between coats so everything sets smooth. Finish with a glossy quick dry top coat, floating it over the nail and sealing the edge. Midweek, add another whisper-thin layer of top coat to refresh shine and lock out chips. At night, massage cuticle oil around the nail to keep polish flexible and prevent cracks, and slip on gloves for dishes or deep-cleaning so hot water and detergents don’t dull your shine. Keep a mini file in your bag to smooth any tiny snags before they turn into chips; a quick buff and re-seal at the tips can stretch your mani through the full holiday lineup.
Love a tiny touch of sparkle? Place nail art striping tape or snowflake nail stickers on completely dry polish (or cured gel) and press edges firmly; then sandwich them under one to two coats of top coat so they don’t lift. A single taped stripe or one delicate snowflake over a nude holiday base is the definition of simple christmas nails—quietly festive and endlessly wearable. If a chip happens, a soft swipe of matching nude nail polish at the tip hides it instantly, or swap one accent nail to gel nail polish red for a spirited refresh. With these gentle habits and smart layering, your minimalist holiday nails will stay glossy, chic, and party-ready long after the last ribbon is tied.
Consider this your gentle nudge to keep holiday beauty calm and chic. From simple christmas nails to minimalist holiday nails, a few clean lines, soft shimmer, and cozy neutrals go a long way. Try an easy christmas manicure with negative space, dainty stars, or a single accent—perfect for short christmas nails and nude holiday nails alike. Keep your palette soft, your shapes tidy, and your schedule free for cocoa and twinkle lights. Pin your favorites, save the inspo, and let your fingertips whisper festive, not shout it.