Physical Address
304 North Cardinal St.
Dorchester Center, MA 02124
Physical Address
304 North Cardinal St.
Dorchester Center, MA 02124
Ready to turn a curbside castoff into a statement piece? In this DIY Thrifted Dresser Makeover, I’ll walk you through a budget-friendly furniture makeover—perfect for beginners in DIY furniture or seasoned thrift flip lovers. We’ll transform a drab dresser with bonding primer, chalk paint or matte furniture paint, a trusty sanding block, and a smooth-rolling foam roller, then finish with gleaming brass drawer pulls for instant chic. Follow along for step-by-step tips, mistakes to avoid, and the exact products I used to nail this dresser makeover without breaking the bank.
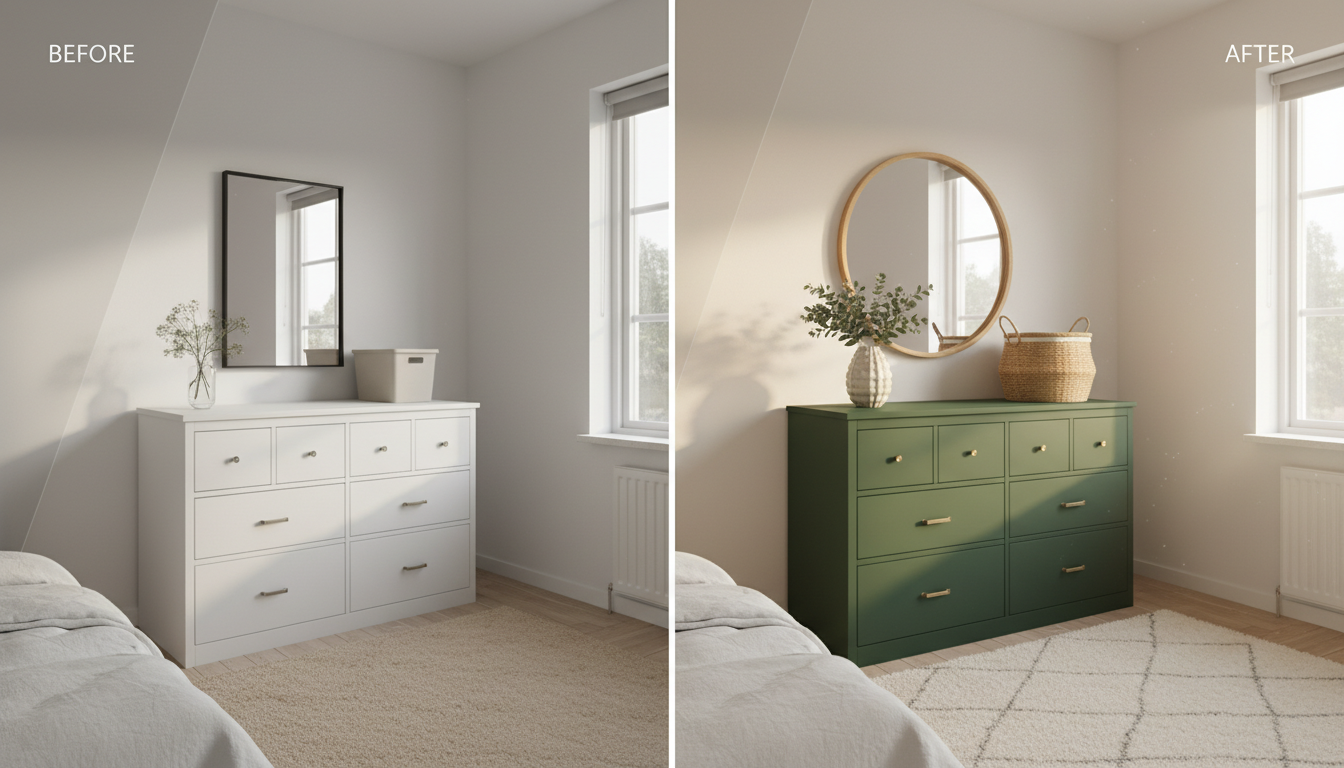
When I first spotted this dresser tucked in a dusty corner of the thrift store, it was the definition of drab: orangey varnish gone blotchy, dinged-up corners, and wobbly, squeaky hardware that had seen better decades. But the bones? Solid wood, dovetail drawers, and a silhouette with great lines just begging for a glow-up. That’s my favorite kind of thrift flip—structurally sound with surface-level drama—aka the perfect candidate for a weekend furniture makeover that doesn’t require a workshop full of tools. I could already picture it styled under a round mirror with a vase of branches, the kind of piece that quietly anchors a room and makes people ask, “Where did you find that?”
For the vision, I’m going full drab-to-chic with a soft, matte finish that lets the shape do the talking. I’m torn between a warm greige and a moody charcoal, but either way we’ll skip the shine and embrace texture with chalk paint or a high-quality matte furniture paint. The plan is to pair that velvety color with understated brass drawer pulls for a modern-classic moment—something that reads collected, not cookie-cutter. Before any paint touches wood, I’ll give the whole piece a deep clean and a quick scuff with a sanding block to knock back the old sheen. Because vintage finishes can be unpredictable, a bonding primer is non-negotiable here; it’ll help the paint grip and guard against tannin bleed-through. For application, I love a small foam roller on the big, flat drawer fronts to keep things smooth, then an angled brush in the curves and corners. Two thin coats should do it, with a light sand in between if needed.
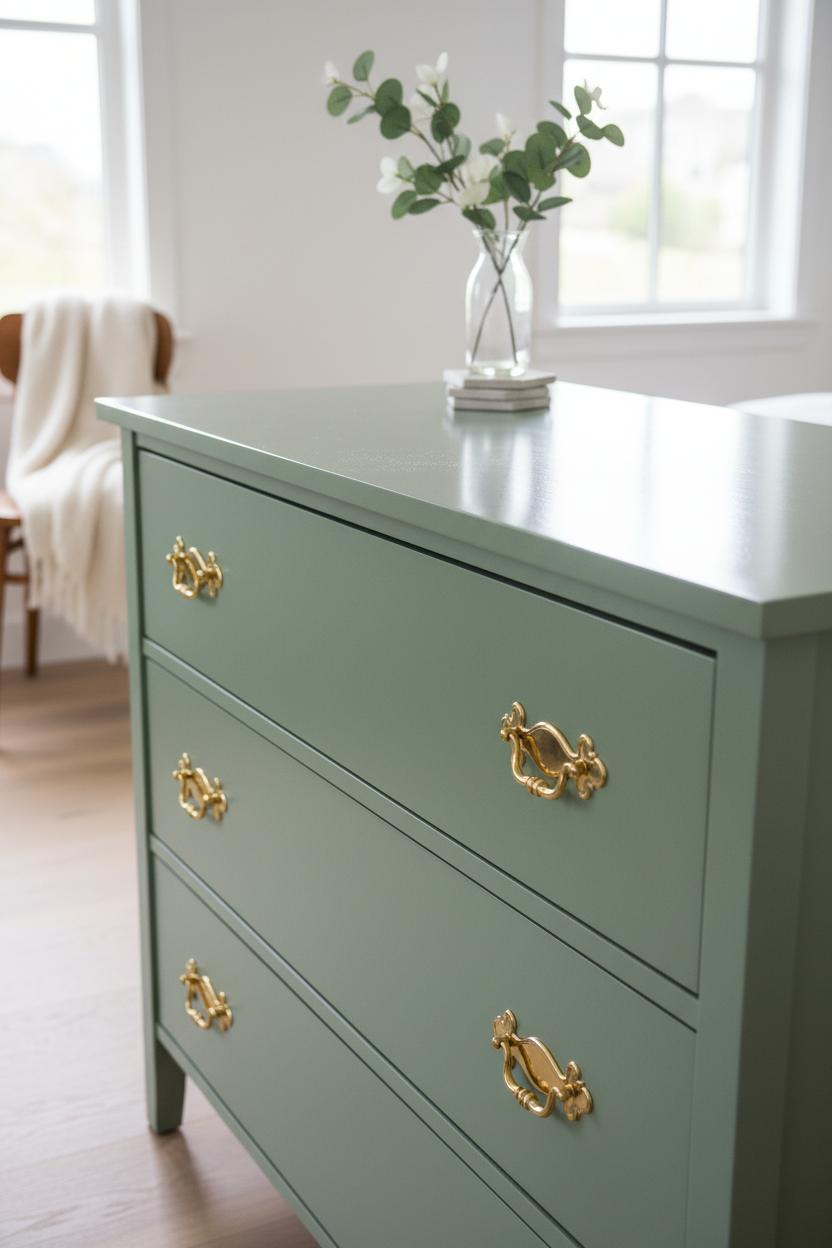
I’ll remove the dated hardware, fill the extra holes if the new pulls need different spacing, and pre-drill for those pretty brass drawer pulls. Any chips or dings will get a swipe of wood filler and a final sand so the finish looks intentional, not “DIY.” I’m also planning to line the drawers and give the interiors a fresh wipe-down so the inside feels as special as the outside. It’s a simple dresser makeover roadmap—clean, prime, paint, polish—that turns a tired piece of DIY furniture into a custom-feeling staple you’ll love for years.
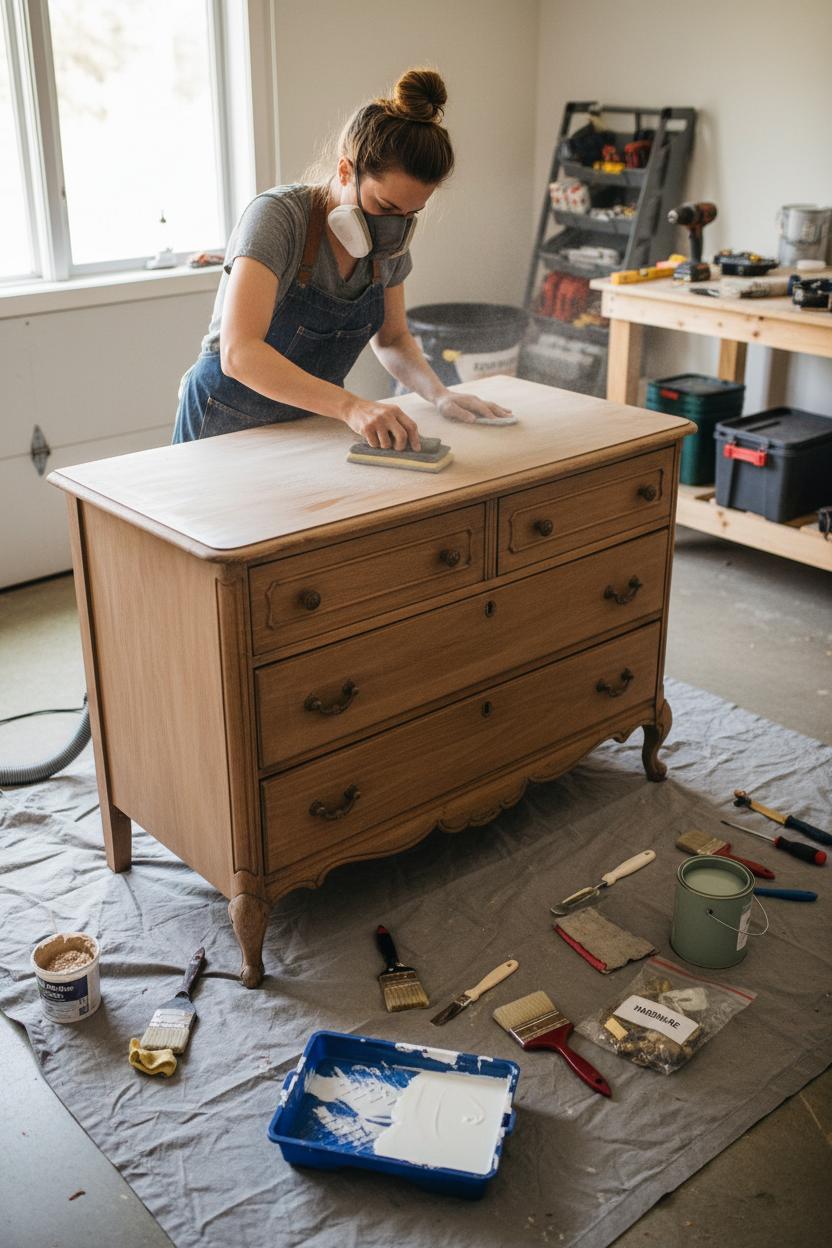
Before you dive into the magic of a dresser makeover, gather a few tried-and-true essentials so your thrift flip feels smooth from start to finish. Start with cleaning supplies: a gentle degreaser, a rag, and a small brush to get into corners. A screwdriver set is key for removing old hardware—tuck screws into a labeled bag so nothing wanders off. Lay down a drop cloth and slip on a dust mask, then reach for a sanding block in medium and fine grits to scuff the surface. This quick pass is the secret to any great furniture makeover, helping paint grip and knocking back old sheen. If you’re dealing with a slick laminate or glossy varnish, a bonding primer is your best friend—it creates a grippy base that keeps your hard work from chipping later. Fill dings with wood filler, smooth with your sanding block once dry, and swipe everything clean with a tack cloth.
When it comes to color, choose your paint personality. If you love a soft, velvety finish that sands beautifully for light distressing, chalk paint is a classic. If you prefer a modern, wipeable look, a matte furniture paint delivers a rich, low-sheen vibe perfect for DIY furniture. Pour your paint into a tray and roll on broad, even coats with a foam roller for those big, flat drawer fronts; then switch to a quality angled brush for rails, edges, and details. Work in thin layers and let each coat dry fully—patience here means fewer drips and a smoother result. Painter’s tape helps keep lines crisp, and a small detail brush is great for tight spots.
Don’t forget the jewelry. Swapping dated knobs for chic brass drawer pulls instantly elevates a thrifted piece and ties your whole dresser makeover together. Keep a measuring tape, level, and drill nearby so new hardware sits perfectly straight; a hardware template is handy for drilling fresh holes with confidence. Seal your paint with clear wax for a soft, hand-rubbed glow or a water-based polyurethane for extra durability, then add felt pads under the feet to protect floors. With these tools in your toolkit, your DIY furniture thrift flip will go from drab to chic in the most satisfying, weekend-friendly way.
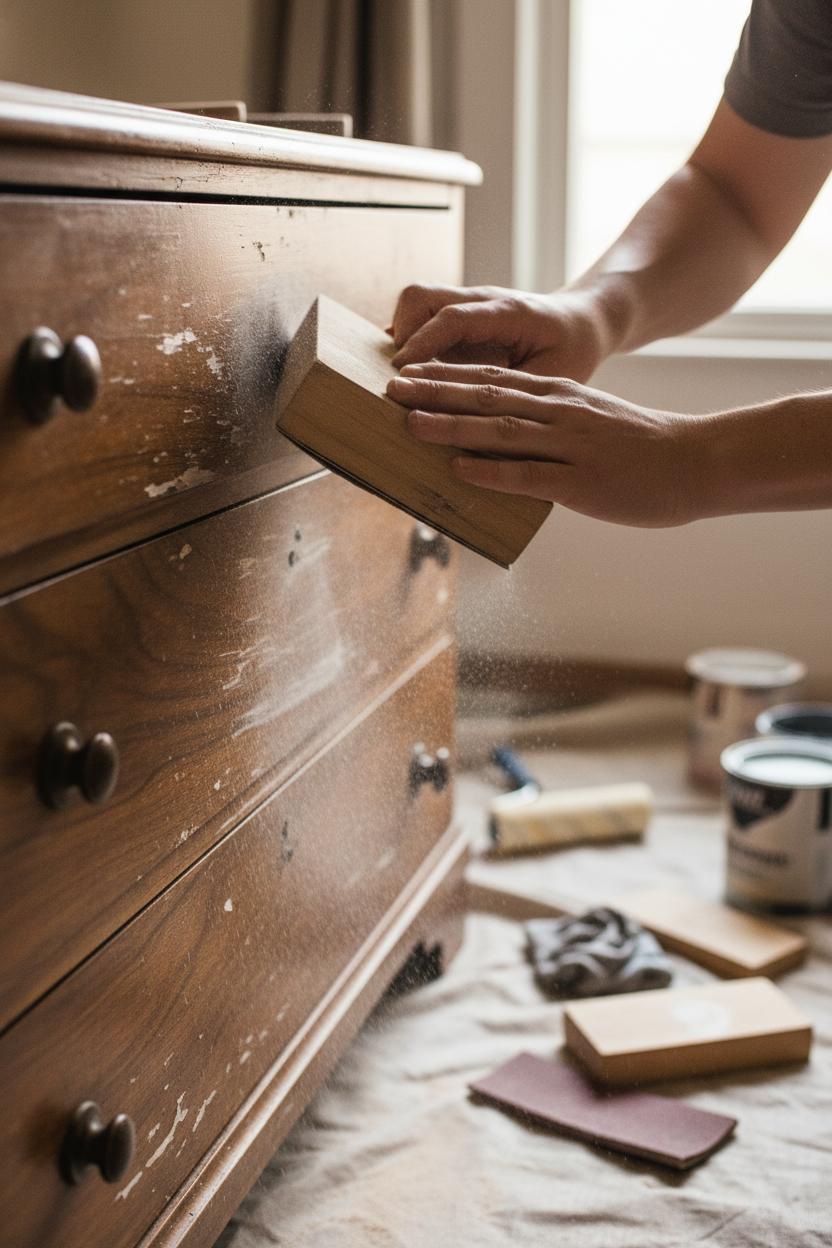
Before you pop open the chalk paint, a little smart sanding sets the stage for a dreamy dresser makeover. Think of your sanding block as a gentle editor, not a demolition crew. Start by giving the whole piece a quick scuff sand to break the gloss—120–150 grit is perfect for most thrift flip finds. Work with the grain, using light, even pressure; you’re creating tiny tooth for paint or bonding primer to cling to, not trying to strip to bare wood. If your dresser has shiny factory lacquer, a coat of bonding primer after that scuff will save you from heavy sanding and help even matte furniture paint stick like a champ. Watch for trouble spots: water rings on the top, chipping edges, or areas where you’ve used wood filler. Those get a few extra passes with the sanding block until they’re flush. If you’re dealing with veneer, be especially gentle—you’re sanding a paper-thin layer, so keep it light and skip coarse grits. For curvy details and beveled drawer fronts, a flexible sanding sponge hugs the shape without gouging.
Once the surface feels consistently velvety, move to 220 grit for a quick once-over that makes paint glide. Dust is the enemy of a smooth finish, so vacuum the crevices, then wipe with a damp cloth or tack cloth. Between paint coats, a whisper-light pass with 320 grit knocks down nibs and brush marks—your foam roller or favorite brush will lay down a silkier second coat because of it. If you’re aiming for a softly aged DIY furniture vibe, save a little extra sanding for last: after the final coat has cured, feather the edges and high points with your sanding block to reveal a hint of wood beneath the chalk paint. Clean again, seal if your product recommends it, and then the fun part—dress it up with fresh brass drawer pulls to finish the furniture makeover glow-up. Smart, minimal sanding doesn’t just make your paint job last; it transforms a tired thrifted piece into a crisp, custom dresser makeover that looks like it was always meant to shine.
You picked the perfect color, the brush strokes have dried, and now it’s time for the secret sauce that makes a dresser makeover last: the topcoat. Think of sealing as the seatbelt for your furniture makeover—quiet, essential, and the reason your thrift flip still looks fresh months from now. For pieces painted in chalk paint or matte furniture paint, a water-based polycrylic is usually the MVP, especially on whites and pastels where oil-based products can yellow. If you’re after that velvety, old-world vibe, clear wax can be lovely over chalk paint, but keep it for low-traffic zones and be prepared to re-wax over time. On dark colors or stained tops, an oil-based polyurethane lends a deep, rich glow and tougher protection. Sheen-wise, matte keeps things soft and modern, satin adds a gentle, wipeable glow, and semi-gloss dials up the light bounce for a more polished look. I love a satin on dresser tops—practical but still chic.
Prep is half the finish. After your color coat dries, lightly scuff with a fine sanding block (320–400 grit) to knock down nibs, then vacuum and wipe away dust. Decant your topcoat into a clean container, and if it’s thick, add a splash of water (about 5–10%) so it levels like a dream. A foam roller makes quick work of large, flat surfaces, while a good synthetic brush can chase into edges and details—work in long, even passes, keeping a wet edge to avoid lap lines. Watch the drips along drawer fronts and the bottom apron; they love to sneak up on you. Let each coat dry fully, then lightly sand again before the next. Two to three coats on the top and one to two on drawers and sides is my sweet spot. Give it 24 hours before gentle handling and a full week before heavy styling; many finishes need up to 30 days to fully cure, so coasters and patience are your friends.
The best part? Reinstall those gleaming brass drawer pulls and step back. If your DIY furniture adventure started with slick laminate, a bonding primer underneath your paint deserves a little nod here—it helped everything stick so your sealant can shine. That final, whisper-thin layer of protection ties the whole thrift flip together, turning a simple dresser makeover into a polished piece that’s ready for everyday life.
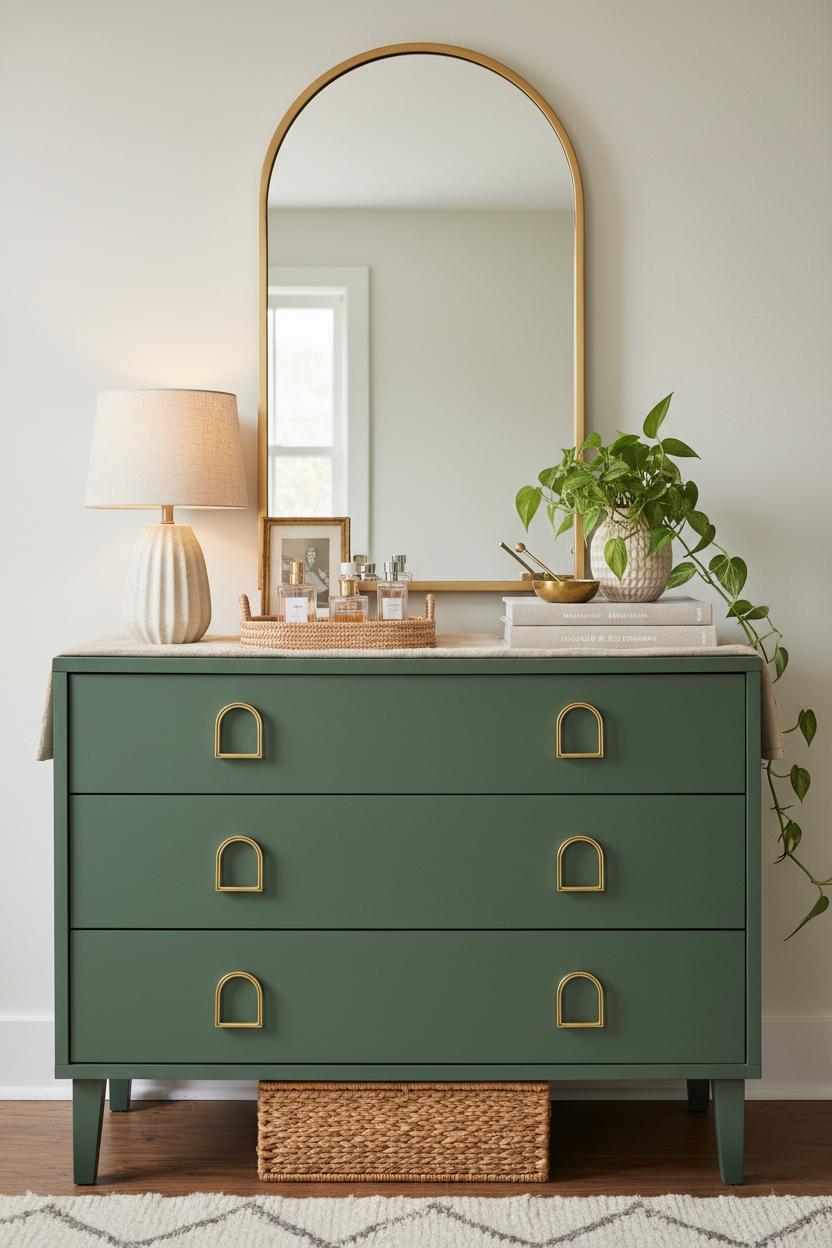
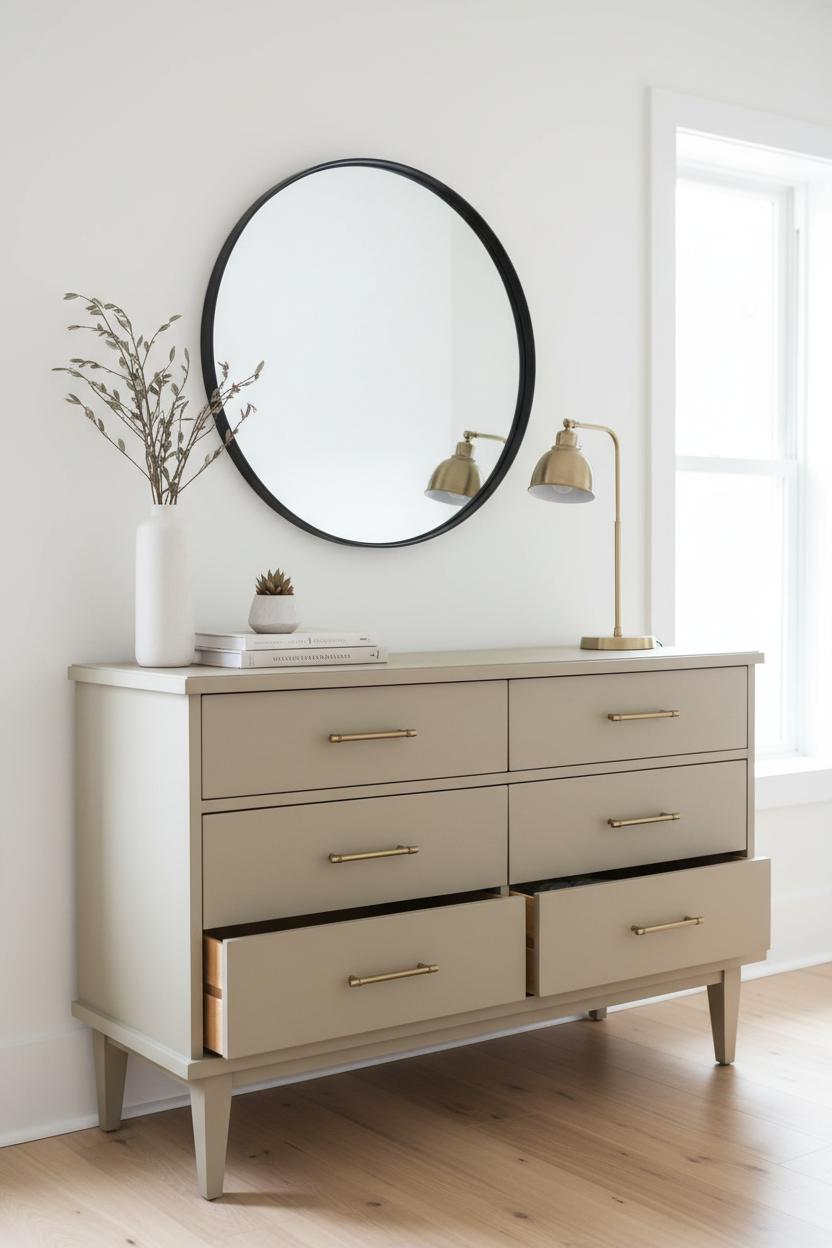
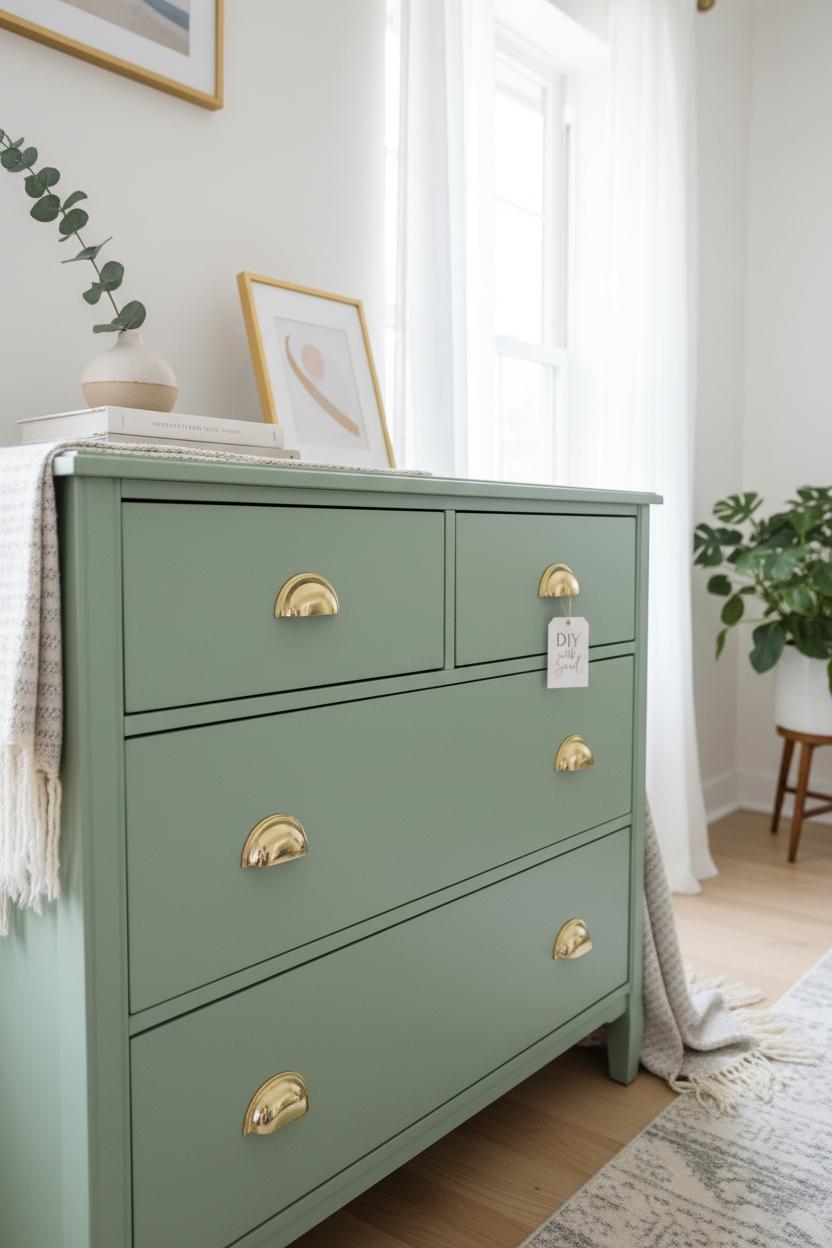
Now for the fun part: dressing her up. After all the sanding block dust settled and the chalk paint cured to that velvety, matte furniture paint finish (applied with a foam roller for a bakery-smooth surface and locked down over bonding primer so there’s no bleed-through), the new brass drawer pulls did most of the heavy lifting in the glow-up. But styling is what transforms a solid dresser makeover into a boutique-worthy centerpiece. I like to start with a statement anchor: a tall arched mirror or a large piece of art hung just a few inches above the top so the dresser feels intentional, not floating. From there, create a gentle triangle with height—lamp on one side, a stack of coffee table books on the other—so the eye moves. Tuck a small bowl on the books for keys and a candle snuffer, then soften the whole vignette with something alive: a trailing pothos or a sculptural branch in a textured vase.
Because this was a true thrift flip and not a showroom piece, I leaned into contrast to tell the story of the furniture makeover. The silky paint surface makes natural textures pop, so I layered in a woven tray to corral perfume and rings, a linen runner to break up the expanse of color, and a ribbed ceramic lamp for quiet dimension. If your DIY furniture project skews moody, pull in warm metals and a smoky glass vessel; if it’s light and airy, let clear glass and pale woods echo the freshness. Keep your palette to three core tones: the dresser color, your metal (those brass drawer pulls are timeless), and one accent pulled from art or textiles. Edit, then edit again—negative space feels luxe. Slide a lidded basket underneath for seasonal throws, and prop a tiny frame against the mirror for that layered, collected vibe. A spritz of linen spray and a low, grounding rug complete the scene. In minutes, the piece goes from “nice paint job” to “where did you get that?” And that’s the magic of a thoughtful dresser makeover: your thrift flip reads custom, your room feels elevated, and you get a daily reminder that style doesn’t have to be spendy to look stunning.
Let’s talk real-life numbers first, because a chic dresser makeover shouldn’t wreck your wallet. A solid thrift flip usually starts with a $30–$120 find, depending on size and condition. Supplies add up but are still budget-friendly: a quart of chalk paint or matte furniture paint runs around $15–$30, a bonding primer for slick veneer is $15–$25, a sanding block is $5–$10, a foam roller and tray set is $6–$12, and a clear topcoat is $15–$20. If you’re swapping hardware, a set of brass drawer pulls can be $20–$40, and don’t forget wood filler and tack cloths for a few extra dollars. All in, most DIY furniture projects like this land between $80 and $200, far less than buying new—and you get a custom piece with soul.
For timeline, plan a slow-and-steady weekend. Day 1 is prep day: remove and label drawers and hardware, deep clean with a degreaser, and repair dings with filler. Do a quick scuff sand using a sanding block (10–15 minutes per surface), then wipe clean. If the dresser is glossy or laminate, roll on a bonding primer and let it dry; if it’s raw or previously painted but dull, you can often skip to paint. Day 2 is color magic: roll on your first coat with a foam roller for that smooth, brush-mark-free finish, then a second light coat an hour or two later. If your color is light, a third whisper-thin coat may be all it needs. Let it dry thoroughly, then add a protective topcoat for durability. Day 3 is for patience and polish: allow a few more hours of cure time before installing those shiny brass drawer pulls and styling the top. Your furniture makeover will be dry to the touch the same day, but give it a week to fully cure before heavy use.
Common mistakes to avoid? Skipping prep is the number one culprit—paint clings to clean, dull surfaces. Don’t ignore bleed-through on old stains; spot-prime with a stain-blocking or shellac-based primer. Avoid heavy coats; thin and even wins. Stir paint well, especially matte furniture paint, and watch humidity, which slows dry time. Test hardware spacing before drilling, and measure center-to-center carefully. And finally, don’t rush the reassembly; a dreamy dresser makeover deserves that extra beat to cure so your thrift flip stays flawless.
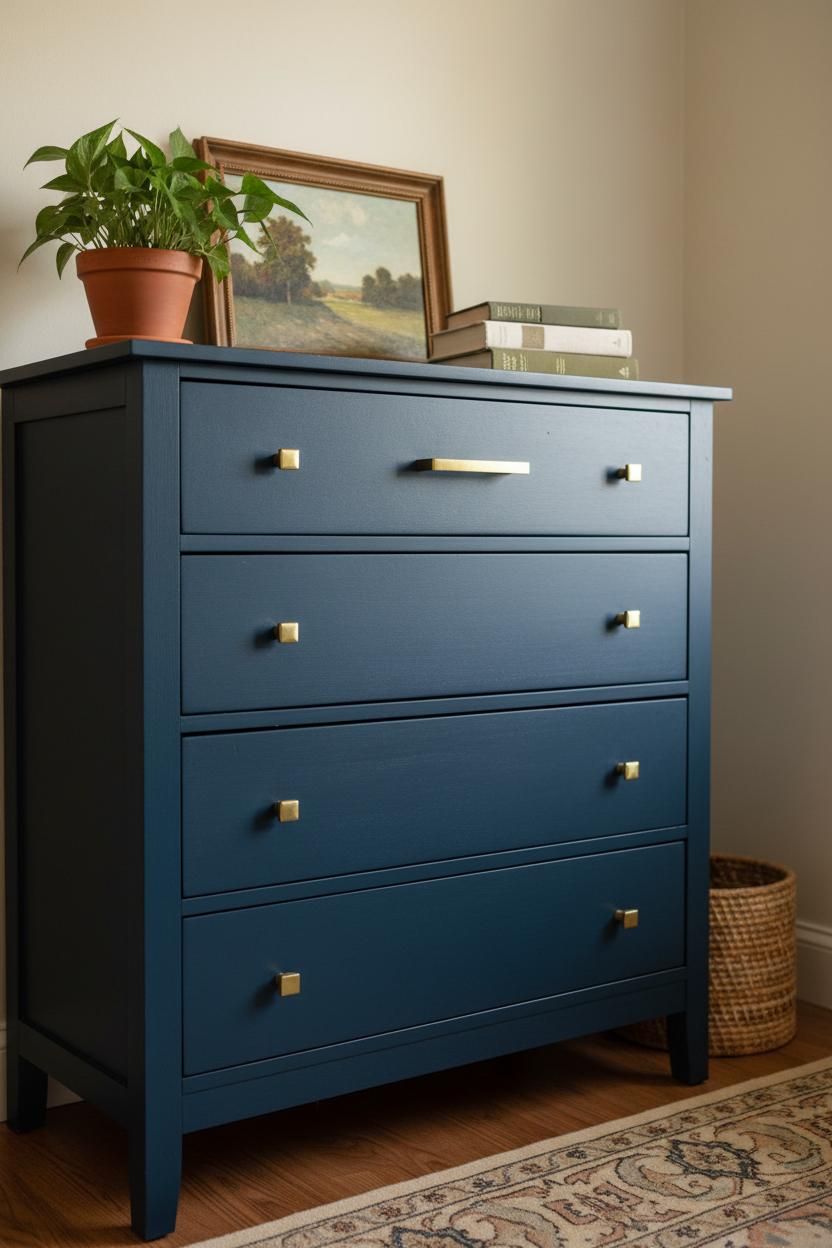
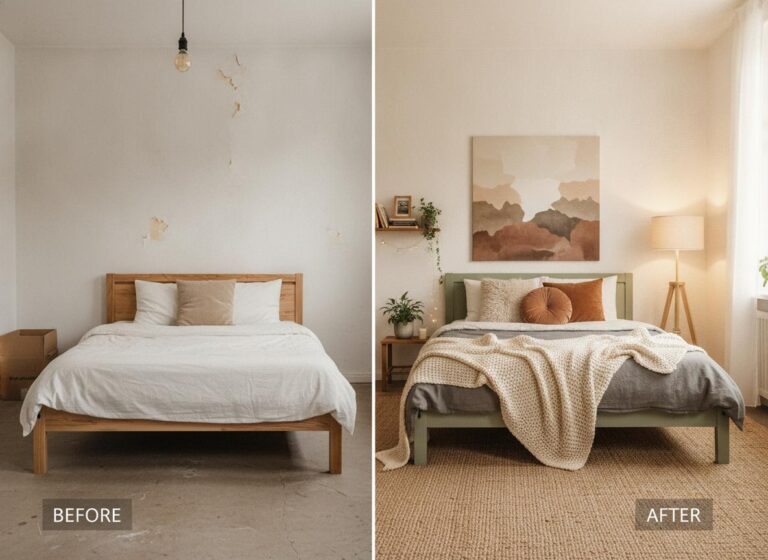
Swipe through the before-and-after photos and you’ll see why I’m still grinning. That shiny orange finish and wobbly knobs were the definition of drab, but a little prep and a lot of patience turned this thrift flip into a chic, collected piece. After a quick scuff with a sanding block and a coat of bonding primer to tame the old varnish, I rolled on a deep inky blue matte furniture paint with a foam roller for that soft, velvety look. The drawers got fresh life with crisp edges, smooth glides, and new brass drawer pulls that glow against the moody color like jewelry. Up close, you can spot the subtle brush-and-roll texture that keeps it feeling handmade, not factory perfect—my favorite kind of character in a dresser makeover. Styled with a leafy plant, a thrifted landscape, and a stack of linen-bound books, the whole vignette now anchors the room and proves a good furniture makeover doesn’t need a big budget, just a little vision and the right tools.
If you’re hunting for sources, I rounded up exact or similar finds so you can recreate this DIY furniture moment. I used a bonding primer to ensure the paint gripped the slick old finish, then a rich, pigment-packed matte furniture paint for coverage that didn’t fight me. A high-density foam roller handled the broad surfaces and left that dreamy matte skin, while a small brush tucked color into the corners. For anyone who loves the ultra-forgiving route, this look is totally achievable with chalk paint too—just seal well if your piece gets heavy use. The satin-bright brass drawer pulls are the secret sauce; they instantly elevate the silhouette and make the whole dresser feel bespoke. Don’t skip a quick once-over with a sanding block between coats for an ultra-smooth final pass. In the after photos you’ll see the finish go from patchy to polished, the profile sharper, and the hardware sparkling—proof that with a few smart supplies and an afternoon, a tired castoff can become the star of your space.
From a scratched castoff to a statement piece, this thrift flip proves that a little sanding, chalk paint, and fresh hardware can spark a stunning dresser makeover on any budget. If you’ve been craving a cozy refresh, let this be your sign to try DIY furniture: hunt a thrifted gem, prep well, layer chalk paint, seal, and style. Every brushstroke adds warmth and personality to your home. Save this furniture makeover for later, pour a cup of tea, and start dreaming up your next piece, because chic, charming style is only a weekend away.