Physical Address
304 North Cardinal St.
Dorchester Center, MA 02124
Physical Address
304 North Cardinal St.
Dorchester Center, MA 02124

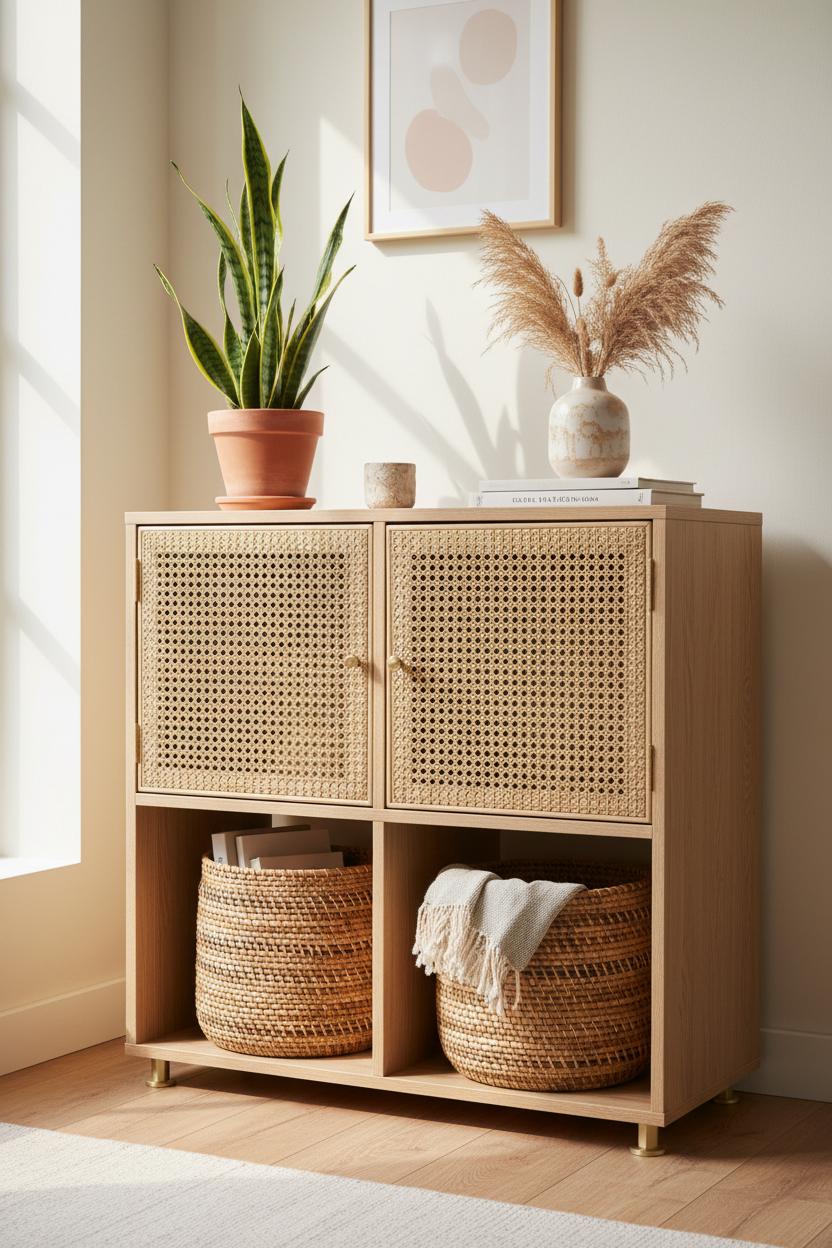
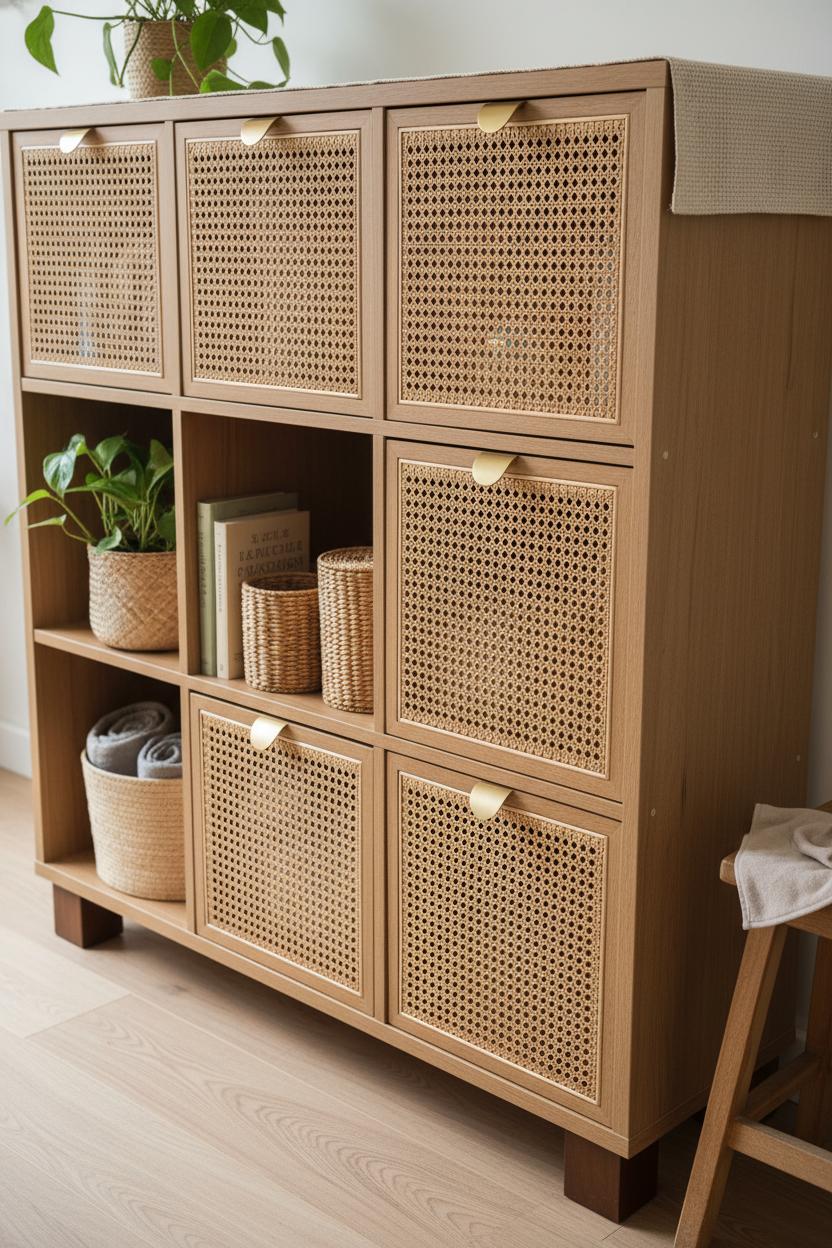
Give your plain IKEA Kallax a breezy boho glow with this chic cane webbing DIY. This renter friendly storage makeover is one of my easiest IKEA hacks and looks custom on a budget. I’ll show you a fast Kallax hack using peel and stick cane (or real cane webbing), brass cabinet pulls, rattan baskets, and discreet furniture leg risers to elevate the silhouette. Expect airy texture, hidden clutter control, and serious budget home decor impact—no power tools or permanent changes required. Ready to turn basic cubes into a boutique-worthy console?
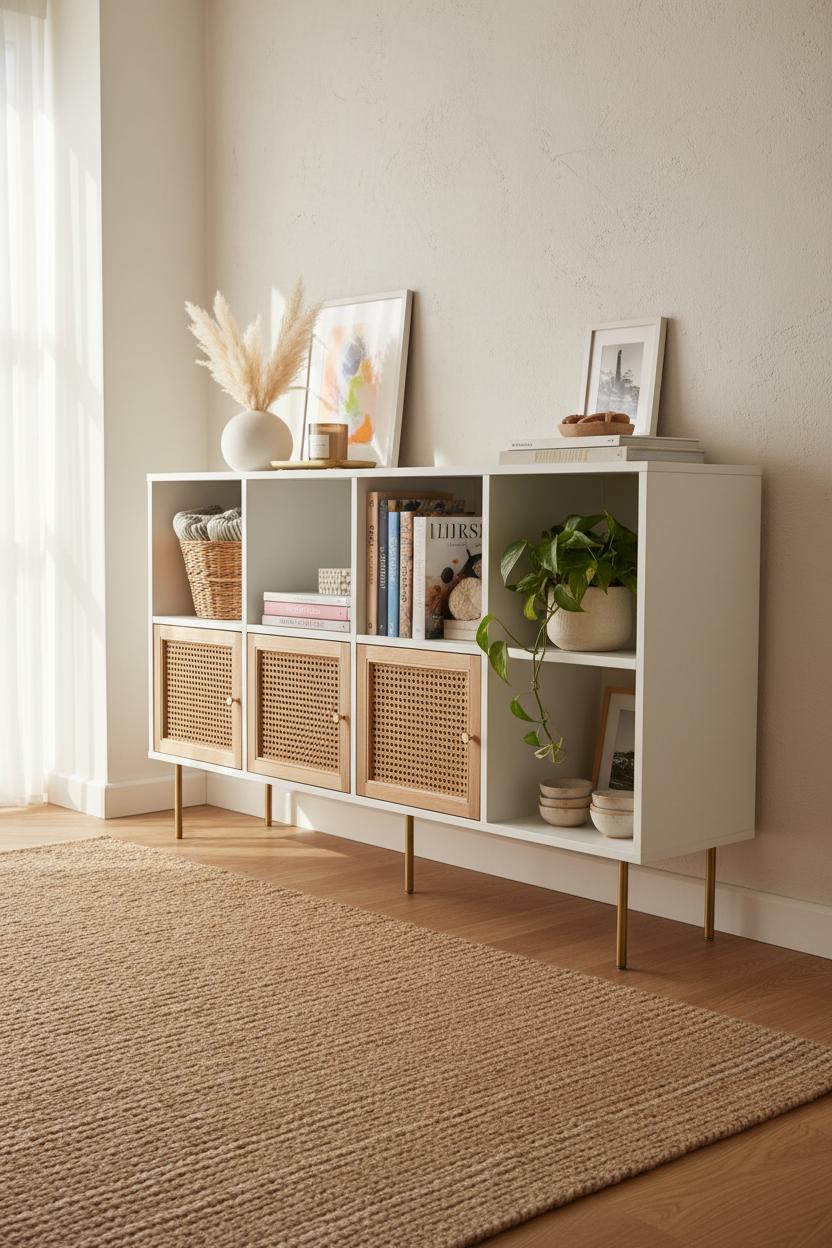
At its core, the IKEA Kallax Cane Hack is about taking that clean, boxy Kallax shelf we all know and giving it a sunny, boho soul. Think of it as one of those simple-but-impactful IKEA hacks that instantly upgrades a room: you’re adding airy cane texture to the fronts—whether that’s doors, drawer inserts, or custom panels—so the piece reads more like a boutique credenza than a utilitarian cube unit. The light, woven pattern softens all those straight lines and filters the look of whatever’s stored inside, creating the kind of laid-back, vacation-home vibe you see pinned a thousand times. It’s a Kallax hack that fits right into budget home decor because you’re working with an inexpensive base, and just layering in tactile finishes to get that collected, designer feel without the splurge.
Here’s the magic of the cane webbing DIY: you can go traditional with real cane webbing (soak, stretch, staple or glue to thin plywood frames or door inserts for a breezy, bespoke look), or opt for peel and stick cane if you want the quickest, most renter friendly route. Add understated brass cabinet pulls for a little gleam, slide in a few rattan baskets to corral the not-so-pretty things, and suddenly you’ve got elevated storage that still works as hard as the original. To fine-tune proportions, attach sleek legs or use furniture leg risers to lift the profile and turn the shelf into a console, media unit, or entryway moment—no permanent alterations required. That’s why this project nails renter friendly storage: it’s mostly reversible, light on tools, and heavy on texture and warmth. Whether you style it with a trailing plant and a stack of art books or tuck it beside a sofa as a sideboard, the Kallax Cane Hack delivers a custom, handcrafted look with just a few thoughtful materials—and the satisfaction of a makeover that proves simple ideas can be seriously chic.
Before you dive into this Kallax hack, lay out your materials so the whole project feels like a breezy weekend craft instead of a chaotic scramble. For the texture lovers, cane webbing is the star—it’s the real deal, airy and organic, and perfect for a cane webbing DIY that instantly adds that sun-washed boho vibe. If you want the look with maximum ease, peel and stick cane is your shortcut; it comes in a roll with adhesive backing already in place, which makes it super renter friendly storage because it removes cleanly later. You’ll want a measuring tape, a sharp craft knife or heavy-duty scissors for crisp cuts, painter’s tape to hold pieces while you align them, and a small brayer or credit card to smooth out bubbles. If you’re working with traditional cane webbing, soak it in warm water for 20–30 minutes so it relaxes, then stretch it over door inserts or thin panels; a thin bead of clear construction adhesive or strong double-sided mounting tape can secure the edges when you’re avoiding nails or staples in true IKEA hacks spirit.
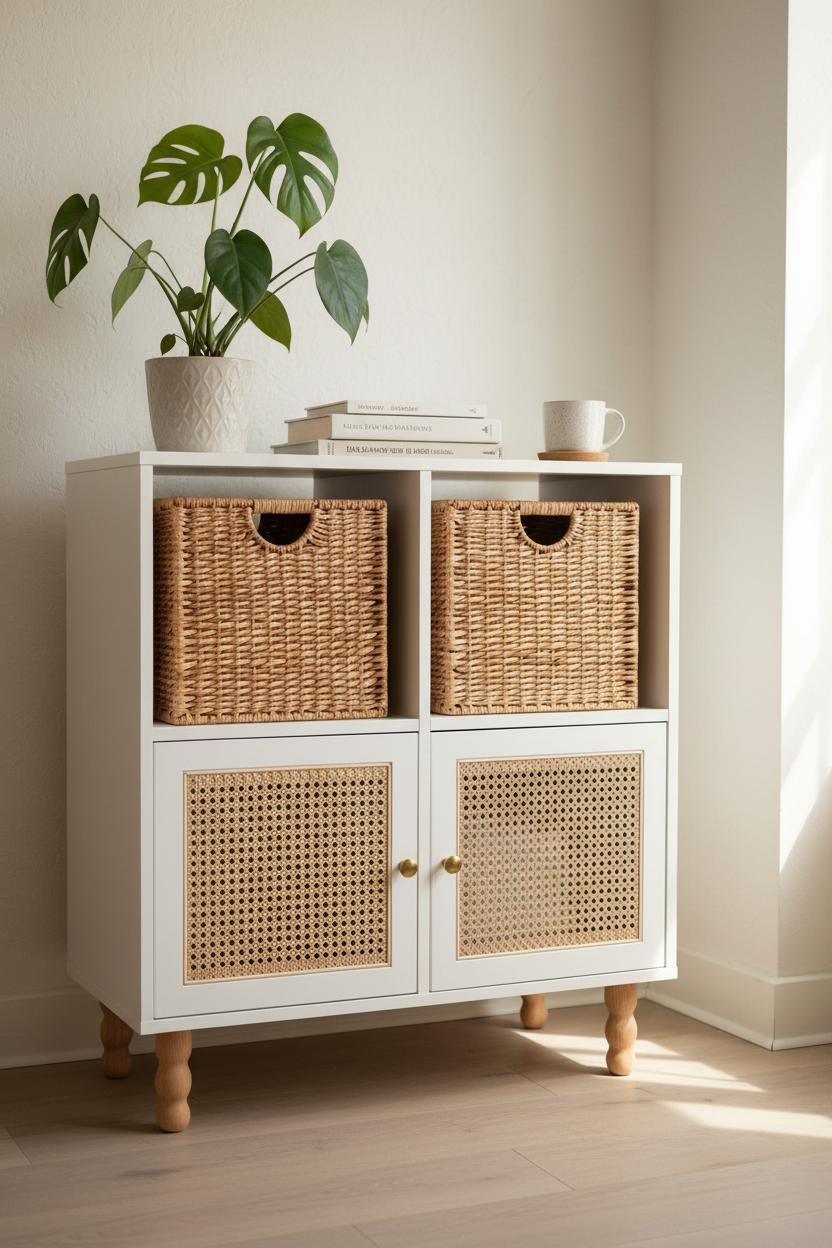
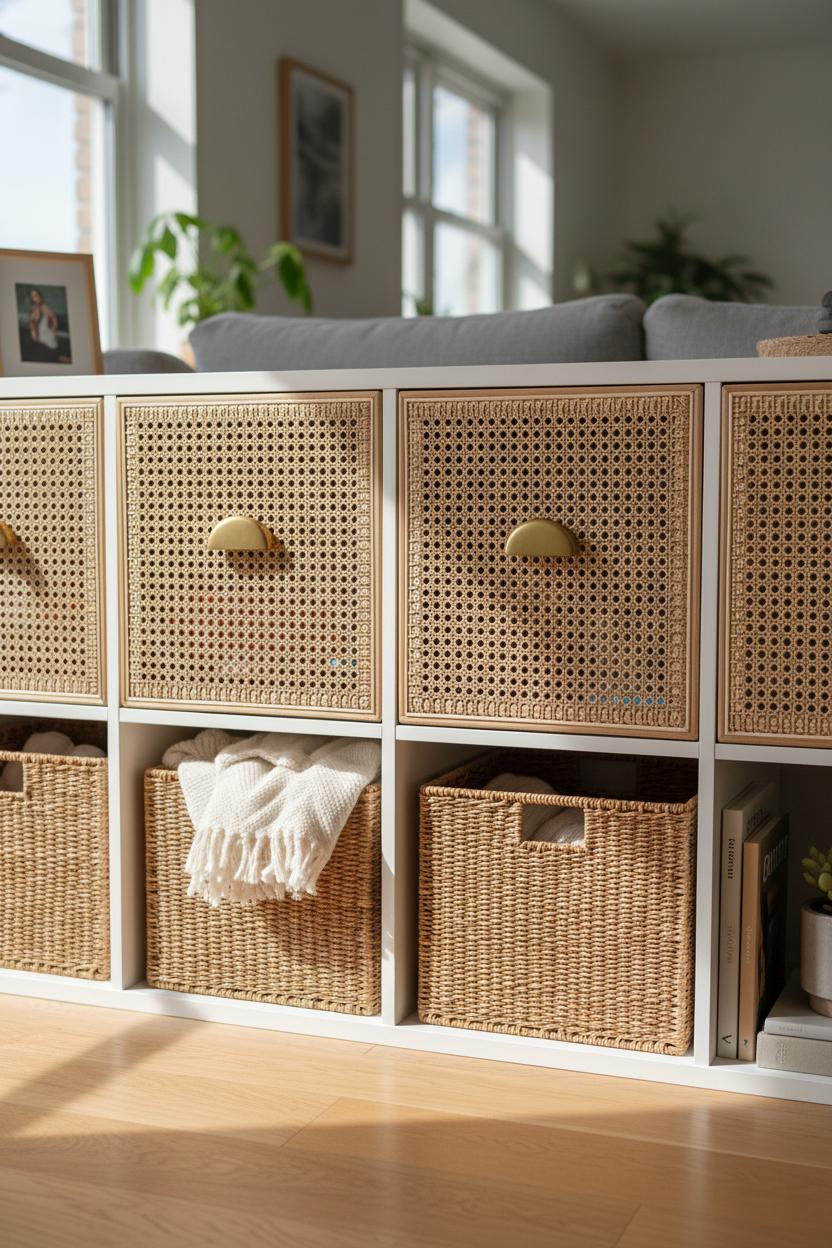
Now for the jewelry: brass cabinet pulls add that polished note that takes the Kallax from basic cube to boutique-built. Choose slender bar pulls or rounded arches—either will glow against the cane and make your budget home decor look custom. If you’re attaching to Kallax door inserts or a thin MDF face, pre-drill tiny pilot holes and use short machine screws with washers so you don’t punch through; for a no-drill approach, look for adhesive-backed hardware that still gives you the look without the commitment. To corral the daily bits and bobs, slide in rattan baskets sized for the 13-inch cubes—these bring warmth, hide the clutter, and echo the woven texture so the whole piece feels cohesive.
To finish, give your unit a little lift with furniture leg risers. Raising the Kallax a couple of inches adds presence, helps clear baseboards, and makes cables or robot vacs happier underneath. Stick-on risers are the easiest, but you can also use low-profile screw-in plates if you’re customizing permanently. A few felt pads, a soft cloth to buff fingerprints off those brass cabinet pulls, and you’re done: a simple, chic Kallax hack that looks designer, lives lightly in a rental, and proves that clever IKEA hacks can be as beautiful as they are practical.

Before you pick up a staple gun, map out your Kallax hack like a mood board come to life. Start by deciding on your layout: will your unit live tall and narrow or long and low under a window? Sketch the grid and mark which cubes will be caned doors, which will stay open, and where you’ll tuck rattan baskets for hidden bits. Keep balance in mind—a row of cane fronts on the bottom with open shelves on top feels airy yet grounded, while alternating doors and open cubbies reads more collected. If you plan to use it as a media console, leave space for cords and a little airflow; cane webbing DIY is naturally breathable, which is a bonus.
Measurements are everything with IKEA hacks. Measure your specific Kallax twice, inside and out, and note the lip of the frame so doors won’t catch. If you’re wrapping cane webbing onto door inserts, allow at least an inch of overlap per side for stapling or trimming, and remember that natural cane tightens as it dries. Prefer a zero-commitment route? Peel and stick cane can be cut to size and smoothed over inserts for a renter friendly storage upgrade—pair with removable adhesive hinges or use existing predrilled hardware holes. If you’re adding height, plan for stability: low-profile furniture leg risers or screw-in feet work, just make sure they’re centered under the vertical dividers.
Set some budget home decor goals before you add to cart. Decide what’s your “hero” material—authentic cane webbing, statement brass cabinet pulls, or sculptural legs—and save on the supporting players like simple rattan baskets and neutral paint. A thrifty breakdown might look like this: reuse your Kallax, choose peel and stick cane for quick coverage, swap on brass cabinet pulls for polish, and slide in baskets for texture. If you’re going classic, go with roll cane webbing, edge it with slim trim for a custom look, and add understated pulls. Either way, keep a small cushion for extras like sandpaper, staples, and edge tape.
Finally, test your configuration on the floor before committing. Lay out doors, baskets, and hardware in position, step back, and check the rhythm of materials. When your layout sings and your measurements are locked, you’ve got a Kallax hack plan that’s chic, functional, and firmly in the budget-friendly Boho lane.
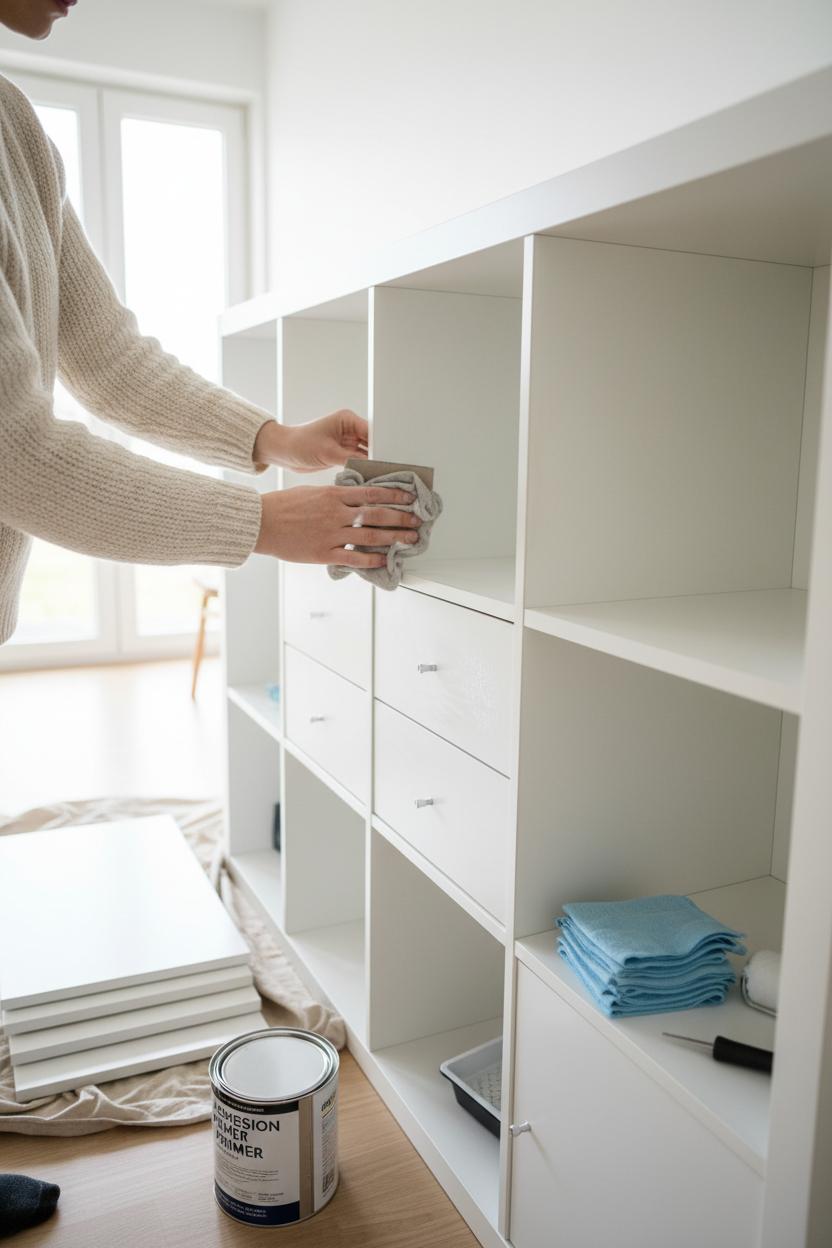
Before the pretty cane details go on, give your Kallax a quick spa day so everything sticks and sits the way it should. Start by removing any doors or inserts and wiping every surface with a damp cloth and a drop of mild soap to ditch dust and fingerprints. Because Kallax is a slick melamine, a light scuff with 220-grit sandpaper makes a huge difference—nothing intense, just a gentle buff to knock back the shine. Follow with a lint-free wipe down and a coat of adhesion primer so paint, peel and stick cane, or decorative trim has a reliable grip. If you’re keeping things super budget home decor, stop at primer and let texture do the talking; a crisp, clean base instantly elevates any Kallax hack and sets the stage for your cane webbing DIY moment.
For renter friendly storage, think reversible layers. Instead of nailing or stapling, mount cane webbing to thin foam board or lightweight plywood cut to cube size, then secure the panels with removable Velcro strips or clear command hooks inside the cubbies—no holes, no heartache on move-out day. If you love the woven look but want zero tools, peel and stick cane sheets are a shortcut that reads custom without commitment; you can line door fronts, drawer inserts, or even the back panels to create a boutique-style backdrop for your treasures. Add rattan baskets that slide in and out like drawers to conceal cords and kid clutter while keeping the airy, boho vibe. For a touch of jewelry, swap in small brass cabinet pulls on door fronts or basket tags—instant polish that still feels handmade.
Don’t forget the stance. Elevating the unit with furniture leg risers or simple clip-on feet gives your piece that breezy, off-the-floor look and makes vacuuming a breeze. If your lease frowns on drilling, look for risers that adhere with strong, removable pads, and always add felt to protect floors. Distribute heavy items low and anchor with renter-safe anti-tip straps that release cleanly—safety can be stylish, too. With these surface steps and smart, removable upgrades, you’ll have a lineup of IKEA hacks that look custom, function beautifully, and keep your deposit safe—proof that a thoughtful Kallax hack can be both chic and truly renter friendly storage.
When it comes to giving your Kallax hack that breezy, boho texture, you’ve got two dreamy routes: peel and stick cane or traditional cane webbing. Peel and stick cane is the fast-and-fabulous option—think weekend-friendly, no-special-tools-required, and super forgiving. Cut your panels to size, peel, smooth onto Kallax doors or drawer fronts, and call it a glow-up. It’s ideal for renters because it’s removable and low-commitment, making it a star in the renter friendly storage category of IKEA hacks. For a more polished finish, add slim trim around the edges or pair with brass cabinet pulls to instantly elevate the look. If you’re doing this as a budget home decor refresh, peel and stick cane is kind to both your time and wallet, and it plays nicely with rattan baskets tucked into the cubes for that layered, organic vibe. Just make sure the surface is clean and dust-free, and burnish the edges well so they don’t lift in high-traffic spots.
Traditional cane webbing, on the other hand, is the connoisseur’s choice—authentic, tactile, and beautifully dimensional. This route leans into cane webbing DIY: you’ll cut your cane webbing to size, lightly mist or soak to make it pliable, then staple it to a frame or Kallax door insert before finishing with trim. The payoff is gorgeous: real woven cane casts those pretty, sun-dappled shadows and holds up better to scuffs and daily handling. It’s more of a project than a peel-and-stick moment, but if you want that heirloom look, this is it. While it’s less removable, you can still keep it renter-friendly by applying the cane to third-party Kallax door inserts or thin plywood panels that pop in and out—no permanent changes to the unit itself.
So which works best? If you crave speed, minimal tools, and zero stress, peel and stick cane gets you the airy-boho look in an afternoon. If you’re after longevity, texture, and a truly custom finish, traditional cane webbing is worth the extra steps. Either way, finish the ensemble with brass cabinet pulls, rattan baskets, and even furniture leg risers to lift the piece to console height. This Kallax hack proves that with a little cane—whether stick-on or the real weave—you can turn simple storage into a chic statement in your budget home decor lineup.
Let’s talk real numbers, real hours, and real effort, because the dreamiest IKEA hacks are the ones you can actually pull off. For this Kallax hack, you’ve got two budget lanes: classic cane webbing DIY or the speedier peel and stick cane. Real cane webbing costs a bit more upfront—think a small roll for doors or cubbies in the $25–$50 range, plus a roll of edge trim if you want a crisp finish. If you’re using Kallax door inserts as your base, add those to the tally. Peel-and-stick cane is the wallet-friendly, no-soak option and lands around $15–$30 for enough to refresh a couple fronts. If you’re swapping hardware, simple brass cabinet pulls are an instant glow-up and can be found affordably, while rattan baskets slide into the cubbies to echo the texture and add hidden storage. Want to give the whole unit a designer lift? Furniture leg risers or screw-in legs transform the silhouette for very little cash. All in, most people land somewhere between $40 and $150 depending on how many doors you’re outfitting and the extras you choose—still squarely in budget home decor territory for a custom-looking piece.
Time-wise, set aside a relaxed afternoon. If you’re doing real cane, it needs a 20–30 minute soak to become pliable, then you’ll cut, adhere or staple (to a removable insert or thin backer), and let it dry flat so it tightens beautifully—count 2–4 hours of active time plus drying. Peel-and-stick cane is the quick win: measure, cut, apply, burnish the edges, and you’re done in about 60–90 minutes for a couple panels. Swapping to brass pulls adds, what, ten minutes? Sliding in matching rattan baskets is an instant finish.
Skill level: beginner-friendly with a sprinkle of patience. You’ll be measuring, cutting, and neatly finishing edges. A utility knife and scissors are your MVPs; a staple gun is optional if you’re working on removable inserts. For renters, this is blissfully low-commitment: stick-on cane or cane applied to insert panels means no drilling into the unit, and you can peel it off or swap inserts later—truly renter friendly storage. Whether you go full cane webbing DIY or a quick peel-and-stick pass, the result looks bespoke, boho, and breezy—proof that a small, smart Kallax hack can deliver a big style moment.
Think of your cane as a natural fiber that loves a little pampering and consistency. For day‑to‑day upkeep, a weekly once‑over with a microfiber cloth or the soft brush on your vacuum keeps dust from nesting in the weave. When life happens—hello, coffee drips—spot clean with a barely damp cloth and a drop of mild soap, then dry immediately; standing moisture is the enemy. Cane webbing prefers balanced humidity, so aim for an indoor range around 40–60% and keep your Kallax away from blasting heat vents or full‑day sun that can dry and fade it. If your cane webbing panels were installed the traditional way during your cane webbing DIY (stapled or set into a groove), a very light mist on the back followed by air‑drying can help the fibers tighten again; just avoid soaking. Using peel and stick cane? Skip the water—wipe gently instead, and if an edge lifts, warm it lightly with a hair dryer and press back down. Add rattan baskets inside the cubes to corral clutter and rotate their positions every few months so wear evens out. Little preventative steps matter too: line shelves to prevent scuffs, don’t overload a single cubby, and lift the unit with furniture leg risers if it sits on a damp‑prone floor for extra airflow and to keep the base pristine.
Don’t forget the supporting cast that makes this Kallax hack feel intentional. Brass cabinet pulls look dreamy against natural cane; keep them fingerprint‑free with a soft cloth and, if needed, a gentle brass polish—test first to avoid removing any protective lacquer. If you’ve used budget home decor add‑ons like cane webbing trim or coordinating hardware, a quick seasonal refresh goes a long way: tighten any loose screws, check adhesive edges on peel and stick cane, and give the entire piece a slow, top‑to‑bottom dust. Because this is renter friendly storage, everything is reversible, but with a touch of care it won’t need to be: balanced light, light hands, and regular wipe‑downs will keep the texture golden and the weave springy. The best IKEA hacks are the ones that age beautifully, and with these habits your chic Boho upgrade will keep looking custom, not crafty, for years—proof that a thoughtful Kallax hack can be both stylish and sturdy.
If your cane edges start to look a little wild, don’t panic—fray happens. For a clean, boho finish on this Kallax hack, tape your cut line on the cane webbing before you snip, then use the sharpest scissors or a craft knife and a metal ruler. A tiny bead of clear-drying wood glue or even clear nail polish along the cut edge locks those fibers in place; press with parchment and a book while it dries so everything lies flat. If you’re doing a cane webbing DIY on removable Kallax doors or panels, you can also tuck the edges under a slim half-round moulding or edge banding for a pro look that’s still renter friendly storage—no splines or permanent grooves required. Working with peel and stick cane? Warm it gently with a hair dryer to ease it around corners and seal edges with a firm brayer pass to prevent future lifting.
Bubbles and ripples are usually about moisture or trapped air. Real cane webbing relaxes when damp and tightens as it dries, so a light misting on the front (not a soak) can re-tension a saggy spot once it’s mounted. If you used spray adhesive on a primed insert, set the panel under books while it cures to keep things glassy. For peel and stick cane, clean the Kallax surface with isopropyl alcohol first, then work from the center out with a felt squeegee. Stubborn air pockets? Prick the tiniest pinhole and smooth; a little warmth helps the adhesive reflow. Humid day installs can cause waves—give it 24 hours and a quick re-smooth. Pair the look with rattan baskets to distract the eye from any tiny imperfections and amplify the texture-forward vibe of budget home decor and other IKEA hacks.
Getting brass cabinet pulls lined up is all about an easy template. Stick painter’s tape across the door, draw your centerlines, and mark hole spacing right on the tape; then dry-fit to confirm it aligns with neighboring doors. Pre-drill with a sharp brad-point bit through the melamine, using tape to prevent chipping, and hold scrap wood behind the panel to avoid blowout. Add a thin washer behind each post if your pull needs to clear the cane layer—no over-tightening or you’ll imprint the weave. If your unit isn’t perfectly level, adjust first with furniture leg risers or shims so the pulls read straight across. Tiny tweaks, big payoff—and totally doable for a chic, renter-friendly Kallax hack.
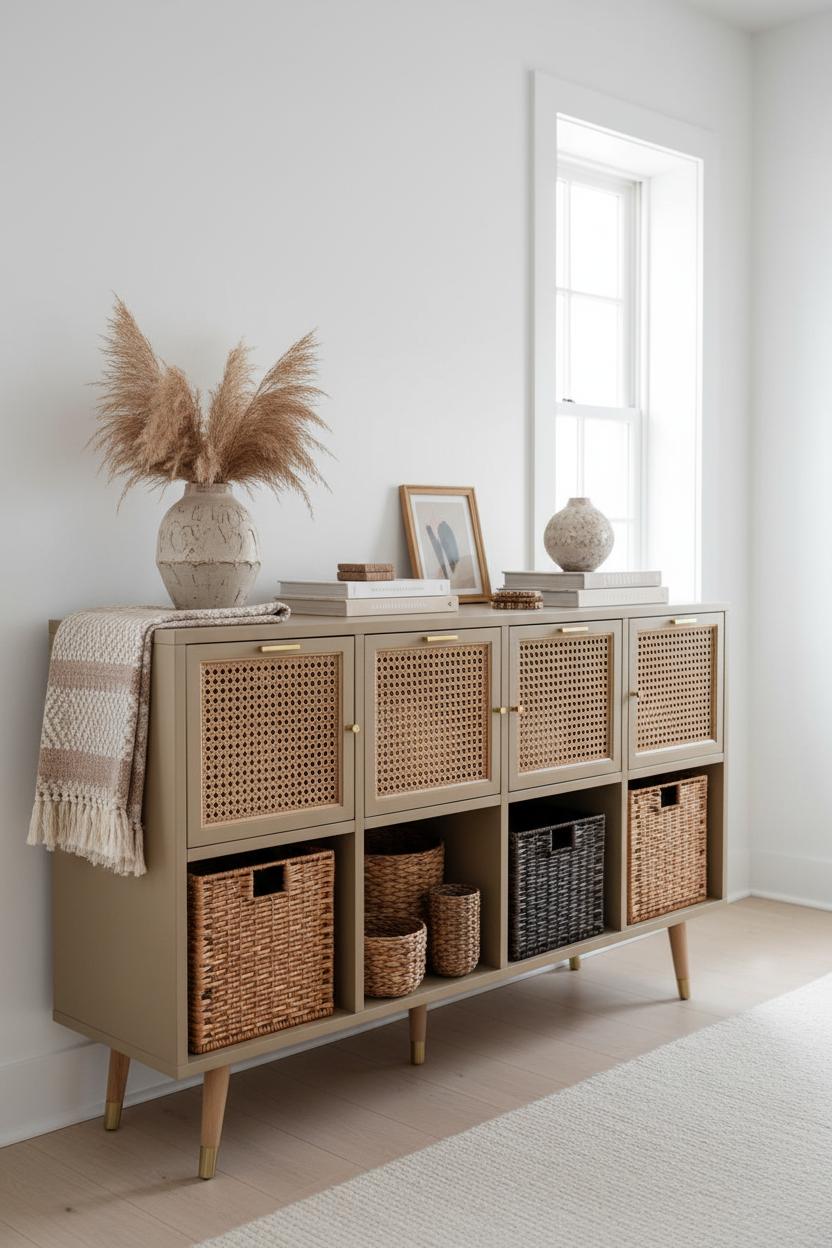
If you’re ready to take this Kallax hack beyond the basics, start by playing with paint. The laminate frame can absolutely look high-end with the right prep: a light scuff sand, an adhesion primer, and two coats of your favorite hue. I love a chalky clay or warm greige for that relaxed-boho vibe, or go bold with olive, slate blue, or even matte black for contrast against the light texture of cane webbing. You can also color-block—paint just the outer frame and leave the interior cubbies crisp white—or flip it and do a moody interior that makes your baskets glow. To shift the proportions, elevate the piece on furniture leg risers or slim tapered legs so it reads as a console instead of a cube shelf (bonus: it’s robot-vac friendly). For true renter friendly storage, keep major changes reversible: line shelves with peel and stick cane for a quick textural moment, or paint removable door inserts instead of the whole unit. These small upgrades are the kind of budget home decor tweaks that make IKEA hacks feel custom without the commitment.
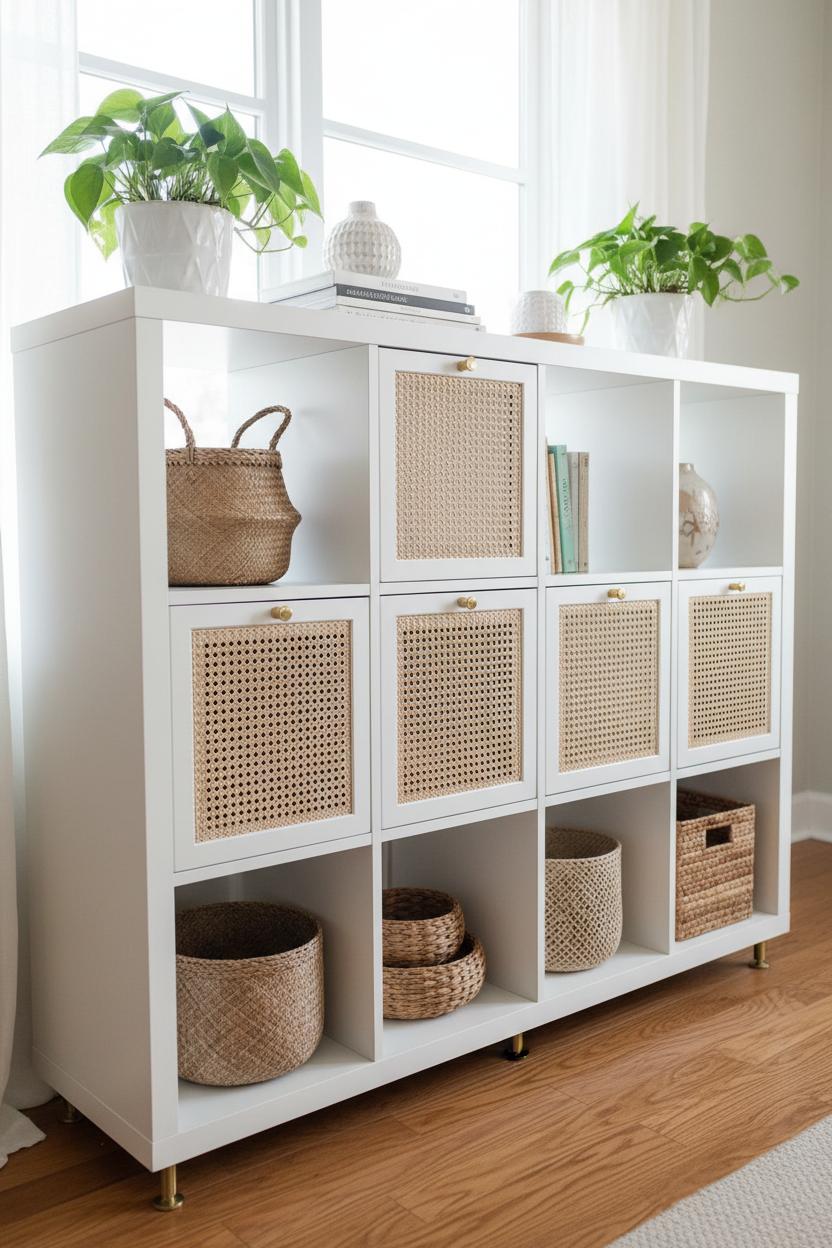
Now layer in texture and jewelry. Mix rattan baskets across the cubbies—try warm honey next to ash-gray or blackwashed to create that effortless, collected look. A row of closed cane doors above open rattan baskets below keeps the flow visually light but hides the clutter where you need it most. If you’re leaning into cane webbing DIY, you can staple traditional cane webbing to door inserts and trim the edges, or go with peel and stick cane for a speedier, no-tools route; both play beautifully with brass cabinet pulls. Speaking of hardware swaps, treat your Kallax like a mini credenza: add slim brass cabinet pulls for a little gleam, or choose leather tabs or matte black pulls if you want an earthy or modern note. Use a simple template to keep holes straight, and pair longer screws with tiny washers so they bite cleanly through the insert panel. Finish with felt bumpers so doors close softly, and tuck cords and remotes into those rattan baskets for a tidy finish. Between the texture of cane, the warmth of rattan baskets, and a few polished hardware moments, this easy upgrade looks boutique—proof that thoughtful details can turn a simple shelf into a custom showpiece.
With a simple cane webbing DIY, our Kallax hack turns plain cubes into warm, boho cabinets—texture, hidden clutter, and custom charm on a budget. This is one of those IKEA hacks that feels designer yet totally renter friendly storage: no heavy tools, reversible panels, and mix-and-match baskets. Choose natural tones, add pulls, and style shelves with plants and pottery for effortless budget home decor. Ready to try it this weekend? Save this for later, share your version, and let your space glow with breezy, coastal-cool vibes.